Sunday, October 11, 2009

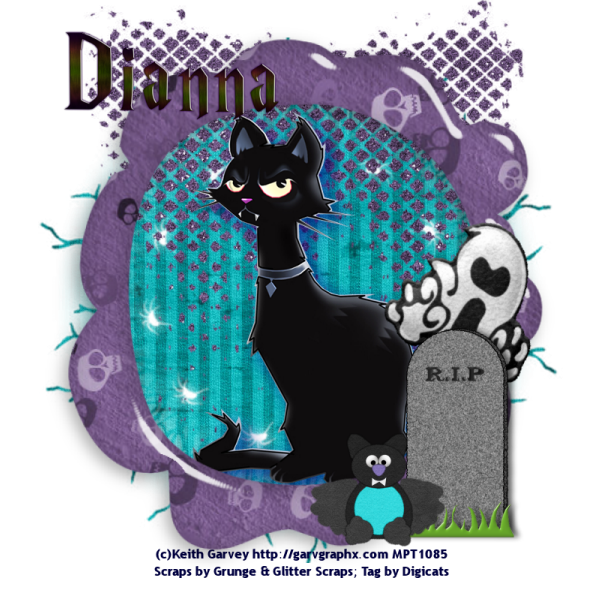
Pissed off Pussy tutorial

Pissed Off Pussy


This tutorial was written by Dianna Richards of Digicats (and Dogs)/Di Before Dawn Tutorials. Any resemblance to any other tutorial, published or unpublished, living, dead or undead, is purely coincidental.

Please do not rebroadcast, redistribute or otherwise claim this tutorial or any part there of as your own work.


Items you will need to complete this project:

The Trick-or-Treat taggers kit by Grunge and Glitter Scraps, which can be purchased at Sophisti-Scraps or Digital Chaos. This is one of the kits I picked out as a birthday pressie!

Tube of choice. I am using PSP9634 Cat by Keith Garvey. You must have a license to use this tube, which is available for purchase at MyPSPTubes.com.

This is "the look" Miss Diamond gives me when she's ticked off about something.  And yes, she does have little vampire fangs just like that!

Wee Scots Lass Halloween Mask #2 which you can download HERE.

Alpha or Font of choice. I am using the Be Scared Halloween Alpha by Myst Designs, which is a FTU alpha, part of the October Ghost Train. This is a super-sized full sized alpha that I first batch processed through QueenBrats "Resize full size ELEMENTS" (not alpha) and then further resized to 25% while I was constructing the names. It's a great alpha, but it's HUGE!


Note that H# and V# refer to Horizontal and vertical coordinates on your canvas grid. Make sure you have View, Rulers checked in order to see the ruler grid.

When I say "Add to your canvas" I expect that you will copy and paste it as a new layer, unless otherwise state in the tutorial.

This tutorial assumes you have a working knowledge of PSP. It was written using PSP X1, but should work in PSP 8 and up.

Open a new raster canvas, 800 x 800 pxls, flood fill white.

Open GG_OctCollab_Paper 7. Go to Layers --> Load/Save Mask --> Load Mask from Disk and select WSL Halloween Mask 2. Make sure the fit to canvas box is check and click on load.

Edit --> Copy Merged and add to canvas, centered.

Open Bling Back and add to canvas, centered at H400, V300.

Open PSP9634-SCGarvey-Cat. Select the Cat with Glow Tube and add to canvas, centered.

Open Frame 1, and resize to 125%. Go to Image -->Rotate right. Add the frame to the main canvas, centered.

Open tombstone, and resize to 50%. Add to canvas centered at H600, V570.

Open Felt Ghost, resize to 75% and add to canvas, centered at H620, V400. Image --> Free Rotate --> Rotate Right, 20 degrees.

On the layers pallet, drag the ghost layer behind the tombstone layer. Then click on the tombstone layer to activate it.

Open Felt Bat, resize to 25% and add to canvas, centered at H500, V650.

Add a drop shadow of choice to the tube layer. I am using vertical and horizontal offsets of 10 each, opacity of 65, blur of 35, color dark blue (#000080).

Add your copyright info and save the artist version as a .pspimage. For the Garvey tube, the copyright info is.

(c)Keith Garvey http://garvgraphx.com YOUR PSP License #.

Click on the bat layer to activate. Using the Alpha or font of choice, add your name to the canvas, centered at around H220, V100, depending upon the size and length of the name.

On the layers pallet, click on the white background layer, the right click and delete.

Layers --> Merge --> Merge Visible. Image --> Resize to 75%. You can now save your finished tag as a .png file.

I hope you enjoyed this tutorial. If you should have a problem, please feel free to E-Mail Me and I'll be happy to help you out.
Pink Gossamer (BCA) Tutorial

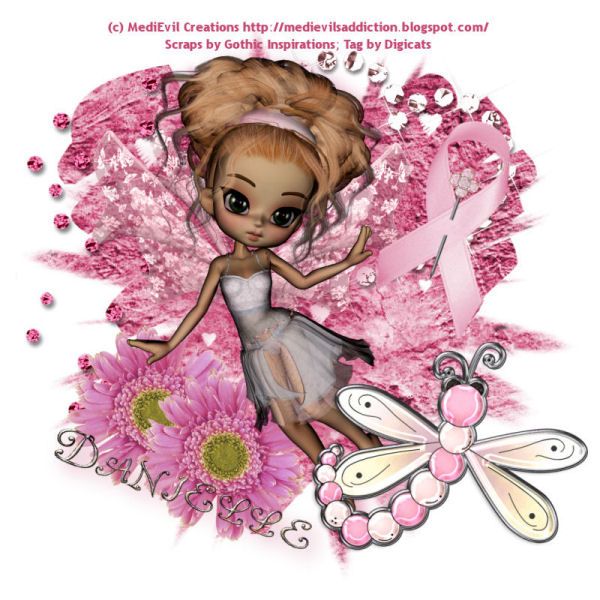
Pink Gossamer Fairy


This tutorial was written for my friend's daughter, Danielle, who at the age of 5 is too young to appreciate either breasts, or breast cancer. She was however, born with a congenial heart defect and has been through two open heart surgeries in her life and faces yet a 3rd, sometime before the age of 12. She can totally sympathize with anyone who has an "ouchie on their chest".

This tutorial was written by Dianna Richards of Digicats (and Dogs)/Di Before Dawn Tutorials. Any resemblance to any other tutorial, published or unpublished, living, dead or undead, is purely coincidental.

Please do not rebroadcast, redistribute or otherwise claim this tutorial or any part there of as your own work.


Items you will need to complete this project:

The BCA Taggers Kit from Gothic Inspirations, which is a FTU kit. (Remember that FTU is not the same is "Free to Share" and please leave a thank you when you download it.)

Tube of choice. I am using Gossamer by MediEvil Creations, which is available at TKO Scraps. According to Medi, Gossamer Fairies roam the Earth making things all nice and sparkly. Danielle is very much into pink AND sparkly!

Wee Scots Mask #202 which you can download HERE.

Alpha or Font of choice. I am using the VintageLicious Alpha by Delicious Scraps, which is a FTU alpha.


Note that H# and V# refer to Horizontal and vertical coordinates on your canvas grid. Make sure you have View, Rulers checked in order to see the ruler grid.

When I say "Add to your canvas" I expect that you will copy and paste it as a new layer, unless otherwise state in the tutorial.

This tutorial assumes you have a working knowledge of PSP. It was written using PSP X1, but should work in PSP 8 and up.

To begin, open a new canvas, 800 x 800 pxls, flood fill white.

Open Paper6-GI_BCA. Select layers --> Load/save mask from Disk --> Load Mask from Disk and find WSL Mask # 202. Make sure the fit to canvas box is check, then click on load.

Edit --> Copy Merged and add to your canvas, centered.

Open Diamond Bling, resize to 75% and add to canvas centered at H200, V350.

Open Flower 1, resize to 50% and add to canvas centered at H200, V550. Duplicate and move the copy to H300, V600.

Open Heart Pink Diamond and add to canvas, centered at H500, V250. Image --> Free Rotate --> Rotate Right, 20 degrees.

Open tube of choice. I am using Gossamer2 by MediEvil Creations. To use the tube, erase Medi's Watermark and resize to 75%. Add to canvas, centered at H350, V380.

Open Gossamer Wing8A, resize to 75%, and add to canvas centered at H335, V300. On the layers pallet, drag the wings under the tube layer.

Click on the tube layer to active, then go to layers --> merge --> merge down to merge the wings with the tube.

Add a drop shadow of choice to the tube. I am using vertical and horizontal offsets of 10 each, opacity of 65%, blur of 35% and color of Raspberry (#c74a74).

Open Dragonfly, and erase the charm ring at the top. Resize to 75% and add to canvas at H600, V600.

Open BCA Ribbon2, resize to 50% and add to canvas, centered at H600, V300. Image --> Free Rotate and rotate right, 20 degrees.

Open Diamond Pin and resize to 25%. Add to canvas, centered at H600, V300. Image --> Free Rotate and rotate right, 20 degrees. Using your eraser tool, erase a small portion of the pin near the center, so that it appears to be stuck through the ribbon.

On the Materials Pallet, set your foreground color to transparent and your background color to #c74a74. Using font of choice (I amusing Trebuchet MS, 4 Points, bold, centered) add the copyright and tagged by watermark to your tag. For the Gossamer tube the copyright info is:

(c) MediEvil Creations http://medievilsaddiction.blogspot.com/

You can now save the artists copy of your tag as a .pspimage.

Using your font or alpha of choice add the name of choice to your tag, centered at around H250, V650, depending upon the length of the name. Image --> Free Rotate and rotate right, 20 degrees. You can add a drop shadow to the name if you wish.

You can either save the tag with the white background as a .jpg file, or without it as a .png file. If you are going to save as a .png file, click on the white background on the layers pallet and choose delete. Otherwise, select Layers --> Merge -- Merge visable. Once you've deleted the white background, you are going to merge visible as well.

Resize the tag to 75% - or 600 x 600 pxls.

Save as either a .jpg file or a .png file and your all finished!

I hope you enjoyed this tutorial. If you should have a problem, please feel free to E-Mail Me and I'll be happy to help you out.
Tuesday, October 6, 2009

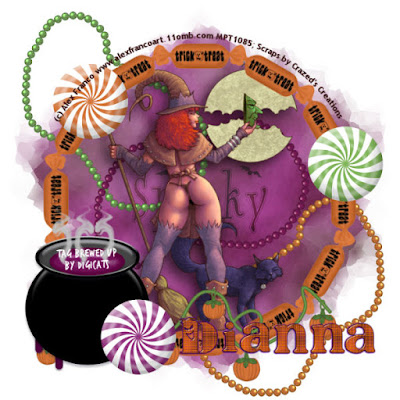
A bit of Hocus Pocus


This tutorial was written by Dianna Richards of Digicats (and Dogs)/Di Before Dawn Tutorials. Any resemblance to any other tutorial, published or unpublished, living, dead or undead, is purely coincidental.

Please do not rebroadcast, redistribute or otherwise claim this tutorial or any part there of as your own work.


Items you will need to complete this project:

The Hocus Pocus kit by Crazed's Creations which is available for sale at Scrappetizing.

Tube of choice. I am using Alex Franco's Strega (the PG version). You must have a license to use this tube, which is available at MyPSPTubes.com.

Wee Scots Mask #220 which you can download HERE.

Alpha (or alphas) of choice. I am using the Creepy Faced Alpha by Nutshell Creations. For Kate's tag, I am also using the White Gunge Alpha by Dreams Fulfilled, which is a FTU alpha.


Note that H# and V# refer to Horizontal and vertical coordinates on your canvas grid. Make sure you have View, Rulers checked in order to see the ruler grid.

When I say "Add to your canvas" I expect that you will copy and paste it as a new layer, unless otherwise state in the tutorial.

This tutorial assumes you have a working knowledge of PSP. It was written using PSP X1, but should work in PSP 8 and up.

To begin, open a raster canvas, 800 x 800 pxl, flood filled white.

Open Crazeds_paper3_HPT. Select Layers --> Load/Save Mask --> Load Mask from Disk. Locate WSL Mask 220, make sure the fit to canvas box is checked, then click on load.

Edit --> Copy Merged, and add to your main canvas, centered.

Open Crazeds_Beads1, and add to canvas, centered at H230, V220.

Open Crazeds_Beads2, mirror and add to canvas centered at H580, V590.

Open Crazed_Beads3, flip and add to canvas centered at H400, V390. Image --> Free Rotate --> and rotate right, 30 degrees.

Open tube of choice, I am using PSP13697 Strega by Alex Franco. I am using the tube with elements layer and because this is a PG rated tutorial, I'm taking the optional PG thong as well.

Add to canvas centered. Add a drop shadow to your tube. I am using a vertical offset of 10, a horizontal offset of -10, opacity of 65, blur of 35 and color black (#000000).

If you are using the optional thong, you might want to merge it down onto the tube so that it doesn't get lost.

Open Crazeds_Frame1, resize to 125% and add to the canvas, centered.

Open Crazeds_Doodle, resize to 75% and add to the canvas, centered at H380, V670.

Open Crazeds_Candy4, resize to 50% and add to canvas, centered at H690, V330.

Open Crazeds_Candy5, resize to 50% and add to canvas, centered at H180, V200.

Open Crazeds_Cauldron2 and add to canvas, centered at H180, V560.

Open Crazeds_Candy6, resize to 50% and add to canvas, centered at H280, V680.

Add you copyright information and optional watermark and save the artist's copy as a .pspimage.

For the Strega tube, the copyright information is:
(c) Alex Franco www.alexfrancoart.11omb.com YOUR MPT License #

I used Font Trebuchet MS, 4 points, bold and centered, and then a drew a vector circle to the size of the frame, make the line invisible, and used the convert text to path option to run the copyright along the top of the frame.

You may, of course, do it any way you wish.

Using the alpha of choice, compose the name you wish to add to the tag on a separate, transparent raster canvas. Merge visible, and then copy and the past the name as a whole to the main canvas. Resize to taste and locate around H550, V650. Actual location will depend upon the size of the name you are using.

Resize canvas to 75% (600 x 600 pxls.) You may then either delete the white background layer and save it as a .png file, or kit the white background layer and save it as a .jpg. That's it...your Hocus Pocus tag is finished!

I hope you enjoyed this tutorial. If you should have a problem, please feel free to E-Mail Me and I'll be happy to help you out.
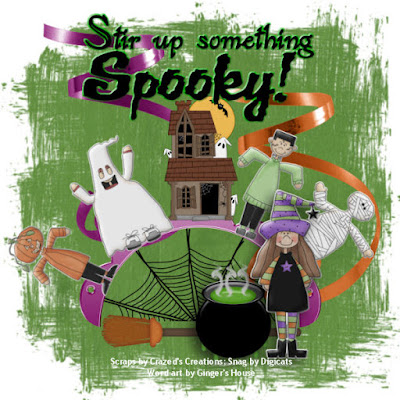
Here is a snag for you using the Hocus Pocus kit:


The word art is courtesy of Ginger's House. Enjoy!

Monday, October 5, 2009

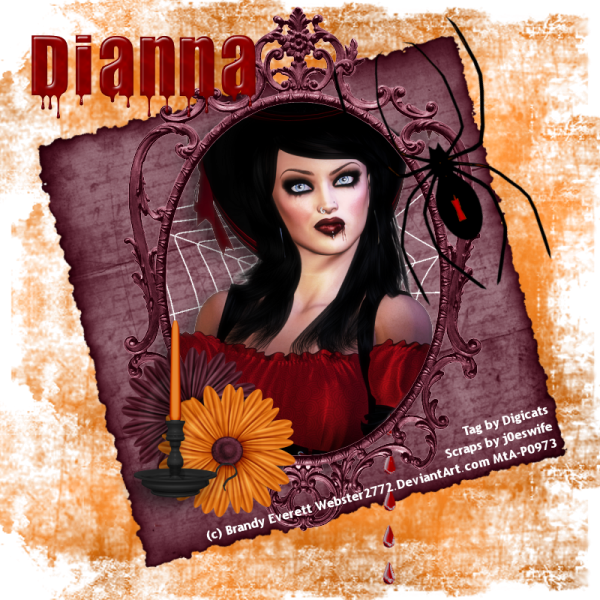
Bloody Widow Tutorial

Bloody Widow


This tutorial was written by Dianna Richards of Digicats (and Dogs)/Di Before Dawn Tutorials. Any resemblance to any other tutorial, published or unpublished, living, dead or undead, is purely coincidental.

Please do not rebroadcast, redistribute or otherwise claim this tutorial or any part there of as your own work.


Items you will need to complete this project:

The Boo to You mega taggers kit by Scraps by j0eswife. This kit is available for purchase at Digital Chaos and other fine stores.

Tube of choice. I am using Brandy Everett's Bloody Mary tube, which is available at Mistaken Art. You must have a license to use this tube which can be obtained at Mistaken Art.

Wee Scots Mask #85 which you can download HERE.

Alpha or font of choice. I am using the Bloody alpha by Designs by Sarah Bryan. This is a FTU alpha, part of the Gothic Inspirations Hallows Eve Blog train. You can download it HERE.


Note that H# and V# refer to Horizontal and vertical coordinates on your canvas grid. Make sure you have View, Rulers checked in order to see the ruler grid.

When I say "Add to your canvas" I expect that you will copy and paste it as a new layer, unless otherwise state in the tutorial.

This tutorial assumes you have a working knowledge of PSP. It was written using PSP X1, but should work in PSP 8 and up.

To begin, open a raster layer canvas, 800 x 800 pxls, flood fill white.

Open SBJ_Paper 60. Select Layers --> Load/Save Mask --> Load Mask from Disk and locate WSL Mask 83. Make sure the fit to canvas box is checked, and click on Load.

Edit --> Copy Merged then add to you canvas, centered.

Open Old Paper 1, resize to 60 percent and add to your canvas, centered. Go to Image --> Free Rotate and rotate Left, 15 degrees.

Open the Blood Mary tube by Brandy Everett, copy the tube layer and add to your canvas, centered.

Open Fancy Frame 1, and add to your canvas centered at H400, V360.

Using your eraser tool, erase all the parts of the tube that fall outside of the frame, including all the parts in between the fancy scroll work.

Open Web. Set the foreground color on you materials pallet to white (#ffffff) and using your paint bucket tool, flood fill the web white. Click on the old paper layer to active it.

Resize the web to 75% and add the canvas, centered at H410, V390. Using your eraser tool, erase any parts of the web that show outside of the frame.

Click on the tube later to active it, and add a drop shadow of choice to the tube. I am using a horizontal offset of 10, a vertical offset of -10, opacity of 65, blur of 35, color black (#000000).

Click on the frame layer to activate it, and open Flower 03, resize to 50% and add to canvas, centered at H250, V550. Open Flower 04, resize to 50% and add to canvas, centered at H300, V600.

Open Candle 04, resize to 50% and add to canvas, centered at H250, V550. Add a drop shadow of choice to to the candle. I am using the same setting as for the tube.

Open Spider 03, and add to canvas. Select Image --> Free Rotate and rotate left, 25 degrees. Center the spider at H590, V215.

Open SBJ Drips 1. Using your Selection tool set to rectangle, select the second from last row of drips, and copy. Click on the Old Paper layer to active it, and add the drips to the canvas, centered H520, V590.

On the materials pallet, set your foreground color to red (#C00000). Click on your color change tool and set the tolerance for 15, and the edge softness to 20. Click on the drips to colorize them to red.

On the layers pallet, click on the spider to select it and change the orange spot on his back to red.

Add you copyright info and save your artist's copy as a .pspimage. In adding the copyright, I typed the information out and then used the free rotate option to rotate it left, 15% to match the old paper.

On the materials pallet, I had my foreground color set to transparent and my background color set for white, and I am using Trebuchet MS, Size 4 Points, Bold and align right.

For the Bloody Mary tube, the copyright info is:

(c) Brandy Everett Webster2772.DeviantArt.com YOUR MtA License #

Using the optional alpha of choice, add your name to the tag. I am using the Bloody Alpha created by Designs by Sarah Bryan, which is a FTU alpha, part of the Gothic Inspirations Hallows Eve blog train.

Resize to taste and center around H180, V100 depending upon the length of name you are using.

Delete the white background layer, then select layers --> merge --> merge visible. Resize your tag to 75%, 600 x 600 pxls. and save as a .png file and your all done!

I hope you enjoyed this tutorial. If you should have a problem, please feel free to E-Mail Me and I'll be happy to help you out.
Sunday, October 4, 2009

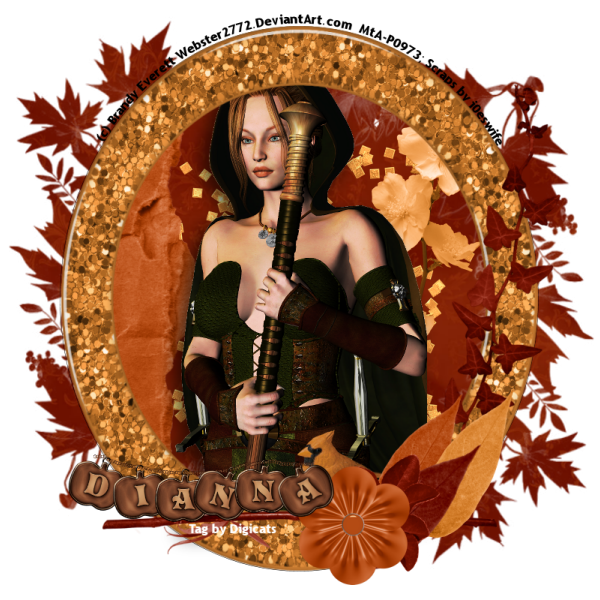
Autumn Mage Tutorial

Autumn Mage


This tutorial was written by Dianna Richards of Digicats (and Dogs)/Di Before Dawn Tutorials. Any resemblance to any other tutorial, published or unpublished, living, dead or undead, is purely coincidental.

Please do not rebroadcast, redistribute or otherwise claim this tutorial or any part there of as your own work.


Items you will need to complete this project:

The Back to Nature taggers kit by Scraps by j0eswife. This kit is available for purchase at Digital Chaos and other fine stores.

Tube of choice. I am using Brandy Everett's Celetic Mage, which is available at Mistaken Art. You must have a license to use this tube which can be obtained at Mistaken Art.

Wee Scots Mask #275 which you can download HERE.

Alpha or font of choice. I am using the Bronze Halloween Charm alpha by Digital Delights, which is a PTU full sized alpha. The alpha and chain needs to be resized to 15% for use in this tutorial.


Note that H# and V# refer to Horizontal and vertical coordinates on your canvas grid. Make sure you have View, Rulers checked in order to see the ruler grid.

When I say "Add to your canvas" I expect that you will copy and paste it as a new layer, unless otherwise state in the tutorial.

This tutorial assumes you have a working knowledge of PSP. It was written using PSP X1, but should work in PSP 8 and up.

To begin, open a new raster layer canvas, 800 x 800 pxls, flood filled white.

Open SBJ Paper08, and resize to 80%. Go to layers --> Load/Save Mask --> Load Mask from Disk, and locate WSL mask # 275. Make sure the fit to canvas box is checked, then click on load.

Edit --> Copy Merged, then add to your canvas, centered.

Open SBJ Glitter Spill 1, copy and add to canvas centered.

Open SBJ Flower Branch 3, and add to canvas, centered at H550, V400.

Open cardboard scrap 2, resize to 75% and add to canvas, centered at H200, V400.

Open Brandy Everett's Celtic Mage (or tube of choice), click on the tube layer, copy and add to canvas, centered. Add a drop shadow of choice. I am using vertical offset of 10, a horizontal offset of -10, opacity of 65, blur of 35, color black (#000000).

Open Glitter Glass Frame 2. Go to image, resize and, uncheck the Lock aspect ratio box and set the width of the frame to 700 pixels and the height of the frame to 800 pxls. This will give a nice oval shaped frame.

Copy and past to your canvas, centered. Click on the cardboard scrap to activate it and using your eraser tool, erase any parts of the cardboard that show outside the frame. (Corel_01_004 works well for this as there's a pretty good sized chunk to be erased.)

On the layers pallet, click on the frame layer to activate it. Open SBJ Little Bird and resize to 25%. Mirror. Add to canvas centered at H470, V620. (Make sure you've rechecked the Lock aspect ratio button.)

Open Ivy 1, resize to 75%, and add to canvas, centered at H620, V400.

Open Stick 2, resize to 76%, and add to canvas, centered at H400, V700.

Open Leaf 1, and resize to 50%. Add to your canvas, centered at H550, V620. Repeat with Leaf 2, centering at H620, V620.

Repeat with Leaf 3, centering at H550, V670. Image --> Free Rotate --> rotate right, 15 degrees.

Open Leaves 3, resize to 25% and mirror. Add to canvas at H520, V720.

Open Flower 7, resize to 35% and add to canvas, centered at H470, V700.

You can now add your copyright information to the tag. For the Brandy Everett tube, that information is:

(c) Brandy Everett Webster2772.DeviantArt.com YOUR MtA License #

You may also add your optional tag by watermark. After that you can save the artist's copy as a .pspimage.

Using the alpha or font of choice add the desired name to your tag. I am using the Bronze Halloween Charm Alpha by Pam at Digital Delights which is a full sized, PTU alpha that is a bit of a pain to work with, but which returns very nice results.

Once you've added your name, you can delete the white background layer and select Layers --> Merge --> Merge Visible. Resize your tag by 75% (to 600 x 600 pxls) and save as a .png file and your all done.

I hope you enjoyed this tutorial. If you should have a problem, please feel free to E-Mail Me and I'll be happy to help you out.
Say What Tutorial

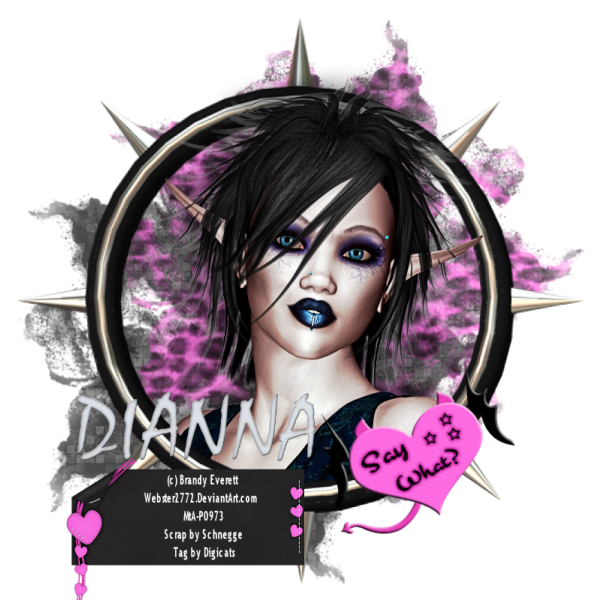
Say What?


This tutorial was written by Dianna Richards of Digicats (and Dogs)/Di Before Dawn Tutorials. Any resemblance to any other tutorial, published or unpublished, living, dead or undead, is purely coincidental.

Please do not rebroadcast, redistribute or otherwise claim this tutorial or any part there of as your own work.


Items you will need to complete this project:

The Say What taggers kit by Schnegge's Scraps. This kit is available for purchase at Scrappetizing as well as other fine stores.

Tube of choice. I am using Dark Faerie Portrait by Brandy Everett, which is available for purchase at Mistaken Art. You must have a license from MtA to use this tube.

Wee Scots Mask #225 which you can download HERE.

Alpha or font of choice. I am using the White Grunge alpha by Dreams Fulfilled. This is a FTU alpha that can be downloaded at her blog.


Note that H# and V# refer to Horizontal and vertical coordinates on your canvas grid. Make sure you have View, Rulers checked in order to see the ruler grid.

When I say "Add to your canvas" I expect that you will copy and paste it as a new layer, unless otherwise state in the tutorial.

This tutorial assumes you have a working knowledge of PSP. It was written using PSP X1, but should work in PSP 8 and up.

Open a new raster layer canvas, 800 x 800 pxls, flood filled white.

Open P-04, then select layers --> load/save mask --> load mask from disk. Locate WSL mask # 225, make sure the fit to canvas box is checked, then click on load.

Edit --> Copy Merged, then add to your canvas, centered at H350, V450.

Open P-18, then select layers --> load/save mask --> load mask from disk. Locate WSL mask # 225, make sure the fit to canvas box is checked, then click on load.

Edit --> Copy Merged, then add to your canvas, centered at H450, V350.

Open tube of choice. I am using Brandy Everett's Dark Faery Portrait which can be purchased at MTA.  

Copy the tube layer, and add to canvas, centered.

Open Frame 10, resize to 150%, and add to canvas, centered.

Using your eraser tool, erase the parts of the tube that show outside of the frame ON THE BOTTOM ONLY.

On the layers pallet, duplicate the frame, then drag the copy under the tube layer.

Set your selection tool to rectangle, then use it to select the top half of the original frame (Raster 4). Then press your delete key. Selections --> Select None.

Add a drop shadow of choice to the tube. I am using Vertical and Horizontal offsets of -10, opacity 65, blur 35, color black (#000000).

Open DevilHeart1, and add to your canvas centered at H550, V600.

Image --> Free Rotate: rotate left, 20 degrees --> Okay.

Open Tag01. Add your copyright information to the tag. For the Dark Faery tube, that information is:

(c) Brandy Everett Webster2772.DeviantArt.com YOURMtALICENSE #

You can also add your "tagged by" information to the tag.  

Edit --> Copy Merged, then add to canvas, centered at V250, H700.  

You can now save your artists' copy as a .pspimage.

Using alpha or font of choice, compose the name you wish to add to the tag and add to the image, centered at around H260, V575. Resize to taste, this may vary based on the length of the name you are using.

I am using the White Grunge alpha by Dreams Fulfilled. This is a FTU alpha available on her blog.

Delete the white background layer, and then select layers --> Merge --> Merge Visible.

Resize your canvas to 75% (600 x 600 pxls), and save as a .png file and your all done!

I hope you enjoyed this tutorial. If you should have a problem, please feel free to E-Mail Me and I'll be happy to help you out.
Saturday, October 3, 2009

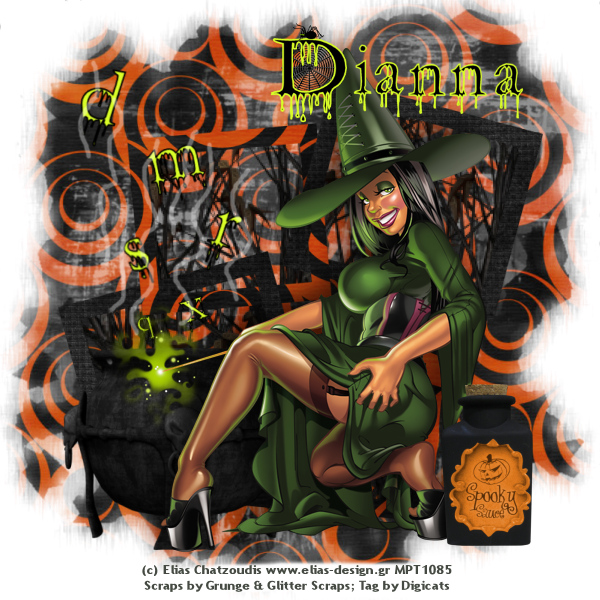
Alphabet Soup

Alphabet Soup


This tutorial was written by Dianna Richards of Digicats (and Dogs)/Di Before Dawn Tutorials. Any resemblance to any other tutorial, published or unpublished, living, dead or undead, is purely coincidental.

Please do not rebroadcast, redistribute or otherwise claim this tutorial or any part there of as your own work.


Items you will need to complete this project:

The Hocus Pocus taggers kit by Grunge and Glitter Scraps. This kit is available for purchase at Sophisti-Scraps as well as other fine stores.

Tube of choice. I am using psp10758 Hocus Pocus by Elias Chatzoudis. You must have a license to use this tube, which is available at www.mypsptubes.com.

Wee Scots Mask #222 which you can download HERE.

Alpha of choice. I am using the "Creepy Alpha" by Winter's Loft which is a FTU alpha available for download on her blog.


Note that H# and V# refer to Horizontal and vertical coordinates on your canvas grid. Make sure you have View, Rulers checked in order to see the ruler grid.

When I say "Add to your canvas" I expect that you will copy and paste it as a new layer, unless otherwise state in the tutorial.

This tutorial assumes you have a working knowledge of PSP. It was written using PSP X1, but should work in PSP 8 and up.

Open a new raster canvas 800 x 800 pxls., flood fill White.

Open GG_Hocus Pocus-paper. Layers --> Load/Save Mask --> Load mask from Disk. Find WSL Mask 222. Make sure the Fit to canvas box it checked and then click on load.

Edit --> Copy Merged and add to canvas, centered.

Using your pick tool, expand the boundaries out to fit the canvas.  

Open dead Bush, enlarge to 200%, and add to canvas, centered. Open Frame 1, and add to canvas, centered.

On the Materials pallet, click on the paper layer, raster 1, and set to invisible. Then activate the bush layer.

Using your eraser tool, erase all the parts of the bush that are not inside the frames area. (You might want to set your eraser to Corel_01_04, as there's a lot of it.)

click on the frame layer to activate it.

Open Cauldron, resize to 75% and add to canvas centered at H250, V600.

Open alpha of choice. I am using Creepy SC g&b by Winter's Loft. Select letters at random and place the on your canvas over the cauldron. Use your pick tool to resize the ones closer to the cauldron smaller, with the ones further up, larger. you can also tilt them to taste.

Resize canvas to 75%, 600 x0 600 Pxls. Open my psp10758 Elias Chatzoudis Hocus Pocus (or tube of choice).

Copy the tube layer, and add to your canvas, centered. Add a drop shadow of choice to tube. I am using Vertical and Horizontal offsets of -10 each, Opacity of 60, blur of 35, color #000000 black.  

On the layer menu, click to activate your paper layer and make it visible. Then reselect your tube layer (which may be raster 12 depending upon how many letters you used).

Using the drop down box in the upper left hand corner of the layers pallet, add a new raster layer. On the materials pallet, set your foreground color to white (#ffffff).

Click on your paint brush tool, and set it to Corel_01_002, size 5, hardness 25. Change the opacity level to 35.

Using your brush, draw some wavy lines over the cauldron to make it look like steam is coming out. (See example.) Painting over the letters is fine.

Open Bottle 2, resize to 50%, and add to canvas, centered at H500, V500.

Use your erase tool to erase any of the background below 560 or 570 on the vertical scale.

Add your copyright info and license number to the tag. You can then save your artist's copy as a .pspimage.

Using the same or similar alpha to the one you used earlier, add you name (or desired name) to the tag, centered at around H400, V80. Resize to taste.

Drop (delete) the white background layer, merge visible and save as a .png file, and your all done!

I hope you enjoyed this tutorial. If you should have a problem, please feel free to E-Mail Me and I'll be happy to help you out.