Showing posts with label Nutshell Creations. Show all posts

Saturday, December 19, 2009

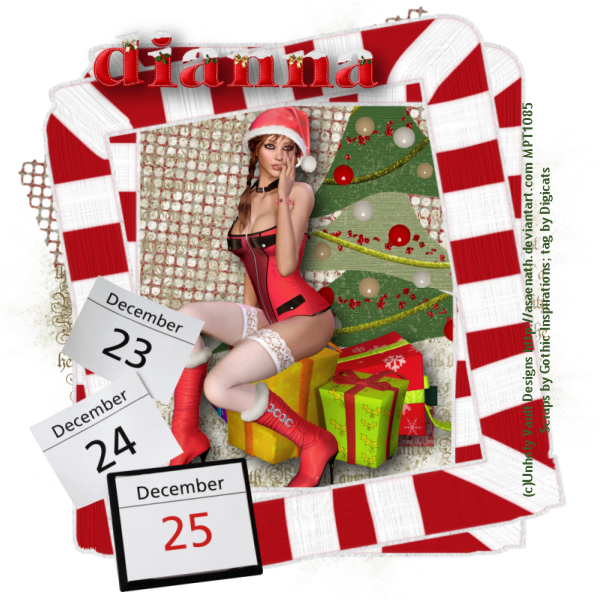
Christmas Countdown Tutorial

newwin


This tutorial was written by Dianna Richards of Digicats (and Dogs)/Di Before Dawn Tutorials. Any resemblance to any other tutorial, published or unpublished, living, dead or undead, is purely coincidental.

Please do not rebroadcast, redistribute or otherwise claim this tutorial or any part there of as your own work.


Items you will need to complete this project:

The Last Minute Christmas taggers kit by Gothic Inspirations. This is a PTU kit which is available at Just4Taggers.com as well as other fine online boutiques.

Tube of choice. I am using Holiday Presents by Unholy Vault Designs. This is one of the tubes we received from My PSP Tubes.com as part of our 2009 Christmas gift. You must have a license to use this tube, which is available at MyPSPTubes.com.

Wee Scots Mask #253 which you can download HERE.

Font(s) and/or alpha of choice. I am using Trebuchet MS, which is a windows system font, and the "Furry" alpha by Nutshell Creations which may be purchased at Scrappetizing.com.


Note that H# and V# refer to Horizontal and vertical coordinates on your canvas grid. Make sure you have View, Rulers checked in order to see the ruler grid.

When I say "Add to your canvas" I expect that you will copy and paste it as a new layer, unless otherwise state in the tutorial.

This tutorial assumes you have a working knowledge of PSP. It was written using PSP X1, but should work in PSP 8 and up.

To begin, open a new raster layer canvas, 800 x 800 pxls, flood fill white.

Open Paper4-GI_Last Minute Christmas. Go to Layers --> Load/Save Mask -- Load Mask from Disk and locate Wee Scots Lass mask 253. Make sure the "Fit to canvas" box is checked, then click on load.

Copy Merged and add to your canvas, centered.

Open Mesh and add to canvas, centered at H350, V250. Image --> Free Rotate --> Rotate left 20 degrees.

Open Lyrics-GI_LastMinuteChristmas and add to canvas, centered.

Open Tree-GI_Last Minute Christmas, resize to 75% and add to canvas, centered at H500, V325.

Open UnholyVault-Holiday Presents (or tube of choice); copy the tube layer and add to canvas, centered.

Add shadow of choice to tube layer. I am using offsets vertical and horizontal of 10 each, opacity of 80, blur 35, and color of black #000000.

Open Frame4-GI_Last Minute Christmas and rotate right. Add to canvas, centered.

Duplicate --> Free Rotate --> Rotate Left 10 degrees.

Open Countdown-GI_LastMinuteChristmas, resize to 75% and add to canvas, centered at H200, V575.

On the materials pallet, set your foreground color to transparent and your background color to Dark Green (#3d5c2f). Using font of choice, add the copyright information to your tag. For the Unholy Vault Design tube the info is:

(c)Unholy Vault Designs http://asaenath.deviantart.com YourMPTLicense #.

I am using Trebuchet MS, which is a Windows system font, 4 points, bold, centered. I rotated my text left, 90 degrees and added to the canvas centered at H720, V400.

You may now save your artist's copy as a .pspimage.

Using alpha or font of choice, add the name of choice to your tag. I am using the Furry Alpha by Nutshell Creations.

I have my name centered around V320, H90. Actual location will depend upon length of name and size of font or alpha you are using.

Add a drop shadow to match the one on your tube to your name.

Delete your white background layer, and merge visible. Resize your canvas by 75% (to 600 x 600 pxls) and save as a .png file.

I hope you enjoyed this tutorial. If you should have a problem, please feel free to E-Mail Me and I'll be happy to help you out.

Wednesday, December 9, 2009

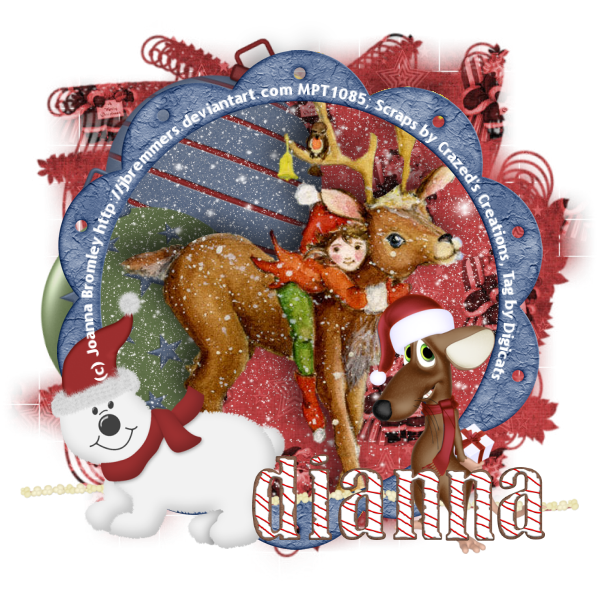
Christmas Critters Tutorial

Christmas Critters


This tutorial was written by Dianna Richards of Digicats (and Dogs)/Di Before Dawn Tutorials. Any resemblance to any other tutorial, published or unpublished, living, dead or undead, is purely coincidental.

Please do not rebroadcast, redistribute or otherwise claim this tutorial or any part there of as your own work.


Items you will need to complete this project:

The Christmas Critters taggers kit by Crazed's creations. This is PTU kit available at Scrappeting.com.

Tube of choice. I am using psp6778-SCBromley Winter Elf and Deer by Joanna Bromley. You must have a license to use this tube, which is available at MyPSPTubes.com.

Wee Scots Mask #281 which you can download HERE.

Snow overlay, which you may snag HERE.

Alpha and/or font of choice. I am using the Striped Gingerbread Cookie Alpha by Nutshell Creations, which is a PTU alpha available at Scrappetizing.com.


Note that H# and V# refer to Horizontal and vertical coordinates on your canvas grid. Make sure you have View, Rulers checked in order to see the ruler grid.

When I say "Add to your canvas" I expect that you will copy and paste it as a new layer, unless otherwise state in the tutorial.

This tutorial assumes you have a working knowledge of PSP. It was written using PSP X1, but should work in PSP 8 and up.

Open a new raster layer canvas, 800 x 800, flood filled white.

Open Crazed-paper3_CCT. Select Layers --> Load/Save Mask --> Load Mask from Disk and find Wee Scots Lass mask # 281. Make sure the "Fit to Canvas" button is checked, then click on load.

Copy merged, and add to your canvas as a new layer, centered.

Open Crazeds_ornament3_CCT and add to canvas, H300, V250. Image --> Free Rotate --> Free Rotate right, 20 degrees.

Open Crazeds_ornament2_CCT and add to canvas, H150, V400. Image --> Free Rotate --> Free Rotate left, 20 degrees.

Resize your canvas by 75% to 600 x 600 Pxls. Make sure the resize all layers box is checked.

Add the snow overlay to your canvas, centered.

Open psp6778_SCBromley - Winter Elf and Deer. copy the tube layer and add to canvas, centered.

Add a drop shadow of choice to your tube layer. I am using offsets, vertical and horizontal of -10 ear, opacity of 65, blur of 25, color black (#000000),

Open Crazeds-frame5_CCT and add to canvas, centered.

Using your magic wand tool, click anywhere outside the frame to select. On the layers pallet, highlight the tube layer (it should be Raster 4) then click on delete.

Selections --> None.

On the layers pallet, click on the frame layer to activate it.

Open Popcornstring_CCT, resize to 70% and add to canvas, centered at H300, V500.

Open Crazeds_polarbear_CCT, resize to 65% and add to canvas, centered at H165, v420.

Open Crazeds_mouse2_CCT, mirror, resize to 65% and add to canvas centered at H450, V420.

On the Materials pallet, set your foreground color to transparent and your background color to White (#ffffff).

Using font of choice, add copyright info to tag. For the Bromley tube, the information is:

(c) Joanna Bromley http://jbremmers.deviantart.com Your MTPLicense#

I am using Trebucket MS, 4 point, bold, centered. and then converted to raster and manually adjusted using the pick tool.

Save you artist's copy as a .pspimage file.

Using the font or alpha of choice, add your name to the tag centered at around H400, V500. Actual location will depend on the length of the name. I am using the Gingerbread Alpha by Nutshell Creations. This is a full sized alpha I've resized for tagging.

Delete the White background layer, merge visible and save as a .png file and your all done!

I hope you enjoyed this tutorial. If you should have a problem, please feel free to E-Mail Me and I'll be happy to help you out.

Friday, December 4, 2009

Candy Cane Elf Tutorial

Candy Cane Elf


This tutorial was written by Dianna Richards of Digicats (and Dogs)/Di Before Dawn Tutorials. Any resemblance to any other tutorial, published or unpublished, living, dead or undead, is purely coincidental.

Please do not rebroadcast, redistribute or otherwise claim this tutorial or any part there of as your own work.


Items you will need to complete this project:

The Holiday Wishes taggers kit by Nette's NightOwl Works, which is a FTU kit.

Tube of choice. I am using Xmas Elf by Joanna Bromley, which is one of the tubes we received as a gift from MPT. You must have a license to use this tube, which is available at MyPSPTubes.com.

Wee Scots Mask #241 which you can download HERE.

Alpha and/or font of choice. I am using the Furry Alpha by Nutshell Creations, which is a PTU alpha available at Scrappetizing.com.


Note that H# and V# refer to Horizontal and vertical coordinates on your canvas grid. Make sure you have View, Rulers checked in order to see the ruler grid.

When I say "Add to your canvas" I expect that you will copy and paste it as a new layer, unless otherwise state in the tutorial.

This tutorial assumes you have a working knowledge of PSP. It was written using PSP X1, but should work in PSP 8 and up.

Open a new raster canvas, 800 x 800, flood filled white.

Open Paper6. Select --> Layers --> Load Save Mask --> Load mask from Disk and locate Wee Scots Lass mask # 241. Make sure the fit to canvas box is checked, then click on load.

Copy Merged and add to main canvas, centered.

Open Tree and add to canvas, centered.

Open Candy Cane and add to main canvas. Select Image --> Free Rotate --> Rotate Right, 30 degrees.

Relocate Candy Cane to H550, V400. Duplicate and mirror.

Open Ornaments, and add to canvas, H400, V500.

Open Box and add to canvas, centered at H200, V525.

Open Xmas Elf tube by Joanna Bromley. Copy the tube layers, and add to canvas,H400, V475.

Add a drop shadow of choice. I am using Vertical and Horizontal offsets of -10 each, Opacity of 65, Blur of 30, color Black (#000000).

Open Lights. Flip. Add to canvas centered at H400, v700.

On the Materials Pallet, set your foreground color to transparent, and your background color to Dark Red (#941f1f).

Using font of choice, add the copyright information to your tag under the row of lights. For the Xmas Elf tube, the copyright info is:

(c)Joanna Bromley http://jbrommers.deviantart.com MyPSPLicense #

I am using Trebucket MS, Size 4 points, bold, and centered.

You may now save the artist's copy as a .pspimage file.

Add name of choice to your tag centered at around H550, V150. Actual location will depend on the length of name.

Delete the white background, and merge visible. Resize your image by 75% (to 600 x 600 pxl), then save as a .png file. Alternately you can keep the white background, merge visible, resize and save as a .jpg file. That's it. You're all done!

I hope you enjoyed this tutorial. If you should have a problem, please feel free to E-Mail Me and I'll be happy to help you out.