Tuesday, March 23, 2010

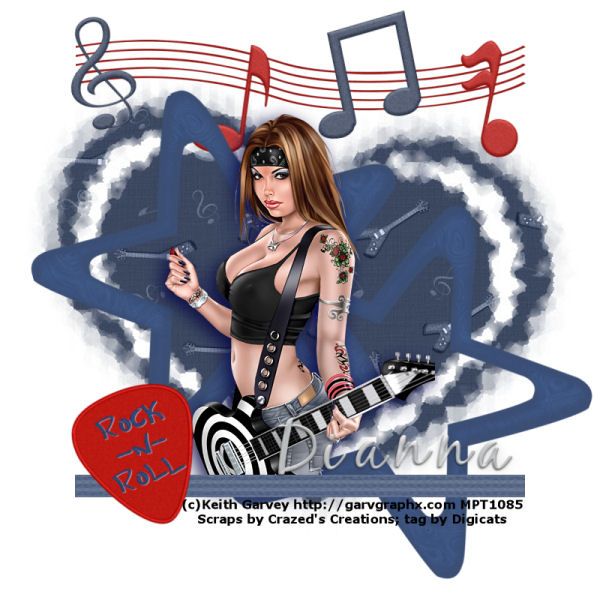
I Love Rock-N-Roll tutorial

I Love Rock-N-Roll


This tutorial was written by Dianna Richards of Digicats (and Dogs)/Di Before Dawn Tutorials. Any resemblance to any other tutorial, published or unpublished, living, dead or undead, is purely coincidental.

Please do not rebroadcast, redistribute or otherwise claim this tutorial or any part there of as your own work.


Items you will need to complete this project:

The Rock Star taggers kit by Crazed's Creations. This is a PTU kit, which is available at Scrappetizing.

Tube of choice. I am using psp0068 SC-Axe by Keith Garvey. You must have a license to use this tube, which is available at MyPSPTubes.com.

Katie has included several adorable Cookie posers in the kit which you may use instead of an artist's tube.

Wee Scots Lass mask #171 which you can download HERE.

Font(s) and/or alpha of choice. I am using Verdana which is a windows system font, and the Metal Gel alpha by Maria Stones. This is a FTU alpha which may be downloaded from Free Digital Scrapbooking.


Note that H# and V# refer to Horizontal and vertical coordinates on your canvas grid. Make sure you have View, Rulers checked in order to see the ruler grid.

When I say "Add to your canvas" I expect that you will copy and paste it as a new layer, unless otherwise state in the tutorial.

This tutorial assumes you have a working knowledge of PSP. It was written using PSP X1, but should work in PSP 8 and up.

Open a new raster canvas, 800 x 800, flood filled white.

Open Crazeds_paper8_RST. Layers --> Load/Save Mask --> Load Mask from Disk and select Wee Scots Lass Mask 171. Make sure the fit to canvas box is checked, then click on load.

Copy Merged and add to main canvas, centered.

Open Crazeds_musicstaff2_RST, resize to 75% and add to canvas, centered at H400, V100.

Open several of Crazeds_musicnotes at random, resize to 50% and add in random locations along the staff at the top of the tag. Rotate the notes slightly to taste.

Open Crazeds_frame6_RST and add to main canvas centered at H300, V300. Repeat, locating the second frame at H550, V500

For the first frame, go to image --> free rotate and rotate left, 15 degrees. For the second frame, rotate right, 20 degrees.

Open psp0068-SCGarvey-Axe (or tube of choice), copy the tube layer and add to main canvas, centered.

Add a drop shadow of choice to tube. I am using offsets vertical of 7, horizontal of -7, opacity of 85, blur of 30, color Navy Blue (#000040).

Open Crazeds_ribbon3, resize to 75% and add to main canvas, centered at H400, V650 (right along the bottom of the tube).

Open Crazeds_guitarpick2_RST, resize to 75% and add to main canvas, centered at H200, V600. Image --> Free rotate --> rotate left, 20 degrees.

On the materials pallet, set your foreground color to transparent and your background color to black (#000000). Using font of choice, add the copyright information to your tube.

For the Garvey tube, that information is (c)Keith Garvey http://garvgraphx.com Your-MPT-License#

If you are using the posers included in the kit, that copyright is ©Luscious Scraps http://lusciousscraps.ecrater.com/

I am using Verdana, 4 points, bold and centered and then I adjusted it slightly to fit to the length of the ribbon.

You can now save the artist's copy of your tag as a .pspimage file.

Using font for alpha of choice, add name of choice to tag centered at around H550, V575. Actual location will depend upon the size and the length of the name.

Layers --> Merge --> Merge visible. Resize tag to 75% (600 x 600 pxls) and save as a .jpg file and your all done!

I hope you enjoyed this tutorial. If you should have a problem, please feel free to E-Mail Me and I'll be happy to help you out.
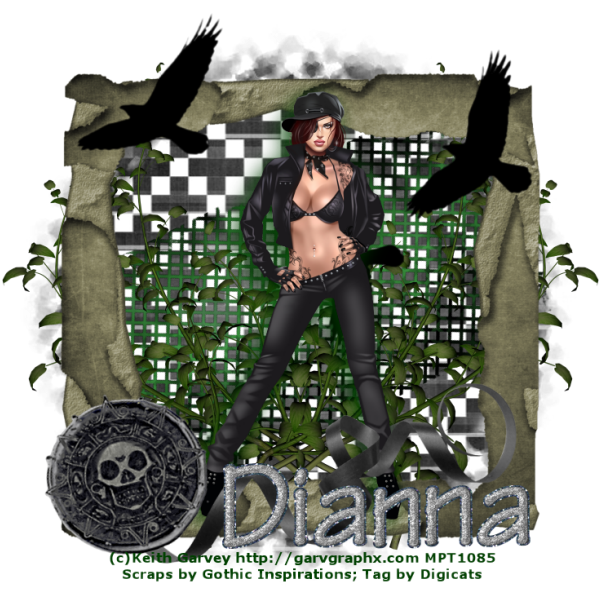
Gothic Gateway tutorial

Gothic Gateway


This tutorial was written by Dianna Richards of Digicats (and Dogs)/Di Before Dawn Tutorials. Any resemblance to any other tutorial, published or unpublished, living, dead or undead, is purely coincidental.

Please do not rebroadcast, redistribute or otherwise claim this tutorial or any part there of as your own work.


Items you will need to complete this project:

The Gateway to Annwn taggers kit by Gothic Inspirations. This is a PTU kit, which is available at Digital Chaos.

Tube of choice. I am using psp15197 SC-Patch by Keith Garvey. You must have a license to use this tube, which is available at MyPSPTubes.com.

Wee Scots Lass mask #201 which you can download HERE.

Font(s) and/or alpha of choice. I am using Verdana which is a windows system font, and the Moonbeam Alpha by Julie It Is. This is a FTU alpha that may be downloaded HERE.


Note that H# and V# refer to horizontal and vertical coordinates on your canvas grid. Make sure you have View, Rulers checked in order to see the ruler grid.

When I say "Add to your canvas" I expect that you will copy and paste it as a new layer, unless otherwise state in the tutorial.

This tutorial assumes you have a working knowledge of PSP. It was written using PSP X1, but should work in PSP 8 and up.

To begin, open a new raster layer canvas, 800 x 800 pxls, flood fill white.

Open Paper8-GI_G.T.A. Go to Layers --> Load/Save Mask --> Load Mask from Disk and select Wee Scots Lass mask 201. Make sure the fit to canvas box is checked, then click on load.

Edit --> Copy Merged, add to main canvas, centered.

Open Mesh-GI_G.T.A. and add to main canvas, centered. Image --> free rotate --> free rotate left, 25 degrees.

Open Leaves-GI_G.T.A. and add to main canvas, centered at H300, V400. Duplicate, Mirror.

Open Frame5_GI_G.T.A. and add to main canvas, centered.

Open Crows-GI_G.T.A. and add to main canvas, centered at H400, V250.

Open psp15197-SCGarvey-Patch, copy tube layer and add to canvas, centered.

Add drop shadow of choice to tube. I am using offsets of vertical 7, horizontal -7, opacity 85, blur 35, color Very Dark Green (#004000).

Open Ribbon3-GI_G.T.A., resize to 75% and add to main canvas, centered at H400, V600.

Open GatewayBrad-GI_G.T.A, resize to 50% and add to main canvas, centerd at H180, V600. Image --> Free Rotate --> Rotate left, 15 degrees.

On the Materials pallet, set your forground color to transparent and your background color to very dark green (#004000). Using font of choice, add the copyright information to your tag.

For the Patch tube, that information is:

(c)Keith Garvey http://garvgraphx.com Your_MPTLicense#

I am using Verdana, 4 points, centered and bold.

You can then save the artist's copy of your tag as a .pspimage.

Using font or alpha of choice, add name of choice to tag centered around H600, V650. Actual location will vary depending upon size and length of name used.

Delete the white background layer and go to Layers --> Merge --> Merge Visible. Resize your image to 75% (600 x 600 pxls) and save as a .png file and you're all done!

I hope you enjoyed this tutorial. If you should have a problem, please feel free to E-Mail Me and I'll be happy to help you out.

Friday, March 19, 2010

A Gothic Easter Tutorial

Darker Side of Easter


This tutorial was written by Dianna Richards of Digicats (and Dogs)/Di Before Dawn Tutorials. Any resemblance to any other tutorial, published or unpublished, living, dead or undead, is purely coincidental.

Please do not rebroadcast, redistribute or otherwise claim this tutorial or any part there of as your own work.


Items you will need to complete this project:

The Darker Side of Easter taggers kit by Gothic Inspirations. This is a PTU kit, which is available exclusively at Digital Chaos.

Tube of choice. I am using psp13160 SC-Bunny by Keith Garvey. You must have a license to use this tube, which is available at MyPSPTubes.com.

Wee Scots Lass mask #260 which you can download HERE.

Font(s) and/or alpha of choice. I am using Trebuchet MS which is a windows system font, and the Halloween Town Alpha by Myst Designs. This is a full size, FTU alpha that can be downloaded from Myst Designs Blog.


Note that H# and V# refer to Horizontal and vertical coordinates on your canvas grid. Make sure you have View, Rulers checked in order to see the ruler grid.

When I say "Add to your canvas" I expect that you will copy and paste it as a new layer, unless otherwise state in the tutorial.

This tutorial assumes you have a working knowledge of PSP. It was written using PSP X1, but should work in PSP 8 and up.

Open a new raster layer canvas, 800 x 800 pxls, flood filled white.

Open Paper 8 (or papers of Choice). Layers --> Load/Save Mask--> Load Mask from Disk and locate Wee Scott's Lass mask 260. Make sure the fit to canvas button is checked, then click load.

Copy merged and add to you main canvas, centered.

Open Fence and add to main canvas, centered. Image --> Free Rotate --> Rotate Right, 10 degrees.

Open Parchment and resize to 75%. Add to main canvas, centered. Image --> Free Rotate --> Rotate Left, 15 degrees.

Open Flowers and resize to 50%. Add to main canvas, centered at H220, V480.

Open a new raster layer canvas, 800 x 800 pxls, transparent. Open Grass, and add to the new canvas, centered at H400, V600.

Layers --> Load/Save Mask--> Load Mask from Disk and locate Wee Scott's Lass mask 260. Make sure the fit to canvas button is checked, then click load.

Copy merged, and add to main canvas, centered at H400, V600. (You can then dismiss the canvas you just opened.)

Open psp13160 SCGarvey-Bunny, copy the tube layer, and add to canvas, centered. Add a drop shadow of choice. (I am using Vertical offset of 7, horizontal offset of -7, opacity 65, blur 35, color black #000000.)

Open border, and add to canvas, centered at H400, V680.

Open Evil Rabbit, resize to 50% and add to canvas, centered at H650, V580.

Open Staple, and resize to 50%. Add to main canvas centered at H150, V250. Image --> Free Rotate --> Rotate Left, 7 degrees.

Duplicate layer. Image, free rotate, rotate left, 90 degrees. Relocated the duplicated layer to H400, V600 of the main canvas.

On the materials pallet, set your foreground color to transparent, and your background color to #c5c2af, which is the color of the parchment.

Using font of choice, add the copyright information to your tag. For the Garvey Bunny tube, that information is:

(c)Keith Garvey http://garvgraphx.com Your_MPT_License#

I am using Trebuchet MS, which is a windows system font, 4 points, centered, bold.

You may then save the artist's copy of your tag as a .pspimage file.

Using font of alpha of choice, add the name of choice to tag, centered at or around H150, V250. Image --> Free Rotate --> Rotate left, 15 degrees (to match parchment). Actual placement will depend upon size and length of name, so adjust accordingly. If necessary drag the name layer behind the tube on the layers pallet to the name is behind bunny ears if it's on the longish side.

Delete the while background layer. Merge visible, and resize to 75% (600 x 600 pxls), save as a .png file, and your all done!

I hope you enjoyed this tutorial. If you should have a problem, please feel free to E-Mail Me and I'll be happy to help you out.