Friday, May 28, 2010

Red, White and Boom tutorial (PTU)

Red White and Boom


This tutorial was written by Dianna Richards of Digicats (and Dogs)/Di Before Dawn Tutorials. Any resemblance to any other tutorial, published or unpublished, living, dead or undead, is purely coincidental.

Please do not rebroadcast, redistribute or otherwise claim this tutorial or any part there of as your own work.


Items you will need to complete this project:

The Red, White and Blue taggers kit by Gothic Inspirations. This is a PTU kit which may be purchased at the Gothic Inspirations store.

Tube of choice. I am using psp15638-MemorialDay by Keith Garvey. You must have a license to use this tube, which may be purchased at My PSP Tubes.com.

Wee Scots Lass mask #241 which you can download HERE.

Font(s) and/or alpha of choice. I am using Garamond which is a windows system font, and Hancock, which is a FTU font that may be downloaded from Outlaw by Design.


Note that H# and V# refer to Horizontal and vertical coordinates on your canvas grid. Make sure you have View, Rulers checked in order to see the ruler grid.

When I say "Add to your canvas" I expect that you will copy and paste it as a new layer, unless otherwise state in the tutorial.

This tutorial assumes you have a working knowledge of PSP. It was written using PSP X1, but should work in PSP 8 and up.

To begin, open a new raster layer canvas, 800 x 800 pixels, flood fill white.

Open Paper13-GI_RW&BBT09. Layers --> Load/Save Mask --> Load Mask from Disk. Locate Wee Scots Lass Mask #241. Make sure the fit to canvas box is checked, then click on load.

Copy merged and add to main canvas, centered.

Open WordArt4-GI_RW&BBT09. Resize to 85% and add to main canvas, centered. Image --> Free rotate --> Left, 23 degrees.

Open Frame3-GI_RW&BBT09. Copy and add to main canvas, centered. Image --> Free rotate --> Left, 90 degrees.

Open psp15638-SCGArvey-MemorialDay, copy Layer 1 and add to main canvas, centered at H300, V350.

Add a drop shadow of choice to tube. I am using offsets Vertical 8, Horizontal -8, Opacity 85, Blur 25, color dark blue (#000040),

Open RibbonBlue-GI_RW&BBT09. Copy and add to main canvas centered at H400, V600.

Open PatrioticRocket-GI_RW&BBT09. Resize to 75% and add to main canvas, centered at H600, V350.

Open PatrioticBucket-GI-RW&BBT09. Resize to 75%, copy and add to main canvas, centered at H550, V500.

Open Pass-GI_RW&BBT09. Resize to 75% and add to main canvas, centered at H500, V200. Image --> free Rotate --> rotate Right, 15 degrees.

On the layers pallet, drag the pass (Raster 8) under the Rocket layer, Raster 6.

On the Materials pallet, set your foreground color to transparent and your background color to dark blue (#000040). Using font of choice, add copy right information to the tag.

For the MemorialDay tube, that information is: (c)Keith Garvey http://garvgraphx.com Your MPT_License#

I am using Garmond, 4 points, centered and bold, and have fit my text to path around the outer edge of the mask layer.

Right click on Vector 1 and convert to raster layer.

You can now save the artist's copy of your tag as a .pspimage file.

Click on the Patriotic Bucket layer to activate. Using font of alpha of choice, add name of choice to tag. I am using Hancock, 26 points, with a silver gradient, bold and centered. I have the name centered at H520, V570. Actual location will depend on the size and length of name you are using.

Delete the white background layer, and merge visible. Resize to 75% (600 x 600 pixels) and save as a .png file and you're all done.

I hope you enjoyed this tutorial. If you should have a problem, please feel free to E-Mail Me and I'll be happy to help you out.

And be sure to have a happy, and safe, Memorial Day!

Thursday, May 27, 2010

Living Dead Doll tutorial (PTU)

Living Dead Girl


This tutorial was written by Dianna Richards of Digicats (and Dogs)/Di Before Dawn Tutorials. Any resemblance to any other tutorial, published or unpublished, living, dead or undead, is purely coincidental.

Please do not rebroadcast, redistribute or otherwise claim this tutorial or any part there of as your own work.


Items you will need to complete this project:

The Living Dead Girl taggers kit by Grunge & Glitter Scraps. This is a PTU kit, which is available at Sophisti-Scraps.com and Grunge & Glitter Scraps.

Tube of choice. I am using PSP15527-VoodooGirl by Unholy Vault Designs. You must have a license to use this tube, which may be purchased at MyPSPTubes.com.

Font(s) and/or alpha of choice. I am using Garamond which is a windows system font, and Haunted Attraction, which is a FTU font that may be downloaded from Free Digital Scrapbooking.


Note that H# and V# refer to Horizontal and vertical coordinates on your canvas grid. Make sure you have View, Rulers checked in order to see the ruler grid.

When I say "Add to your canvas" I expect that you will copy and paste it as a new layer, unless otherwise stated in the tutorial.

This tutorial assumes you have a working knowledge of PSP. It was written using PSP X1, but should work in PSP 8 and up.

To begin, open a new raster layer canvas, 700 x 700 pixels, flood filled white.

Open GG_LDG_paper8. Layers --> Load/Save Mask --> Load Mask from Disk and locate Wee Scots Lass mask #194. Make sure the Fit to Canvas box is checked, then click on load.

Drag the boundry lines on the mask out to the edge of the canvas, then copy merged and paste as a new layer, centered.

Open GG_LDG_wire, resize to 75%, then add to canvas, centered. Free Rotate --> Rotate Left --> 20 degrees.

Open GG_LDG_Nightsky as add to main canvas, centered at H250, V150.

Open GG_LDG_coffin, resize to 75%, and add to canvas, centered at H500, V350.

Open GG_LDB_frame1, copy and add to main canvas, centered. Free rotate --> rotate left --> 35 degrees.

Open PSP15527-SCUVD_VoodooGirl. Copy Raster2 (the close up layer) and add to main canvas, centered.

Duplicate the frame layer (Raster 5), then on the layers pallet, drag the duplicate over the top of the tube layer (Raster 6).

Set your selection tool to Selection Type: Rectangle, Mode: Replace, and select the top half the duplicated frame (Copy of Raster 5). Click on delete.

Selections, Select none.

Using your eraser tool, erase the parts of the tube that fall outside the frame.

Add a drop shadow of choice to the tube. I am using offsets Vertical of 8, Horizontal of -8, Opacity of 85, Blur 35, color dark purple (#400040).

On the layers pallet, set the opacity level of the tube layer, Raster 6, to around 80. (I am using 81).

Click on Copy of Raster 5 to activate.

Open GG_LDG-Cross, and resize to 75%. Add to main canvas, centered at H550, V450.

on the Materials pallet, set your foreground color to transparent and your background color to purple (#800080). Using font of choice, add copyright information to the tag.

For the VoodooGirl tube, that information is: (c)Unholy Vault Designs http://asaenath.deviantart.com Your MPTLicense#

I am using Garamond, 4 points, bold and centered.

Add a white glow to the copyright info to make it stand out.

Open GG_LDG_candle1, resize to 75%, and add to main canvas, centered at H470, V530.

Open GG_LDG_barbedwire2 and add to main canvas, centered at H350, V600.

You can now save the artist's copy of your tag as a .pspimage file.

Click on the cross layer, Raster 7, to activate. Using font or alpha of choice, add name of choice to tag.

I am using Haunted Attraction, 14 points, bold and centered with my foreground color set to white, and my background color set to light gray (#c0c0c0).

I've centered the name at around H550, V360 to match the cross.

Merge visible and resize your tag by 86% to 600 x 600 pixels. Save as a .jpg file, and you are all done!

I hope you enjoyed this tutorial. If you should have a problem, please feel free to E-Mail Me and I'll be happy to help you out.

Madame Dynamite tutorial (PTU)

Madame Dynamite


This tutorial was written by Dianna Richards of Digicats (and Dogs)/Di Before Dawn Tutorials. Any resemblance to any other tutorial, published or unpublished, living, dead or undead, is purely coincidental.

Please do not rebroadcast, redistribute or otherwise claim this tutorial or any part there of as your own work.


Items you will need to complete this project:

The Madame Midnight ptu taggers kit by Grunge & Glitter Scraps. This is a PTU kit, which is available at Sophisti-Scraps.com and Grunge & Glitter Scraps.

Tube of choice. I am using psp15343-Dynamite by Unholy Vault Designs. You must have a license to use this tube, which may be purchased at MyPSPTubes.com.

Font(s) and/or alpha of choice. I am using Trebuchet MS which is a windows system font, and the Bloody Alpha alpha by Sarah Bryan, which is a FTU alpha that may be downloaded from her blog.


Note that H# and V# refer to Horizontal and vertical coordinates on your canvas grid. Make sure you have View, Rulers checked in order to see the ruler grid.

When I say "Add to your canvas" I expect that you will copy and paste it as a new layer, unless otherwise state in the tutorial.

This tutorial assumes you have a working knowledge of PSP. It was written using PSP X1, but should work in PSP 8 and up.

To begin, open a new raster layer canvas, 800 x 800 pxls, flood fill white.

Open GG_MM_paper10 and add to main canvas centered.

Open GG_MM_oldpaper, resize to 65% and add to main canvas, centered.

Open GG_MM_corset1, resize to 50%, and add to main canvas centered at H200, V250. Image --> Free Rotate --> Rotate Right, 15 degrees.

Open GG_MM_corset2, resize to 50%, and add to main canvas, centered at H200, V500. Image --> Free Rotate --> Rotate Left, 15 degrees.

Open GG_mm_frame5 and add to main canvas, centered.

Open psp15343-SCUVD-Dynamite. Copy the "Merged" layer and add to main canvas, centered.

Duplicate the frame5 layer, on the the Layer pallet, drag the copy over the tube layer.

Set your selection tool to Selection type: Rectangle, Mode: Replace and select the to half the duplicated frame. Press the delete key to erase.

Selection --> select none.

Add a drop shadow of choice to tube. I am using offsets, horizontal 8, vertical -8, opacity 85, blur 35, color dark red (#400000).

Open GG_MM_beadedwire, resize to 75% and add to main canvas, centered at H400, V600.

Open GG_MM_boot, and add to main canvas, centered at H150, V500.

Open GG_MM_candle2, copy and add to main canvas, centered at H650, V520.

Open GG_MM-candle1, resize to 75% and add to main canvas, centered at H550, V570.

On the Materials pallet, set your foreground color to transparent and your background color to white (#ffffff). Using font of choice, add the copyright information to your tag. For the Dynamite tube, that information is (c)Unholy Vault Designs http://asaenath.deviantart.com Your_MPTLicense#.

You can now save the artist's copy of your tag as a .pspimage file.

Image --> Canvas Size and set to Width: 700, Height: 700, centered, then click on OK.

Using font or alpha or choice, add name of choice to tag. I am using the FTU Bloody Alpha by Sarah Bryan.

I have located my name, centered at H200, V100 and then free rotated it left, 17 degrees. Actual location may vary depending upon the size and length of the name you are using.

Layers, merge visible, then resize your canvas, by 86% to 600 x 600 pxls. Save as a .jpg file and you're all done!

I hope you enjoyed this tutorial. If you should have a problem, please feel free to E-Mail Me and I'll be happy to help you out.

Wednesday, May 19, 2010

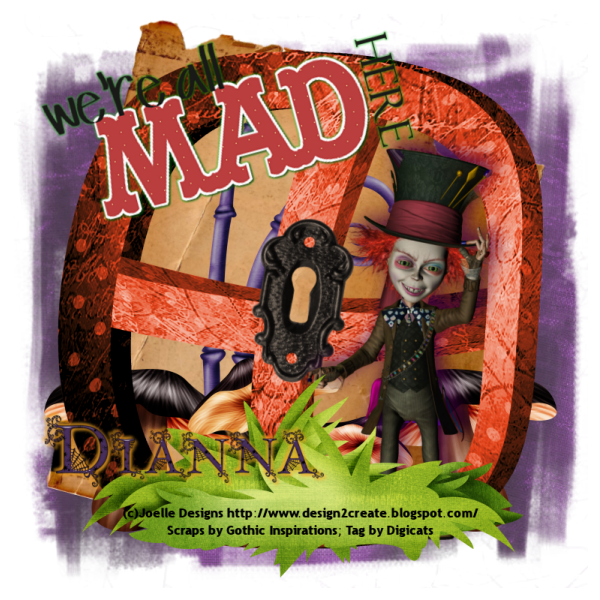
Mad, Mad World tutorial

Wonderland


This tutorial was written by Dianna Richards of Digicats (and Dogs)/Di Before Dawn Tutorials. Any resemblance to any other tutorial, published or unpublished, living, dead or undead, is purely coincidental.

Please do not rebroadcast, redistribute or otherwise claim this tutorial or any part there of as your own work.


Items you will need to complete this project:

The Mayhem taggers kit by Gothic Inspirations. This is a PTU kit which may be purchased at the Gothic Inspirations store as well as Digital Chaos.

Tube of choice. I am using the Mad Hatter (Curious Hatter) tube by Joelle Designs that is included in the kit.

Wee Scots Lass mask #3 which you can download HERE.

Font(s) and/or alpha of choice. I am using Trebuchet MS which is a windows system font, and the Goth Chic alpha by Whispy's D'zines, which is a FTU alpha that may be downloaded from her blog.


Note that H# and V# refer to Horizontal and vertical coordinates on your canvas grid. Make sure you have View, Rulers checked in order to see the ruler grid.

When I say "Add to your canvas" I expect that you will copy and paste it as a new layer, unless otherwise state in the tutorial.

This tutorial assumes you have a working knowledge of PSP. It was written using PSP X1, but should work in PSP 8 and up.

To begin, open a new raster layer canvas, 800 x 800 pxls, flood filled white.

Open Paper22-GI_Mayhem. Go to Layers --> Load/Save Mask --> Load Mask from Disk. Locate Wee Scots Lass Mask 3. Make sure the "Fit to Canvas" box is checked, then click on load.

Resize to 90%, copy Merged, and add to main canvas, centered.

Open Parchment1-GI_Mayhem, resize to 85%, and add to main Canvas, centered. Free Rotate -->Rotate Right --> 15 degrees.

Open Bamboo-GI_Mayhem, and add to main canvas, centered.

Open Mushroom1_GI_Mayhem, resize to 50% and add to main canvas, centered at H200, V600.

Open Mushroom2-GI_Mayhem, resize to 50%, and add to main canvas centered at H400, V600.

Duplicate Mushroom1_GI_Mayhem (Raster layer 4) and mirror.

Open WindowFrame-GI_Mayhem, and add to main canvas, centered.

Open MadHatter2-GI_Mayhem, resize to 75% and add to main canvas, centered at H550, V460.

Open Grass-GI_GI_Mayhem, and add to main canvas centered at H400, V630.

Open Keyhole-GI_Mayhem, resize to 50%, and add to main canvas, centered. Free Rotate --> Rotate Right, 10 degrees.

Using your eraser tool, erase the portion of the frame behind the keyhole.

Add a drop shadow of choice to the MadHatter. I am using offsets vertical -8, horizontal 8, opacity 85, blur 35, color dark purple (#400040).

Open WordArtGlow1-GI_Mayhem, and add to main canvas, centered at H300, V150. Free Rotate --> Rotate Left, 15 degrees.

On the materials pallet, set your foreground color to transparent, and your background color to black (#000000). Using font of choice, add the copyright information to your tag. For the Mad Hatter tube, that info is:

(c)Joelle Designs http://www.design2create.blogspot.com/

I am using Trebuchet MS, 4 points, Bold and centered.

You can now save the artist's copy of your tag as a .pspimage file.

Using font or alpha of choice, add name of choice to tag. I am using the Goth Chic alpha by Whispy's D'zines.

I have the name centered at H250, V600, and have added an orange (#f0a124) glow to it.

You can now delete the white background layer, and merge Visible. Resize your tag to 75% (600 x 600 pxls), save as a .png file, and you're all done!

I hope you enjoyed this tutorial. If you should have a problem, please feel free to E-Mail Me and I'll be happy to help you out.

Diva Tutorial

Diva Style


This tutorial was written by Dianna Richards of Digicats (and Dogs)/Di Before Dawn Tutorials. Any resemblance to any other tutorial, published or unpublished, living, dead or undead, is purely coincidental.

Please do not rebroadcast, redistribute or otherwise claim this tutorial or any part there of as your own work.


Items you will need to complete this project:

The Diva Style taggers kit by Gothic Inspirations. This is a PTU kit which may be purchased at the Gothic Inspirations store as well as Digital Chaos.

Tube of choice. I am using psp15332-Megan1 by Jose Cano. You must have a license to use this tube, which may be purchased at MyPSPTubes.com.

Wee Scots Lass mask #352 which you can download HERE.

Font(s) and/or alpha of choice. I am using Trebuchet MS which is a windows system font, and the Goth Chick Alpha by Sarah Bryan, which is a FTU alpha that may be downloaded from her blog.


Note that H# and V# refer to Horizontal and vertical coordinates on your canvas grid. Make sure you have View, Rulers checked in order to see the ruler grid.

When I say "Add to your canvas" I expect that you will copy and paste it as a new layer, unless otherwise state in the tutorial.

This tutorial assumes you have a working knowledge of PSP. It was written using PSP X1, but should work in PSP 8 and up.

Open a new raster layer canvas, 800 x 800 pxls, flood filled white.

Open Paper12-GI_DivaStyle. Go to Layers --> Load/Save Mask --> Load Mask from Disk and locate Wee Scots Lass mask 352. Make sure the fit to canvas box is checked, then click on load.

Copy Merged and add to main canvas, centered.

Open GlitterBling-GI_DivaStyle, resize to 75% and add to main canvas, centered at H400, V350.

Open FilmStrip-GI_DivaStyle and add to main canvas, centered at H350, V200. Free rotate --> rotate left --> 15 degrees.

Open Lights-GI_DivaStyle, and add to main canvas, centered at H400, V150.

Open Frame3-GI_DivaStyle, resize to 85% and add to main canvas, centered.

Open psp15332_SCCano-Megan1 (or tube of choice), copy the pinup layer and add to main canvas, centered.

Add a drop shadow of choice to tube. I am using offsets of Vertical -8, Horizontal 8, Opacity of 85 and blur of 35. Color set to Dark Purple (#400040).

Duplicate your frame layer, and on the Layers pallet, drag it over the tube layer. Set your selection tool to Selection type: Rectangle, Mode: Replace and select the top half of the duplicated frame. Delete.

Selections --> Select none.

Open WordArt2-GI_DivaStyle, resize to 75% and add to main canvas, centered at H400, V550.

Open Shoe-GI_DivaStyle, resize to 65% and add to main canvas, centered at H200, V575.

Open Raspberries-GI_DivaStyle, resize to 65%, copy and add to main canvas, centered at H250, V650.

On the materials pallet, set your foreground color to transparent and your background color to black (#000000). Using font of choice add the copyright information to the tag.

For the Megan1 tube, that information is (c)Jose A Cano http://personales.ya.com/jocachi Your MPTLicense#.

I am using Trebuchet MS, 4 points, bold and centered.

You can now save the artist's copy of your tag as a .pspimge file.

Using Font or alpha of choice, add name of choice to tag. I am using the Goth Chick alpha by Sarah Bryan. I have my name centered at H500, V625. Actual location will vary depending upon size and length of name.

Delete the white background layer and and Merge Visible. Resize your tag to 75% (600 x 600 pxls), save as a .png file and you're all done!

I hope you enjoyed this tutorial. If you should have a problem, please feel free to E-Mail Me and I'll be happy to help you out.

Saturday, May 15, 2010

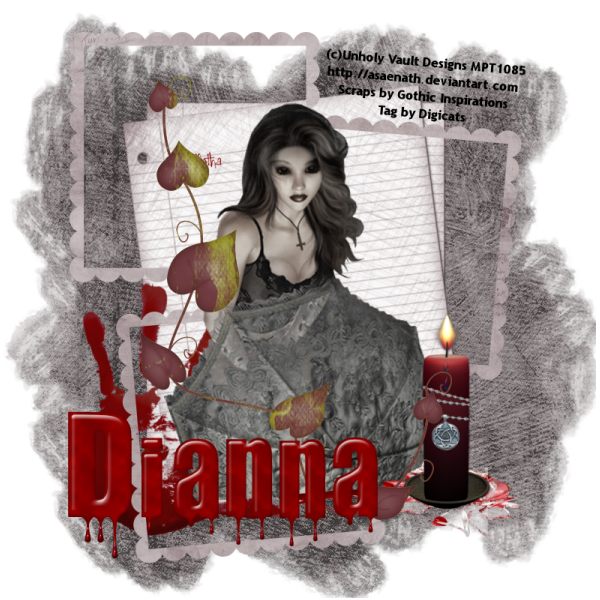
Gothic Mommy Tutorial

Gothic Mommy


This tutorial was written by Dianna Richards of Digicats (and Dogs)/Di Before Dawn Tutorials. Any resemblance to any other tutorial, published or unpublished, living, dead or undead, is purely coincidental.

Please do not rebroadcast, redistribute or otherwise claim this tutorial or any part there of as your own work.


Items you will need to complete this project:

The Mommy Dearest taggers kit by Gothic Inspirations. This is a PTU kit which may be purchased at the Gothic Inspirations store as well as Digital Chaos.

Tube of choice. I am using psp12317-GothicIII by Unholy Vault Designs. You must have a license to use this tube, which may be purchased at MyPSPTubes.com.

Wee Scots Lass mask #255 which you can download HERE.

Font(s) and/or alpha of choice. I am using Trebuchet MS which is a windows system font, and the Bloody Alpha by Sarah Bryan, which is a FTU alpha that may be downloaded from her blog.


Note that H# and V# refer to Horizontal and vertical coordinates on your canvas grid. Make sure you have View, Rulers checked in order to see the ruler grid.

When I say "Add to your canvas" I expect that you will copy and paste it as a new layer, unless otherwise state in the tutorial.

This tutorial assumes you have a working knowledge of PSP. It was written using PSP X1, but should work in PSP 8 and up.

Open a new raster layer canvas, 800 x 800, flood filled white.

Open Paper4-GI_MommieDearest. Layers --> Load/Save Mask --> Load Mask from Disk and locate Wee Scots Lass mask #255. Make sure the "fit to canvas" box is checked, then click on load.

Copy Merged and add to main canvas, centered.

Open LetterPaper-GI_MommieDearest. Resize to 75% and add to main canvas, centered.

Open HandPrint-GI_MommieDearest, resize to 50% and add to main canvas, centered at H250, V550. Image --> Free Rotate --> Rotate Right, 20 degrees.

Open Frames-GI_MommieDearest and add to main canvas, centered.

Open psp12317-SCUVD-GothicIII, copy the Tube layer and add to main canvas, centered. Free rotate --> rotate left, 3 degrees.

Open Candle-GI_MommieDearest, resize to 50%, copy and add to main canvas, centered at H550, V570.

Open Leaves-GI_MommieDearest, copy and add to main canvas, centered.

On the materials pallet, set your background color to transparent and your foreground color to black (#000000). Using font of choice, add copyright information to the tag.

for the GothicIII tube that information is: (c)Unholy Vault Designs http://asaenath.deviantart.com Your MPTLicense#. I am using Trebuchet MS, 4 points, bold and centered.

You may now save the artist's copy of your tag as a pspimage file.

Using font or alpha of choice, add name of choice to tag. I am using the Bloody Alpha by Sarah Bryan, which is FTU alpha. I have centered the name at H300, V650, actual location may vary depending upon the size and length of name you are using.

Delete the white background layer, and merge visible. Resize to 75% (600 x 600 pxls) and save your tag as a .png image and you're all done!

I hope you enjoyed this tutorial. If you should have a problem, please feel free to E-Mail Me and I'll be happy to help you out.

Sunday, May 9, 2010

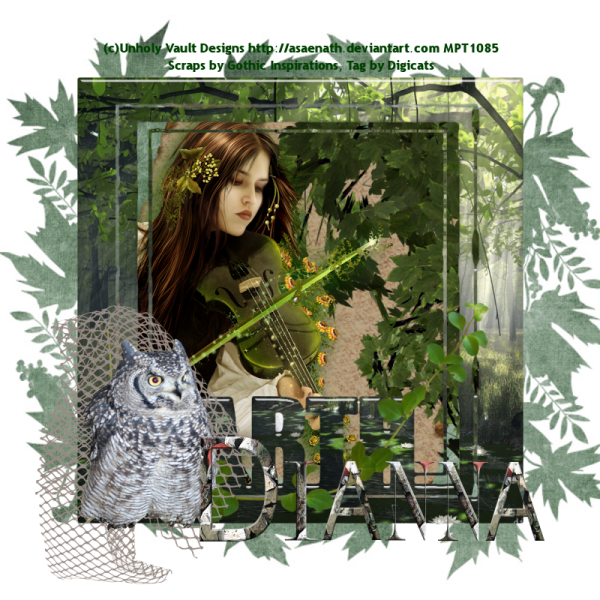
Earth Song tutorial (PTU)

Earth Song


This tutorial was written by Dianna Richards of Digicats (and Dogs)/Di Before Dawn Tutorials. Any resemblance to any other tutorial, published or unpublished, living, dead or undead, is purely coincidental.

Please do not rebroadcast, redistribute or otherwise claim this tutorial or any part there of as your own work.


Items you will need to complete this project:

The Four Elements taggers kit by Gothic Inspirations. This is a PTU kit which may be purchased at the Gothic Inspirations store as well as Digital Chaos.

Don't forget to stop by Jessica's blog and snag the add on for this kit. While you will not need it for this tutorial, you will want it for use in the future.

Tube of choice. I am using psp15525-Sounds of Spring by Unholy Vault Designs. You must have a license to use this tube, which may be purchased at MyPSPTubes.com.

Wee Scots Lass mask #275 which you can download HERE.

Font(s) and/or alpha of choice. I am using Trebuchet MS which is a windows system font, and the Rock alpha by Dreams Fulfilled, which is a FTU alpha that may be downloaded from her blog.


Note that H# and V# refer to Horizontal and vertical coordinates on your canvas grid. Make sure you have View, Rulers checked in order to see the ruler grid.

When I say "Add to your canvas" I expect that you will copy and paste it as a new layer, unless otherwise state in the tutorial.

This tutorial assumes you have a working knowledge of PSP. It was written using PSP X1, but should work in PSP 8 and up.

Open a new raster layer canvas, 800 x 800 pixels, flood filled white.

Open Paper8-GI_TheFourElements. Layer --> Load/Save Mask --> Load Mask from Disk and find Wee Scotts Lass mask #275. Make sure the fit to canvas button is checked, then click on load.

Copy Merged and add to main canvas, centered.

Open Parchment-GI_TheFourElements and resize by 75%. Add to main canvas, centered. Go to Image --> free rotate --> rotate right, 15 degrees.

Open Foilage1_GI_TheFourElements and add to main canvas, centered at H500, V400.

Open psp15525-SCUVD-SoundsofSpring and copy Raster 4. Add to main canvas, centered.

Open Frame3-GI_TheFourElements. Resize to 85%, Copy and add to main canvas, centered.

Using you pick tool, line the left side of the tube up with the inner left side of the frame.

Add a drop shadow of choice to tube. I am using offsets, of Vertical 8, Horizontal -8, opacity 85, blur 35, color forest green (#004000).

Click on your frame layer, Raster 4 to activate.

Open Ivy2-GI_TheFourElements, mirror, copy and add to main canvas, centered at H400, V550.

Open Netting-GI_TheFourElements, resize to 65%, and add to main canvas, centered at H300, V600.

Open Owl-GI_TheFourElements, copy and add to main canvas, centered at H210, V580.

On the materials pallet, set your foreground color to transparent, and your background color to forest green (#004000). Using font of choice, add copyright information to the tag.

For the Sounds of Spring tube, that information is: (c)Unholy Vault Designs http://asaenath.deviantart.com Your_MPTLicense#.

You can now save the artist's copy of your tag as a .pspimage.

Using Font or Alpha of choice, add name of choice to tag. I am using the Rock Alpha by Dreams Fulfilled, which is free to use, full size alpha I have resized for tagging purposes.

I have centered my name at H500, V650 on the canvas. Actual location may vary depending upon size and length of name you are using.

Merge the layers, and resize to 75% to 600 x 600 pxls. Save as a .jpg file and you're all done!

I hope you enjoyed this tutorial. If you should have a problem, please feel free to E-Mail Me and I'll be happy to help you out.