
Tuesday, April 6, 2010

Addicted 2 Rac tutorial

Addicted 2 Rac


This tutorial was written by Dianna Richards of Digicats (and Dogs)/Di Before Dawn Tutorials. Any resemblance to any other tutorial, published or unpublished, living, dead or undead, is purely coincidental.

Please do not rebroadcast, redistribute or otherwise claim this tutorial or any part there of as your own work.


Items you will need to complete this project:

The Addicted to Rac taggers kit by Crazed's Creations. This is a PTU kit, which currently available as part of the Addicted to Rac collaboration at Just4Taggers.com. You may buy this collaboration outright for $10, or you may get it free with a $10 purchase.

Tube of choice. I am using Bad Barbie by Ismael Rac. You must have a license to use this tube, which is available at artisticmindsinc.com.

Wee Scots Lass mask #225 which you can download HERE.

Font(s) and/or alpha of choice. I am using Verdana which is a windows system font, and the Goth Chic alpha by Sarah Bryan. This is a FTU alpha which may be downloaded from Sarah's Blog.


Note that H# and V# refer to Horizontal and vertical coordinates on your canvas grid. Make sure you have View, Rulers checked in order to see the ruler grid.

When I say "Add to your canvas" I expect that you will copy and paste it as a new layer, unless otherwise state in the tutorial.

This tutorial assumes you have a working knowledge of PSP. It was written using PSP X1, but should work in PSP 8 and up.

Open a new raster layers canvas, 800 x 800 pxls, flood filled white.

Open Crazeds_paper11_ATRT. Go to Layers --> Load/Save Mask --> Load Mask from Disk and locate Wee Scots Lass mask #225. Make sure the "Fit to canvas" button is checked, then click on load.

Edit --> Copy Merged and add to main Canvas, centered.

Open Crazeds_doodle3_ATRT and add to main canvas, centered at H400, V200.

Open Crazed_Stars1_ATRT and add to main Canvas, centered at H600, V400. Go to Image --> free rotate --> rotate right, 20 degrees. Duplicate the layer, and mirror.

Open crazeds_frame5_ATRT and add to main canvas, centered at H400, V450.

Open Ismael Rac's Bad Barbie03 and select tube with hair color that appeals to you. Copy and add to main canvas, centered at H400, V450.

Dupilicate the frame layer and drag the duplication over the tube. Set your selection tool to Selection type: Rectangle, Mode: Replace, and select the top half of the duplicated frame. Delete.

Selections --> Section none.

Open Crazeds-starchain1_ATRT and resize to 75%. Add to main canvas centered at H180, V500.

Open Crazed-guitarpick3_ATRT, resize to 75% and add to main canvas, centered at H200, V550.

Open Crazeds_guitar2_ATRT and add to main canvas, centered at H250, V500.

Image --> Free rotate, rotate left, 25 degrees.

On the materials pallet, set your foreground color to transparent, and your background color to very dark purple (#400040). Using font of choice, add the copyright information to the tag. 

For the Bad Barbie tube, that information is (c)Ismael Rac www.xeracx.com Your_AMI_LIcense#

You may now save the artist's version of your tag as a .pspimage file.

Using font or alpha of choice add name of choice to tag. I am using the Goth Chic alpha by Sarah Bryan. I have centered my name at around H450, V580. Actual location will depend upon size and length of name.

Delete the white background layer, and merge visible. Resize to 75% (600 x 600 pxls) and save a .png file and your all done!

I hope you enjoyed this tutorial. If you should have a problem, please feel free to E-Mail Me and I'll be happy to help you out.

Sunday, April 4, 2010

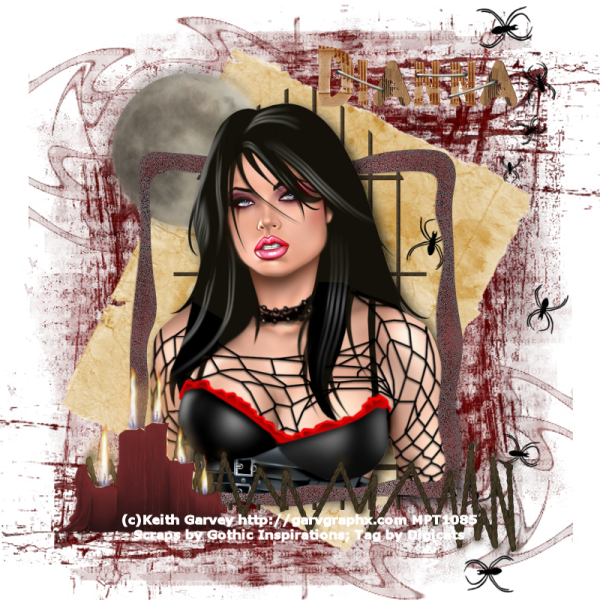
Delusional Tutorial

Delusional


This tutorial was written by Dianna Richards of Digicats (and Dogs)/Di Before Dawn Tutorials. Any resemblance to any other tutorial, published or unpublished, living, dead or undead, is purely coincidental.

Please do not rebroadcast, redistribute or otherwise claim this tutorial or any part there of as your own work.


Items you will need to complete this project:

The Delusional taggers kit by Gothic Inspirations. This is a PTU kit which may be purchased at the Gothic Inspirations store.

Tube of choice. I am using psp13801-KittyKat by Keith Garvey. You must have a license to use this tube, which may be purchased at MyPSPTubes.com.

Wee Scots Lass mask #221 which you can download HERE.

Font(s) and/or alpha of choice. I am using Verdana which is a windows system font, and the Cardboard alpha by Elyane Araujo, which is a PTU alpha.


Note that H# and V# refer to Horizontal and vertical coordinates on your canvas grid. Make sure you have View, Rulers checked in order to see the ruler grid.

When I say "Add to your canvas" I expect that you will copy and paste it as a new layer, unless otherwise state in the tutorial.

This tutorial assumes you have a working knowledge of PSP. It was written using PSP X1, but should work in PSP 8 and up.

Open a new raster layer canvas, floodfilled white.

To begin open a new raster layer canvas, 800 x 800 pxls, flood fill white.

Open Paper20-GI_Delusional. Layers --> Load/Save Mask --> Load Mask from Disk and locate Wee Scots Lass Mask #221. Make sure the fit to canvas box is checked, then click on load.

Copy Merged and add to main canvas, centered.

Open Parchment-GI_Delusional, and add to main canvas, centered. Image --> Free Rotate --> Rotate Right 27 degrees.

Open Moon-GI_Delusional, resize to 50% and add to main canvas, centered at H250, V200.

Open Gates-GI_Delusional copy and add to canvas, centered.

Open Spiders-GI_Delusional and add to main canvas, centered at H650, V400.

Open psp13801-SCGarvey-KittyKat (or tube of choice) and copy the bonus closeup layer. Add to main canvas, centered.

Add drop shadow of choice. I am using Vertical & Horizontal offsets of 7, Opacity 85, blur 25, color black (#000000).

Open Frame3-GI_Delusional and add to main canvas, centered at around H400, V430, or so bottom of the frame matches the bottom of the tube.

Duplicate and on the layers pallet, drag the duplicate under the tube layer.

Return to the main frame layer (Raster 6). Using your selection tool set to Selection: Rectangle, Mode: Replace, select the top half the frame and then press the delete key.

Selections --> Select None.

Open Stitches-GI_Delusional, and add to main canvas, centerd at H400, V650.

Open CandlesMelting-GI_Delusional, resize to 50% and add to main canvas, centered at H200, V600.

On the Materials Pallet, set both your background and foreground colors to white (#ffffff). Using font of choice, add the copyright information to your tag. For the Garvey tube, that information is:

(c)Keith Garvey http://garvgraphx.com Your MPTLicense#

I am using the font Verdana, 4 points, bold and centered.

You can now save the artist's version of your tag as a .pspimage.

Using alpha or font of choice, add name of choice to tag. I am using the Cardboard alpha by Elyane Araujo, which is PTU alpha.

Once I added the alpha I used the Staple from the kit, resized to 50% to "staple" the alpha to the tag.

Delete your white background, and merge visible. Resize to 75% (600 x 600 pxls) and save as a .png file, and you're all done!

I hope you enjoyed this tutorial. If you should have a problem, please feel free to E-Mail Me and I'll be happy to help you out.
Saturday, April 3, 2010

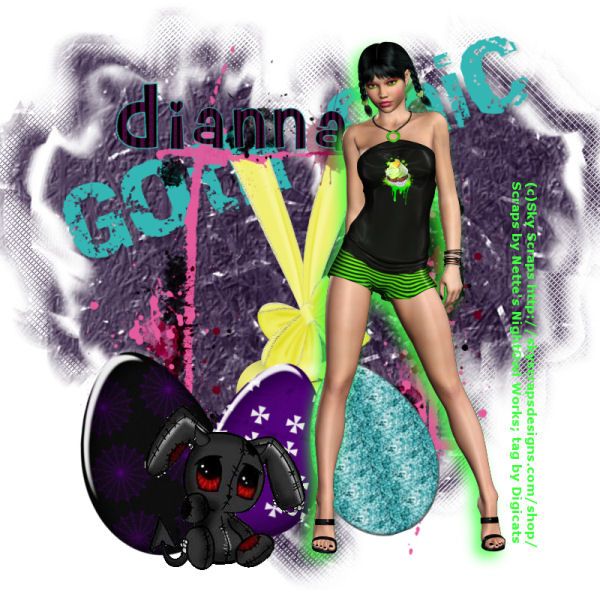
Easter Chic tutorial (FTU)

Easter Chic


This tutorial was written by Dianna Richards of Digicats (and Dogs)/Di Before Dawn Tutorials. Any resemblance to any other tutorial, published or unpublished, living, dead or undead, is purely coincidental.

Please do not rebroadcast, redistribute or otherwise claim this tutorial or any part there of as your own work.


Items you will need to complete this project:

The Goth Chic taggers kit by Nette's NightOwl Works. This is a FTU kit, which can be downloaded from Nette's blog.

Tube of choice. I am using Mandy3a by Sky Scraps. This is a FTU tube which may be obtained at the Sky Scraps Designs store.

The free to use Goth Chic word art by Conchi which may be downloaded at the DiseƱando Scraps blog.

Wee Scots Lass mask #261 which you can download HERE.

Font(s) and/or alpha of choice. I am using Verdana which is a windows system font, and Goth alpha that came enclosed with the kit.


Note that H# and V# refer to Horizontal and vertical coordinates on your canvas grid. Make sure you have View, Rulers checked in order to see the ruler grid.

When I say "Add to your canvas" I expect that you will copy and paste it as a new layer, unless otherwise state in the tutorial.

This tutorial assumes you have a working knowledge of PSP. It was written using PSP X1, but should work in PSP 8 and up.

To begin, open a new raster layer canvas 800 x 800 pxls, flood filled white.

Open nnwgc3. Layers --> Load/Save Mask --> Load Mask from Disk and select Wee Scots Lass mask #261. Make sure the fit to canvas box is checked, then click on load.

Copy Merged and add to main canvas, centered.

Open Wortartgothicchic by Conchi and get gothchic4. Copy and add to main canvas, centered at H400, V200. Image --> Free rotate --> rotate left, 20 degrees.

Open nnwheart2ts and resize to 65%. Add to main canvas, centered.

Open nnwgcspatterframe3, resize by 85% and add to canvas, centered. Using the pick tool, adjust the heart just a bit so that it lines up with the top of the frame.

Open nnwgothegg1, and resize to 35%. Add to canvas centered at H200, V600. Image --> Free Rotate --> Free Rotate left, 15 degrees.

Open nnwgothegg2, and resize to 30%. Add to canvas centered at H350, V600. Image --> Free Rotate --> Free Rotate right, 15 degrees.

Open nnwgothegg4, and resize to 30%. Add to canvas centered at H500, V600. Image --> Free Rotate --> Free Rotate left, 20 degrees.

Open SkyScraps-Mandy3a, and add to main canvas, centered at H550, V400. Add a drop shadow of choice. I am using offsets, vertical of 8, horizontal of -8, opacity of 85, blur of 25, color bright green (#40ff40).

Open nnwgcbunny and add to main canvas, centered at H300, V650.

On the materials pallet, set your foreground color to transparent, and your background color to bright green (#40ff40). Using font of choice add copyright info to your tag. For the Mandy tube, that info is:

(c)Sky Scraps http://skyscrapsdesigns.com/shop/

I am using Verdana, which is a windows system font, 4 points, bold and left justified.

You can now save the artist's copy of your tag as a .pspimage file.

Using font or alpha of choice, add name of choice to tag. I am using the alpha that was included in the kit and have centered the name at H250, V150. Actual location will depend on the length and size of name.

You can now merge visible, resize to 75% (600 x 600 pxls) and save as a .jpg file, and your all done!

I hope you enjoyed this tutorial. If you should have a problem, please feel free to E-Mail Me and I'll be happy to help you out.
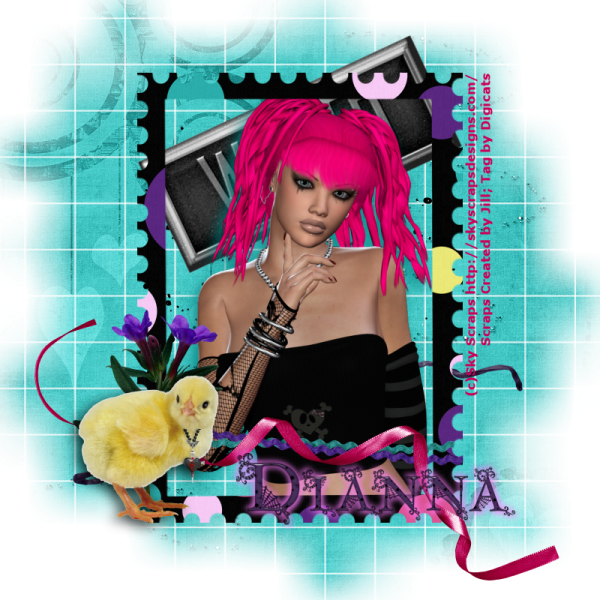
Wicked Chic tutorial (FTU)

Wicked Chic


This tutorial was written by Dianna Richards of Digicats (and Dogs)/Di Before Dawn Tutorials. Any resemblance to any other tutorial, published or unpublished, living, dead or undead, is purely coincidental.

Please do not rebroadcast, redistribute or otherwise claim this tutorial or any part there of as your own work.


Items you will need to complete this project:

The Goth Chic Sampler taggers kit Created by Jill. This is a FTU kit, which can be downloaded from Jill's blog.

Tube of choice. I am using Goth Chic 2 (Close up) by Sky Scraps. This is a FTU tube which may be downloaded from Marie's tubes blog.

Wee Scots Lass mask #281 which you can download HERE.

Font(s) and/or alpha of choice. I am using Verdana which is a windows system font, and the Gothic Chic alpha, which is a FTU alpha by Whispy's D'zines. This is a full sized alpha I have resized for tagging purposes.


Note that H# and V# refer to Horizontal and vertical coordinates on your canvas grid. Make sure you have View, Rulers checked in order to see the ruler grid.

When I say "Add to your canvas" I expect that you will copy and paste it as a new layer, unless otherwise state in the tutorial.

This tutorial assumes you have a working knowledge of PSP. It was written using PSP X1, but should work in PSP 8 and up.

To begin, open a new raster layer canvas, 800 x 800, flood fill white.

Open GCS_paper03_cbj. Layers --> Load/Save Mask --> Load Mask from Disk and locate Wee Scots Lass mask #84. Make sure the fit to canvas layer is checked, then click on load.

Go to image --> resize and resize the mask layer only by 125%. (Unclick the box that says "resize all layers".)

Edit --> copy merged and add to main canvas, centered.

Open GCS_glitter_cbj and add to main canvas, centered at H400, V350.

Open GCS_workart_cbj and add to main canvas, centered at H400, V200. Image --> Free Rotate --> rotate left, 25 degrees.

Open GCS_twine_cbj and add to main canvas, centered at H400, V500.

Open SkyScraps_GC1 and resize to 75%. Add to canvas, centered.

Add a drop shadow of choice. I am using offsets, horizontal of 7, vertical of -7, opacity of 85, blur of 25, and color of #008080.

Open GCS_frame2_cbj, rotate left, copy and add to main canvas, centered. Using your pick tool, adjust it slightly to line up with the bottom edge of the tube.

Open GCS-ricrac2_cbj, resize to 55% and add to main canvas, centered at H400, V600.

On the layers pallet, click on the frame layer to activate, then, using your magic wand, click anywhere outside of the frame to select. With the selection still in place, click on the ricrac2 layer and then press your delete key.

Selections --> Select None.

Open GCS_ribbon_cbj and add to canvas, centered at H400, V600.

Open GCS_flower1_cbj and add to canvas, centered at H200, V550.

Open GCS_chick_cbj, resize to 50% and mirror. Copy and add to main canvas, centered at H200, V600. Add a drop shadow of choice to the chick.

On the materials pallet, set your foreground color to transparent and your background color to Goth Chic red (#cd0059).

Using font of choice, add the copyright info to the tag. For the Sky Scraps tube, that information is: (c)Sky Scraps http://skyscrapsdesigns.com/

You can then save the artist's copy of your tag as a .pspimage.

Using font or alpha of choice, add name of choice to tag. I am using the Gothic Chic alpha by Whispy's D'zines.

I have my name centered at H500, V630, and have added a drop shadow glow (color #ff80ff) to it.

Delete the white background layer and merge visible. Resize to 75% (600 x 600 pxl) and save as a .png file and your all done!

I hope you enjoyed this tutorial. If you should have a problem, please feel free to E-Mail Me and I'll be happy to help you out.
Friday, April 2, 2010

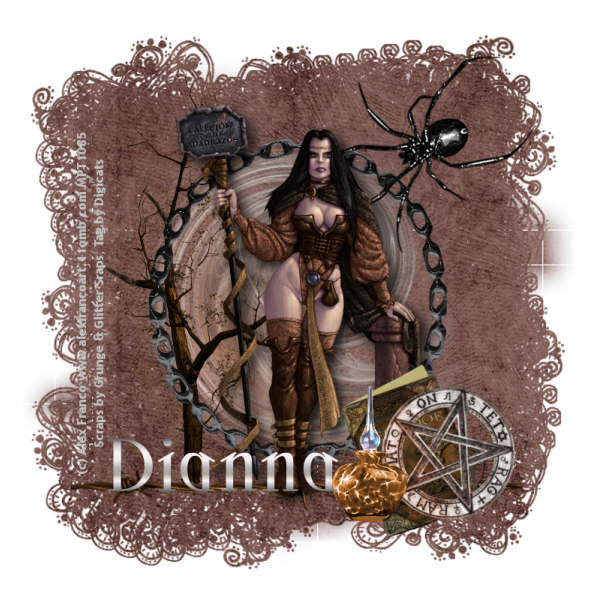
Wytchkraft tutorial (PTU)

WytchKraft


This tutorial was written by Dianna Richards of Digicats (and Dogs)/Di Before Dawn Tutorials. Any resemblance to any other tutorial, published or unpublished, living, dead or undead, is purely coincidental.

Please do not rebroadcast, redistribute or otherwise claim this tutorial or any part there of as your own work.


Items you will need to complete this project:

The The Craft ptu taggers kit by Grunge & Glitter Scraps. This is a PTU kit, which is available exclusively at Sophisti-Scraps.com.

Tube of choice. I am using psp12795-Violet by Alex Franco. You must have a license to use this tube, which may be purchased at MyPSPTubes.com.

Wee Scots Lass mask #283 which you can download HERE.

Font(s) and/or alpha of choice. I am using Trebuchet MS which is a windows system font, and Scythe, which is a free to use font that may be downloaded from Outlaw by Design.


Note that H# and V# refer to Horizontal and vertical coordinates on your canvas grid. Make sure you have View, Rulers checked in order to see the ruler grid.

When I say "Add to your canvas" I expect that you will copy and paste it as a new layer, unless otherwise state in the tutorial.

This tutorial assumes you have a working knowledge of PSP. It was written using PSP X1, but should work in PSP 8 and up.

To begin, open a new raster layer canvas, 800 x 800, flood filled white.

Open Paper8. Layers --> Load/Save Mask --> Load Mask from Disk and select Wee Scots Lass mask #283. Make sure the fit to canvas box is checked, then click on load.

Copy Merged and add to main canvas, centered.

Open magic1, copy and add to main canvas, centered.

Open deadtree and add to canvas, centered at H300, V350.

Open frame1, copy and add to main canvas, centered.

Open spider. Image --> Mirror. Copy and add to main canvas, centered at H500, V200. Image --> Free Rotate --> rotate left, 20 degrees.

Open barbed wire, resize to 75% and add to main canvas, centered at H400, V650.

Open psp12795-SCFranco-Violet (or tube of choice) and add to main canvas, centered.

Add a drop shadow of choice to tube. I am using offsets, vertical and horizontal of 8 each, opacity of 85, blur of 25, color black (#000000).

Open spellbook and add to main canvas, centered at H550, V600.

Open pentagram, resize to 75% and add to main canvas, centered at H600, V600. Image --> Free Rotate --> rotate right, 15 degrees.

Open potionbottle1, add to main canvas centered at H500, V600.

On the materials pallet, set your foreground color to transparent and your background color to light gray (#c0c0c0).

Using font of choice, add the copyright information to your tube. For the Alex Franco tube, that information is: (c) Alex Franco www.alexfrancoart.11omb.com Your MPT_License#.

I am using Trebuchet MS, which is a windows system font, 4 points, bold and centered.

You can now save the artist's copy of your tag as a .pspimage file.

Using font or alpha of choice add name of choice to tag. I am using the font Scythe with a silver gradient, 24 points, Bold, and Centered. I have my name centered at H300, V620, actual location will depend on the length and size of the name you are using.

Delete the white background layer, and merge visible. Resize your tag to 75% (600 x 600) and save as a .png file and your all done!

I hope you enjoyed this tutorial. If you should have a problem, please feel free to E-Mail Me and I'll be happy to help you out.
Batter Up tutorial (PTU)

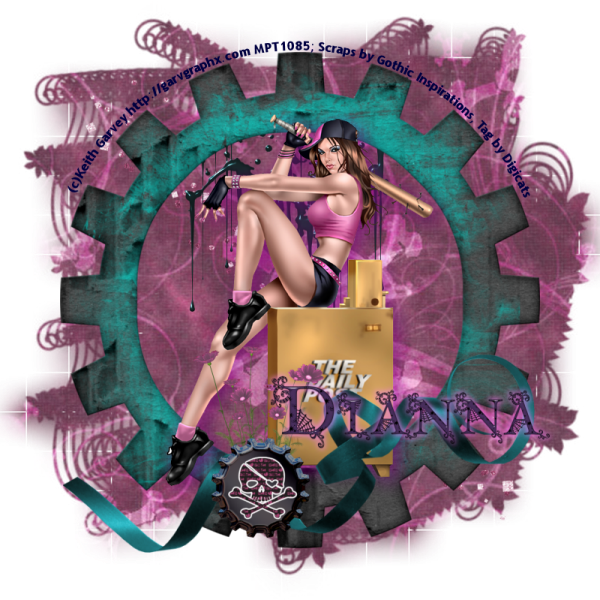
Batter Up


This tutorial was written by Dianna Richards of Digicats (and Dogs)/Di Before Dawn Tutorials. Any resemblance to any other tutorial, published or unpublished, living, dead or undead, is purely coincidental.

Please do not rebroadcast, redistribute or otherwise claim this tutorial or any part there of as your own work.


Items you will need to complete this project:

The Goth Chic taggers kit by Gothic Inspirations. This is a PTU kit, which is available at Gothic Inspirations.

Tube of choice. I am using psp7496-Baseball by Keith Garvey. You must have a license to use this tube, which may be purchased at MyPSPTubes.com.

Wee Scots Lass mask #281 which you can download HERE.

Font(s) and/or alpha of choice. I am using Trebuchet MS which is a windows system font, and the Gothic Chic alpha, which is a FTU alpha by Whispy's D'zines. This is a full sized alpha I have resized for tagging purposes.


Note that H# and V# refer to Horizontal and vertical coordinates on your canvas grid. Make sure you have View, Rulers checked in order to see the ruler grid.

When I say "Add to your canvas" I expect that you will copy and paste it as a new layer, unless otherwise state in the tutorial.

This tutorial assumes you have a working knowledge of PSP. It was written using PSP X1, but should work in PSP 8 and up.

Open a new raster layer canvas, 800 x 800, flood fill white.

Open Paper12_GI_GothChic. Layers --> Load/Save Mask --> Load Mask from Disk and select Wee Scots Lass mask #281. Make sure the fit to canvas box is checked, then click on load.

Copy merged, and add to main canvas, centered.

Open GlitterSpill-GI_GothChic, resize to 75% and add to main canvas, centered.

Oepn Splatter1_GI_GothChic, and add to main canvas, centered at H400, V300.

Open Frame4-GI_GothChic, resize to 75% and add to main canvas, centered.

Open psp7496-SCGarvey-Baseball, copy the tube layer and add to main canvas, centered.

Add a drop shadow of choice to tube. I am using offsets vertical and horizontal of 7 each, opacity of 65, blur of 35 and color of dark purple (#800080).

Open Flowers-GI_GothChic, resize to 35% and add to main canvas, centered at H350, V550.

Open Ribbon2-GI_GothChic and add to main canvas, centered at H400, V600.

Open BottleCap1-GI_GothChic, resize to 50% and add main canvas, centered at H350, V650.

On the Materials pallet, set your foreground color to transparent and your background color to navy blue (#000040).

Using font of choice, add copyright info to the tag. For the Garvey Baseball tube, that information is:

(c)Keith Garvey http://garvgraphx.com Your_MPT_LIcense#

I am using Trebuchet MS, which is a windows system font, 4 points, bold and centered, then I fit the text to path around the outside of the frame.

It is beyond the scope of this tutorial to explain how to do that, I promise I will write a separate tutorial for that soon, as long as my computer doesn't crash again.

You can now save your artist's copy as a .pspimage file.

Using font or alpha of choice, add name of choice to tag. I am using the Goth Chic alpha by Whispy's D'zines. I located my alpha centered at H550, V550, but actual location will depend on the size and length of the name your are using. I then added a drop shadow offsets V & H of 3 each, opacity 65, blur 10, color #ff80ff to make it stand out, as it's a dark alpha.

you can now delete the white background layer, merge visible and resize your tag to 75% (600 x 600 pxls). Save as a .png file and your all done.

I hope you enjoyed this tutorial. If you should have a problem, please feel free to E-Mail Me and I'll be happy to help you out.
Thursday, April 1, 2010

Goth Chic Tutorial (FTU)

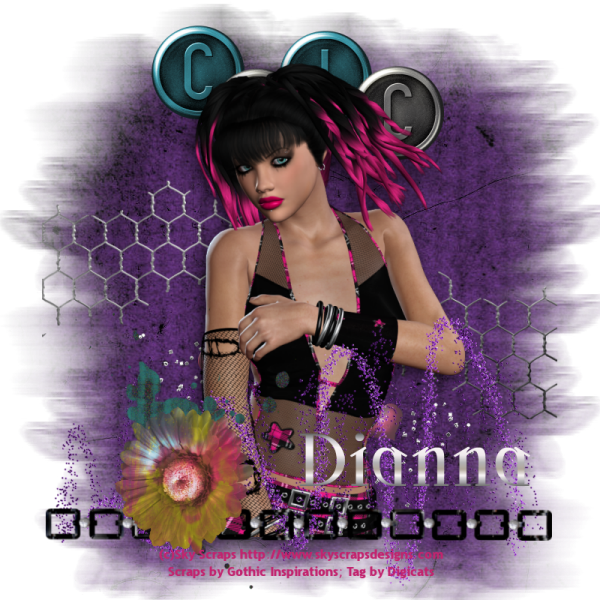
Goth Chic


This tutorial was written by Dianna Richards of Digicats (and Dogs)/Di Before Dawn Tutorials. Any resemblance to any other tutorial, published or unpublished, living, dead or undead, is purely coincidental.

Please do not rebroadcast, redistribute or otherwise claim this tutorial or any part there of as your own work.


Items you will need to complete this project:

The Goth Chic Sampler taggers kit by Gothic Inspirations. This is a FTU kit, which is available on Jessica's Blog.

Tube of choice. I am using Goth Chic 7 (Close up) by Sky Scraps. This is a PTU tube which may be purchased at Sky Scraps Designs. Sky has a FTU Goth Chic tube which may be substituted for this one which is available at Marie's Blog.

Wee Scots Lass mask #260 which you can download HERE.

Font(s) and/or alpha of choice. I am using Trebuchet MS which is a windows system font, and Scythe, which is a free to use font that may be downloaded from Outlaw by Design.


Note that H# and V# refer to Horizontal and vertical coordinates on your canvas grid. Make sure you have View, Rulers checked in order to see the ruler grid.

When I say "Add to your canvas" I expect that you will copy and paste it as a new layer, unless otherwise state in the tutorial.

This tutorial assumes you have a working knowledge of PSP. It was written using PSP X1, but should work in PSP 8 and up.

Open a new raster layer canvas, flood filled white.

Open Paper3-GI_GothChicSampler. Layers --> Load/Save Mask --> Load Mask from Disk and locate Wee Scots Lass mask #260. Make sure the fit to canvas box is checked, then click on load.

Copy Merged and add to main canvas, centered.

Open Tule-GI_GothChicSampler and resize to 85%. Add to main canvas, centered.

Open HeartSpill-GI_GothChicSampler, and add to main canvas,centered at H400, V550.

Open WordArtTabs-GI_GothChicSampler and add to main canvas, centered at H400, V120.

Open SkyScraps-GC7 (or tube of choice). Resize to 85% and add to main canvas, centered. Add drop shadow of choice, I am using offsets, vertical of 7, horizontal -7, opacity 65, blur of 35, color black (#000000).

Open Glitter-GI_GothChicSampler, resize to 85% and add to main canvas, centered at H400, V600.

Open Chain-GI_GothChicSampler, resize to 85% and add to main canvas, centered at H400, V700.

Open Splatter-GI_GothChicSampler, resize to 75% and add to main canvas, centered at H350, V600.

Open Flower-GI_GothChicSampler, resize to 35% and add to main canvas, centered at H250, V650.

on the materials pallet, set your foreground color to transparent and your background color to Goth Chic red (#c3246f). using font of choice, enter the copyright information for the tube you are using.

For the Goth Chic tube, that information is (c)Sky Scraps http://www.skyscrapsdesigns.com

I am using Trebuchet MS, which is a windows system font, 4 points, bold and centered.

You can now save the artist's copy of your tag as a .pspimage file.

Using font or alpha of choice, add the name of choice to the tag. I am using the font Scythe, 36 points, bold and center with my material foreground set to transparent and my material background set to a silver gradient. I have centered at the name at H550, V650. Actual location will depend upon the size and length of the name you are using.

You can now delete the background layer, Merge visible, resize to 75% (600 x 600 pxls) and save your tag as a .png file and your all done!

I hope you enjoyed this tutorial. If you should have a problem, please feel free to E-Mail Me and I'll be happy to help you out.