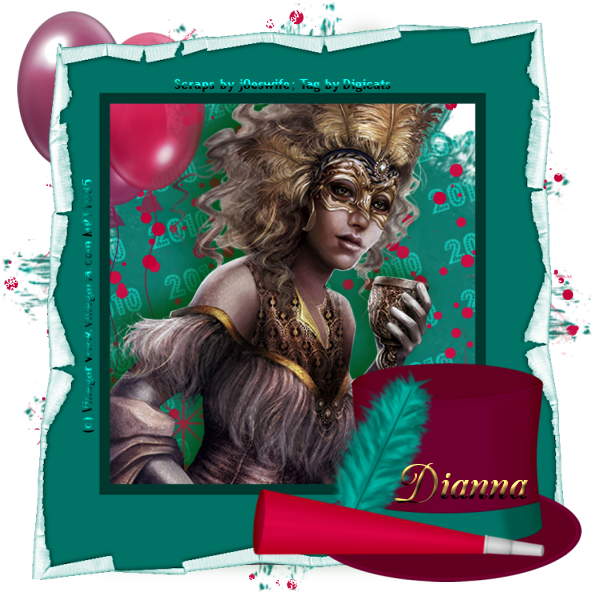
This tutorial was written by Dianna Richards of Digicats (and Dogs)/Di Before Dawn Tutorials. Any resemblance to any other tutorial, published or unpublished, living, dead or undead, is purely coincidental.
Please do not rebroadcast, redistribute or otherwise claim this tutorial or any part there of as your own work.
Items you will need to complete this project:
The Rockin New Year taggers kit by Scraps by j0eswife. This is FTU kit that is available on Tanya's blog.
Tube of choice. I am using psp11783-SCVinegar Carnival by Vinegar. You must have a license to use this tube, which is available at MyPSPTubes.com.
Wee Scots Mask #178 which you can download HERE.
Font(s) of choice. I am using Trebuchet MS, which is a windows system font, and Champagne, which is a FTU font available at www.outlawbydesign.com.
Note that H# and V# refer to Horizontal and vertical coordinates on your canvas grid. Make sure you have View, Rulers checked in order to see the ruler grid.
When I say "Add to your canvas" I expect that you will copy and paste it as a new layer, unless otherwise state in the tutorial.
This tutorial assumes you have a working knowledge of PSP. It was written using PSP X1, but should work in PSP 8 and up.
Open a new raster layers canvas, 800 x 800, flood fill white.
Open SBJ_Paper_08, and resized to 80%. Go to Layers --> Load/Save Mask --> Load Mask from Disk and locate Wee Scots Lass Mask #178. Make sure the "Fit to Canvas" box is checked, then click on load.
Copy Merged and add to your main canvas, centered.
Open Sparkles 3 and add to canvas. On the Layer pallet, click on the paper layer to activate. Using you magic wand tool, click anywhere around the the outside of the paper (anywhere in the white area).
On the Layers pallet, click on the sparkles layer to active (Raster 2), then press the delete key. This will get ride of the sparkles that fall outside the paper area.
Selections --> Select None.
Open SBJ_Balloon_1 and add to canvas, centered at H100, V350.
Open SBJ_Balloon_2 and add to canvas, centered at H150, V400.
Open SBJ_Balloon_3 and add to canvas, centered at H200, V375.
Resize canvas to 75% (600 x 600 pxls). Make sure the resize all layers box is checked!
Open psp11783-SCVinegar Carnival (or tube of choice) and add tube layer to your canvas, centered.
Open SBJ_Frame_10, and resize to 80%. Add to canvas, centered.
Using your pick tool, slide the tube over to the left so that it matches up with the inside edge of the frame.
Add a drop shadow of choice to your tube. I am using offsets, vertical and horizontal of -10 each, opacity of 80, blur of 35 and color of dark green (#004000).
Click on the frame layer (Raster 7) to activate.
Open SBJ_PartyHat_1, resize to 65%, and add to canvas, centered at H400, V475.
Open SBJ_Feather_2, and add to canvas, centered at V374, H450. Image --> Free Rotate --> Right, 25 degrees.
Open SBJ_PartyHorn_4. Resize to 65%, but UNCHECK the resize all layers box. Image --> Free Rotate --> Free Rotate right, 44 degrees. Mirror, then add to your main canvas, centered at H400, V520.
On the Materials Pallet, set your foreground color to transparent, and your background color to SeaGreen (#00b4a3). Using font of choice, add the copyright information to your tag. For the Vinegar tube, the information is:
(c) Vinegar www.vinegaria.com Your_MPT_License#
I am using Trebuchet MS, 8 points, bold, and centered.
Save the artist's copy as a .pspimage file.
On the Materials Pallet, set your foreground color to transparent, and your background color to Gold (#c7a253).
Using Font of choice, add the name desired to the tag. I am using the Champagne font, 36 points, Bold, centered and located the name at around H470, V490. Actual location of your name will depend on length and size of font you are using.
Convert the name layer to a raster layer, then go to Effects --> 3D Effects --> Inner Bevel. I am using the following settings:
Bevel: 2, Width: 9, Smoothness: 29, Depth: 26, Ambiance: 0, Shininess: 20, Color: #ffffff, Angle: 355, Intensity: 40, Elevation: 35.
Delete the white background layer, Merge Visible and save your tag as a .png file, and you're all done!
I hope you enjoyed this tutorial. If you should have a problem, please feel free to E-Mail Me and I'll be happy to help you out.
No comments:
Post a Comment