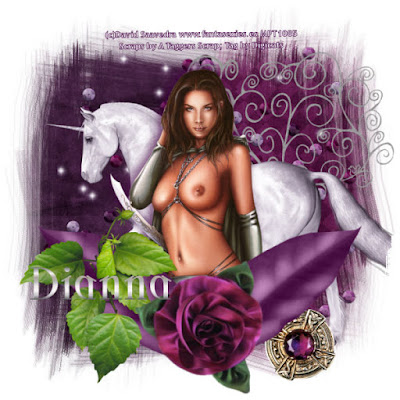
This tutorial was written just after amethyst midnight by Dianna Richards of Digicats (and Dogs)/Di Before Dawn Tutorials. Any resemblance to any other tutorial, published or unpublished, living, dead or undead, is purely coincidental.
Please do not rebroadcast, redistribute or otherwise claim this tutorial or any part there of as your own work.
Items you will need to complete this project:
The Amethyst Folly Mega Taggers Kit by A Taggers Scrap. This is a PTU kit which may be purchased exclusively at Sophisti-Scrap.com.
Tube of choice. I am using psp14860-Elven by David Saavedra. You must have a license to use this tube, which is available at MyPSPTubes.com.
Wee Scots Mask #117 which you can download HERE.
Font(s) and/or alpha of choice. I am using Trebuchet MS which is a windows system font, and the Scythe font, which is a FTU font that can be downloaded from Outlaw by Design.
Note that H# and V# refer to Horizontal and vertical coordinates on your canvas grid. Make sure you have View, Rulers checked in order to see the ruler grid.
When I say "Add to your canvas" I expect that you will copy and paste it as a new layer, unless otherwise state in the tutorial.
This tutorial assumes you have a working knowledge of PSP. It was written using PSP X1, but should work in PSP 8 and up.
To begin, open a new raster layer canvas, 800 x 800 pxls, flood filled white.
Open paper4. Open edgeoverlay5, and add to paper4, centered at H100, V400. Merge down.
Layers --> Load/Save Mask --> Load Mask from Disk and locate WSL mask #117. Make sure the "Fit to canvas" button is checked, then click on load. Edit-->Copy Merged, then add to your main canvas a new raster layer.
Open SequinSpill, and add to main canvas, centered.
Open SilverTree and add to main canvas, centered at H550, V400.
Open unicorn and add to main canvas, centered at H500, V450.
On the materials pallet, click on the paper layer (Raster 1) to activate. Using your magic wand, click anywhere outside the paper to select.
On the materials Pallet, click on the unicorn layer (Raster 4) and press delete. This erases the parts of the unicorn that fall outside the paper area.
Selections --> Select none.
Open psp14860-SCSaavedra-Elven. copy the Arwen layer and add to your main canvas, centered.
Open Leaf4 and resize to 75%, Add to your main canvas. Image --> free rotate --> left, 25 degrees. Relocate to center at H200, V600. Duplicate and mirror.
Open greenery2 and resize to 75%, add to your main canvas, centered at H200, V600. Use your eraser tool to erase the parts of the stem (only) that fall outside the masked paper area. (Leave the leaves intact.)
Open Satinflower and add to canvas, centered at H400, V650. Using your eraser tool, erase the stem bits of the leaf4s that show below the flower.
On the Layers pallet, click on the tube layer (Raster 3) to active, then add a drop shadow of choice to the tube. I am using offsets horizontal and vertical of -7, opacity of 65, blur of 25, color very dark purple (#400040).
Open Gem and add to canvas, centered at H600, V690.
On the materials pallet, set your foreground color to very dark purple (#400040) and your background color to white (#ffffff). Using font of choice, add the copyright information to your tag. For the David Saavedra tube that information is:
(c)David Saavedra www.fantasexies.es Your_MPTLicense#
I am using Trebuchet MS, which is a windows system font, 4 points, Bold and centered and located the information centered at H400, V80.
You can now save the artist's copy of your tag as a .pspimage file.
On your layers pallet, make sure you top layer, the Satin Rose layer, is active. if not, click on it to activate. Using font or alpha of choice, add name of choice to tube.
I am using Scythe, 22 points, bold and centered and have my foreground color set to transparent on the materials pallet, and the Metal Steel gradient set as my background color for the lettering.
I centered my name at H200, V600. Actual location will vary depending upon the size and length of name you are using.
Merge visible, resize to 75% (600 x 600) and save your file as a .jpg file and you're all done. Alternately you can drop the white background layer before you merge and resize and save a .png.
As I'm sure someone at Photoprude will take offense to the semi-clothed state of the artwork I'm using, I've stored this tube on Picasa so we'll stick with .jpg.
I hope you enjoyed this tutorial. If you should have a problem, please feel free to E-Mail Me and I'll be happy to help you out.
No comments:
Post a Comment