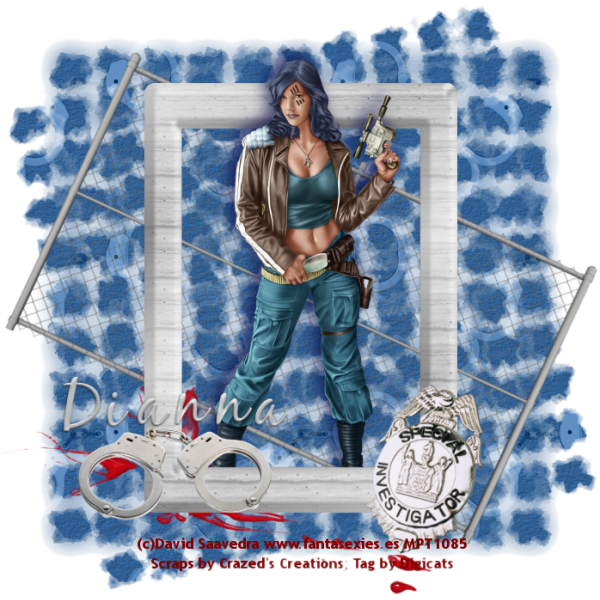
This tutorial was written by Dianna Richards of Digicats (and Dogs)/Di Before Dawn Tutorials. Any resemblance to any other tutorial, published or unpublished, living, dead or undead, is purely coincidental.
Please do not rebroadcast, redistribute or otherwise claim this tutorial or any part there of as your own work.
Items you will need to complete this project:
The Crime Scene taggers kit by Crazed's Creations. This is a PTU kit which may be purchased at Scrappetizing.com.
Tube of choice. I am using psp14859-BountyHunter by David Saavedra. You must have a license to use this tube, which is available at MyPSPTubes.com.
Wee Scots Mask #126 which you can download HERE.
Font(s) and/or alpha of choice. I am using Trebuchet MS which is a windows system font, and the Metal Gel alpha by Marie Stones. This is a FTU (full-sized) alpha which is available at Free Digital Scrapbooking.com.
Note that H# and V# refer to horizontal and vertical coordinates on your canvas grid. Make sure you have View, Rulers checked in order to see the ruler grid.
When I say "Add to your canvas" I expect that you will copy and paste it as a new layer, unless otherwise state in the tutorial.
This tutorial assumes you have a working knowledge of PSP. It was written using PSP X1, but should work in PSP 8 and up.
To begin, open a new raster layer canvas, 800 x 800 pxls, flood fill white.
Open Crazeds_paper14_CSt. Layers --> Load/Save Mask --> load mask from disk and locate WSL mask #126. Mare sure the fit to canvas button is checked, then click on load.
Edit --> Copy Merged and add to your main canvas, centered.
Open Crazeds_fence_medi_CST and add to main canvas, centered. Image --> free rotate --> rotate right, 25 degrees.
Open Crazeds_bloodsplatter1_SCT, and add to your main canvas, centered at H300, V600.
Open Crazeds_securitycamera_CST, resize to 75%, and add to main canvas, centered at H400, V100.
Open Crazeds_frame5_CST and add to main canvas, centered.
Open psp14859_SCSaavedra-BountyHunter, copy "layer" (the tube layer, not the close up) and add to main canvas, centered. *
On the layers pallet, click on the frame layer, and duplicate. Drag the frame copy over your tube layer.
Set your selection tool to rectangle, mode:replace, and select the top half of the frame copy. Press delete.
Selections --> Select None.
Open Crazeds-badge2_CST, resize to 50% and add to the main canvas, centered at H550, V550.
Image --> Free Rotate --> Rotate right, 15 degrees.
Open Crazeds_handcuffs2_medi_CST, resize to 50% and add to canvas centered at H250, V600.
On the materials pallet, set your foreground color to transparent and your background color to dark red (#800000).
Using font of choice, add the copyright information to your tag. For the Bounty Hunter tube, that information is:
(c)David Saavedra www.fantasexies.es YourMPTLicense#
I am using Trebuchet MS, 4 points, bold and centered and located the copyright at H400, V700.
You can now save the artist's copy of your tag as a .pspimage file.
Using font of alpha of choice add name of choice to tag. I am using the Metal Gel alpha, composed the name on a separate canvas, merged down, and added it to the tag as one element. I centered it at H250, V525, although the final location will depend on the size the length of name you are using.
Layers --> Merge --> Merge Visible.
Activate your magic wand tool, sent to Mode: Replace; Match mode: RGB Value; Tolerance:10, Feather: 2. The contiguous and Anti-alias boxes should be checked and it should be set to outside. Click on your canvas, anywhere in the white background around the tag.
Selections --> Invert. Image --> Crop to selection.
Resize your canvas, to width 600 pxls, then go to Image --> Canvas size and readjust the canvas size to Width 600 pxls, height 600 pxls, with the placement set to center.
Save your tag as a .png image and you're all done!
I hope you enjoyed this tutorial. If you should have a problem, please feel free to E-Mail Me and I'll be happy to help you out.
* Note: I was writing this in the middle of the night and forgot to add a drop shadow to the tube. You should probably add a drop shadow of choice to your tube. Offsets - horizontal and vertical - of -7 each, opacity of 65 and blur of 25 works well, with the color of either black (#000000) or navy blue (#000040).
No comments:
Post a Comment