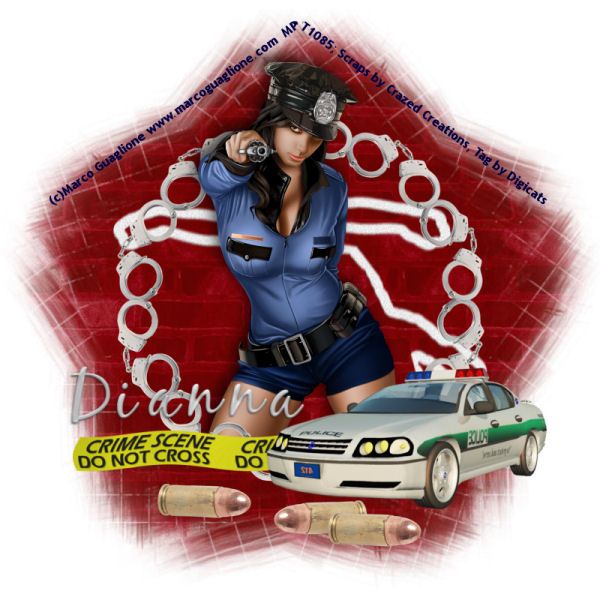
This tutorial was written by Dianna Richards of Digicats (and Dogs)/Di Before Dawn Tutorials. Any resemblance to any other tutorial, published or unpublished, living, dead or undead, is purely coincidental.
Please do not rebroadcast, redistribute or otherwise claim this tutorial or any part there of as your own work.
Items you will need to complete this project:
The Crime Scene taggers kit by Crazed's Creations. This is a PTU kit which may be purchased at Just4Taggers.com.
Tube of choice. I am using PSP12851-DenisePolice by Marco Guaglione. You must have a license to use this tube, which is available at MyPSPTubes.com.
Wee Scots Mask #141 which you can download HERE.
Font(s) and/or alpha of choice. I am using Trebuchet MS which is a windows system font, and the Metal Gel alpha by Marie Stones. This is a FTU (full-sized) alpha which is available at Free Digital Scrapbooking.com.
Note that H# and V# refer to horizontal and vertical coordinates on your canvas grid. Make sure you have View, Rulers checked in order to see the ruler grid.
When I say "Add to your canvas" I expect that you will copy and paste it as a new layer, unless otherwise state in the tutorial.
This tutorial assumes you have a working knowledge of PSP. It was written using PSP X1, but should work in PSP 8 and up.
Open a new raster layer canvas, 800 x 800 pxls, flood filled white.
Open Crazeds_paper22_CST. Go to layers --> load/save mask --> load mask from disk and locate WSL mask # 141. Make sure the fit to canvas button is checked, then click on load.
Image --> Flip.
Image --> Resize, 115%. Make sure the Resize all layers box is UNCHECKED, as you only want to resize the mask.
Edit --> copy merged and add to your main canvas, centered.
Open Crazed_chalkoutline2_CST and add to main canvas, centered.
Open Crazeds_frame2_CST. Copy and add to main canvas, centered.
Open PSP12851-SCGuaglione-DenisePolice and copy the tube layer. Add to the main canvas, centered at H400, V350.
On the layers pallet, duplicate the cuff frame (Raster 3) and drag the copy over the tube layer (Raster 4).
Set your selection tool to rectangle, replace, and select the top half of the duplicate cuff frame (Copy of Raster 3). Press the delete key to delete that portion of the copy.
Selection, select none.
Open Crazeds_tape1_CST, resize to 75% and add to the main canvas, centered at H400, V600.
Open Crazeds_copcar_CST, and Mirror. Resize to 75% and add to you main canvas centered at H550, V475.
Open Crazed_bullet2_CST, rotate right and resize by 50%. Add several copies, at random, along the bottom potion of the tag between V600 and V700. You may mirror the bullets as you please.
On the layers pallet, click on the tube layer and add a drop shadow of choice. I am using offsets, vertical and horizontal of -7 each, opacity of 65, blur of 25, color black (#000000).
Click on your top layer to activate.
On the materials pallet, set your foreground color to transparent and your background color to navy blue (#000040). Using font of choice, add the copyright information to your tag. For the Denise Police tube, that information is:
(c)Marco Guaglione www.marcoguaglione.com Your MPTLicense#
I am using Trebuchet MS, 4 points, bold and centered and fit my text to path using a pentagon shape.
It is beyond the scope of this tutorial to explain how to fit text to path, although I promise I'll write a separate tutorial one day soon explain the process in case you don't know how to do it.
You can now save the artist's copy of the tag as a .pspimage file.
Using font of alpha of choice add name of choice to tag. I am using the Metal Gel alpha, composed the name on a separate canvas, merged down, and added it to the tag as one element. I centered it at H250, V525, although the final location will depend on the size the length of name you are using.
Delete the white background layer, and go to layers --> merge --> merge visible.
Resize your tag by 75% to 600 x 600 pxls. (Make sure you've rechecked the "resize all layers" box if you hadn't done so previously.) Save the tag as a .png file and you're all done. Alternately you can keep the white background and save the file as a .jpg file.
I hope you enjoyed this tutorial. If you should have a problem, please feel free to E-Mail Me and I'll be happy to help you out.
No comments:
Post a Comment