This tutorial was written by Dianna Richards of Digicats (and Dogs)/Di Before Dawn Tutorials. Any resemblance to any other tutorial, published or unpublished, living, dead or undead, is purely coincidental.
Please do not rebroadcast, redistribute or otherwise claim this tutorial or any part there of as your own work.
Items you will need to complete this project:
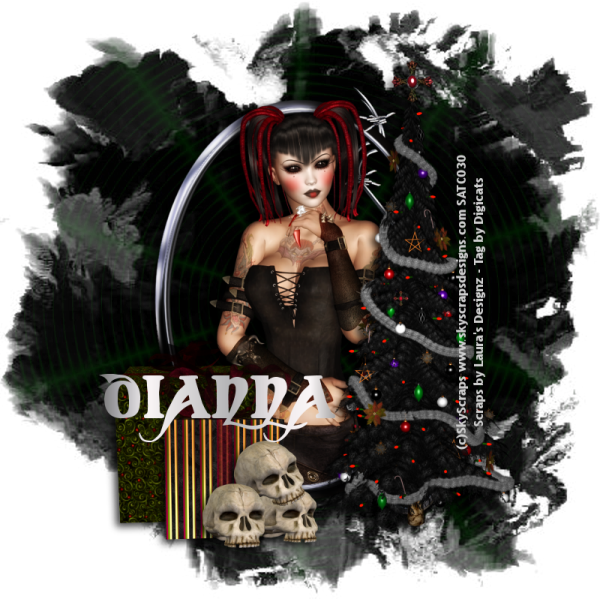
A Gothic Kind of Christmas taggers kit by Laura's Designz, which is a PTU kit that can be purchased at Scraps and the City.
Tube of choice. I am using Buffy Gaian Dark (or Buffy6 from the Buffy Bundle) by Sky Scraps. You must have a license to use this tube, which is available at Scraps and the City.
Mask of choice. I am using the Grunge16 mask by Nik's Scripts & Scraps which is part of her PSP Masks Mega Pack.
Font(s) and/or alpha of choice.
Note that H# and V# refer to Horizontal and vertical coordinates on your canvas grid. Make sure you have View, Rulers checked in order to see the ruler grid.
When I say "Add to your canvas" I expect that you will copy and paste it as a new layer, unless otherwise state in the tutorial.
This tutorial assumes you have a working knowledge of PSP. It was written using PSP X3, but should work in PSP 8 and up.
To begin, open a new raster layer canvas, 800 x 800 pxl, flood fill white.
Open LD_AGKOC_Paper8. Layers -> load/save mask -> load mask from disk and select mask of choice. Make sure the fit to canvas button is checked, then click on load.
I am using Nik's Grunge16 from Nik's Scripts and Scraps.
Edit -> Copy Special -> Copy Merged and add to main canvas, centered.
Open LD_AGKOC_ELement26, and add to main canvas, centered.
Open LD-AGKOC_ELement7, and add to main canvas, centered at H550, V400.
Open tube of choice. I am using Buffy6 by Sky Scraps. Resize to 75%, and add to main canvas, centered.
On the layers pallet, right click on the frame (Raster 2) and duplicate. Right click on the Copy of Raster2 -> Arrange -> Bring to top.
With your selection tool set to rectangle, replace, select the top half of the Copy of Raster 2, and delete.
Selections -> Select None.
Click on Raster 4 to activate. Using your eraser tool, erase the bits of the tube that are showing outside the bottom of the frame.
On the layers pallet, right click on the tree layer (Raster3) -> Arrange -> Bring to top.
Open LD_AGKOC_Element8, resize to 50% and add to main canvas, centered at H250, V575.
Open LD_AGKOC_Element10, resize to 50% and add to main canvas, centered at H300, V600.
Open LD_AGKOC_Element25, resize to 35% and add to main canvas, centered at H350, V660.
Add a drop shadow of choice to each of the elements on your main canvas, except for Copy of Raster2 (the frame copy) and the background paper, Raster1. I am using offsets vertical 5, horizontal -5, opacity 75, blur 15, color black (#000000).
Click on Raster7 to activate.
On the materials pallet, set your foreground color to transparent and your background color to silver (#cdcdcd). Using font of choice, add the copyright information to your tag. I am using Trebuchet MS, which is a windows system font, 4 points, bold and centered. I then free rotated the text left, 90 degrees centered it at H625, V400. You can of course put the copyright on the tag where ever you please.
You can now save the artist's copy of the tag as a .pspimage.
Using a nice suitable Gothy sort of font, add the name of choice to the tag. I am using Coverack Demo, which you can snag HERE. I have the name centered at H300, V525 or there abouts. The actual location will vary depending upon the size of the font and length of the name you are using.
Drop the white background layer, merge visible and resize your tag to 75% (600 x 600 pixels). Save a .png file, and you're all done!
I hope you enjoyed this tutorial. If you should have a problem, please feel free to E-Mail Me and I'll be happy to help you out.
No comments:
Post a Comment