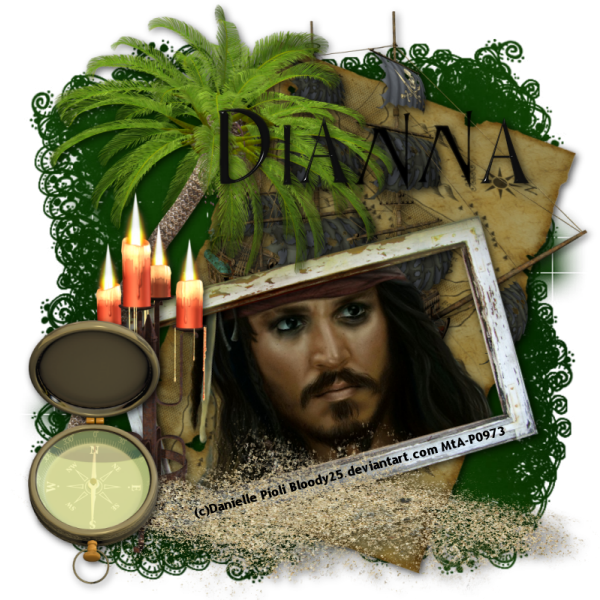
This tutorial was written by Dianna Richards of Digicats (and Dogs)/Di Before Dawn Tutorials. Any resemblance to any other tutorial, published or unpublished, living, dead or undead, is purely coincidental.
Please do not rebroadcast, redistribute or otherwise claim this tutorial or any part there of as your own work.
Items you will need to complete this project:
The Arrr Treasure Isle taggers kit by Gothic Inspirations, which is a PTU kit available at Gothic Inspirations.com.
Tube of choice. I am using Jack Sparrow, by Danielle Pioli. This is a FTU tube, but you must have a license to use this tube, which is available at MIStaken Art.
Mask of choice. I am using Wee Scots Mask #283 which you can download HERE.
Font(s) and/or alpha of choice. I am using Trebuchet MS, which is a windows system font, and the Black Epoxy alpha, which is a FTU alpha you can download from Free Digital Scrapbooking.com.
Note that H# and V# refer to Horizontal and vertical coordinates on your canvas grid. Make sure you have View, Rulers checked in order to see the ruler grid.
When I say "Add to your canvas" I expect that you will copy and paste it as a new layer, unless otherwise state in the tutorial.
This tutorial assumes you have a working knowledge of PSP. It was written using PSP X3, but should work in PSP 8 and up.
To begin, open a new raster layer canvas, 800 x 800 pxl, flood fill white.
Open paper of choice, I am using Paper12-GI_ArrrTreasureIsle. Layers -> Load/save mask -> Load mask from disk and select mask of choice. I am using Wee Scots Lass mask #283. Make sure the fit to canvas box is checked, then click on load.
Resize to 90%. Edit -> Copy special -> Copy merged and add to canvas, centered.
Open Map2-GI_ATresIsle, resize to 90% and add to main canvas, centered. Free Rotate -> rotate right -> 20 degrees.
Open Ship-GI_ATresIsle, resize to 75% and add to main canvas, centered at H525, V250.
Open Danielle Pioli's Jack Sparrow and select the tube layer. Copy and add to the main canvas, centered at H450, V500. Image -> free rotate -> rotate left, 15 degrees.
Open Frame3-GI_ATresIsle, resize to 65%, and add to main canvas, centered at H525, V500. Image -> free rotate -> rotate left, 15 degrees.
Use your pick tool to make any fine adjustments to the tube and the frame.
Open Palm2-GI_ATresIsle, resize to 90% and mirror. Add to main canvas centered at H285, V350.
Open Candles-GI_ATresIsle, resize to 75%, and add to main canvas, centered at H200, V500.
Open SandSmuge-GI_ATresIsle and add to main canvas, centered at H400, V675.
Open Compass-GI_ATresIsle, resize to 75%, and add to main canvas, centered at H125, V600.
On the materials pallet, set your foreground color to transparent, and your background color to #000000. Using font of choice, add the copyright information to your tag.
I am using Trebuchet MS, which is a windows system font, 4 points, bold and centered.
For the Jack Sparrow tube, that information is: (c)Danielle Pioli bloody25.deviantart.com Your_MtA-License#
You may also add the background credit and tagged by information at this time if you so choose.
I have free rotated my text left, 15 degrees to match the frame and aligned it on the bottom of the frame.
Starting with the map layer (Raster2) on your materials pallet and working upward, add a drop shadow of choice to the elements in your tag.
I am using offsets vertical and horizontal of 3 each, opacity of 75, Blur of 15, and color black (#000000). So NOT add a drop shadow to your copyright information.
You can now save the artist's copy of your tag as a .pspimage file.
Using font or alpha of choice, add name of choice to the tag. I have located the name at H500, V200. Actual location my vary depending upon the size the length of the name you are using.
Add matching drop shadow to the name.
Drop the white background layer, and merge visible. Resize to 75% (600 x 600 pixels), and save as a .png file and you're all done!
I hope you enjoyed this tutorial. If you should have a problem, please feel free to E-Mail Me and I'll be happy to help you out.
No comments:
Post a Comment