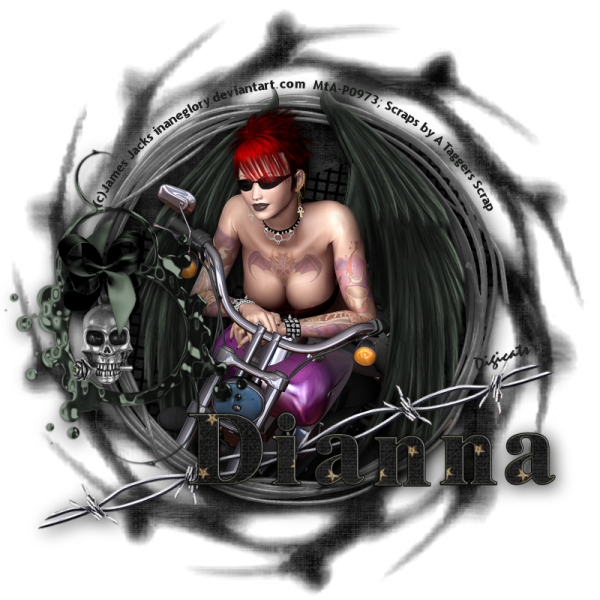
This tutorial was written by Dianna Richards of Digicats (and Dogs)/Di Before Dawn Tutorials. Any resemblance to any other tutorial, published or unpublished, living, dead or undead, is purely coincidental.
Please do not rebroadcast, redistribute or otherwise claim this tutorial or any part there of as your own work.
Items you will need to complete this project:
The Black Dagger Brotherhood: Wrath taggers kit by A Taggers Scrap, which is a PTU kit available at Scraps and the City.
Tube of choice. I am using PinUp3, by James Jacks. You must have a license to use this tube, which is available at MIStaken Art.
Mask of choice. I am using the tambourine mask by Nik's Scripts & Scraps which is part of her PSP Masks Mega Pack.
Font and/or Alpha of choice. I am using the PTU Tricksters alpha by Gemini Creationz, which is also available at Scraps and the City.
Note that H# and V# refer to Horizontal and vertical coordinates on your canvas grid. Make sure you have View, Rulers checked in order to see the ruler grid.
When I say "Add to your canvas" I expect that you will copy and paste it as a new layer, unless otherwise state in the tutorial.
This tutorial assumes you have a working knowledge of PSP. It was written using PSP X3, but should work in PSP 8 and up.
To begin, open a new raster layer canvas, 800 x 800 pxl, flood fill white.
Open paper of choice. I am using Paper4.jpg. Layers -> Load/Save Mask -> Load mask from disk and select mask of choice. I am using Nik's Tambourine.
Make sure the fit to canvas button is checked, then click on load.
Edit -> Copy Special -> Copy Merged and add to main canvas, centered.
Open Mesh.png and add to main canvas, centered. Image -> Free rotate -> rotate left, 17 degrees.
Open Frame5 and add to main canvas, centered.
Open darkwings. Edit -> Copy special -> copy merged and add to main canvas, centered.
Open tube of choice. I am using JamesJacks PinUp3 - TubeCU1. Add to main canvas, centered.
On the layers pallet, click on the frame layer (Raster3) and duplicate. Drag the copy over the top of the tube layer, Raster4.
With your selection tool set to rectangle, replace, select the top half the Copy of Raster3 and delete.
Selections -> Select None.
Using your eraser tool, erase the bits of the tube that fall below the frame on the bottom. Also erase the parts of the mesh that fall outside the frame on either side.
On the layers pallet, click on the Copy of Raster 3 to activate.
Open Darkwings, and copy only the right hand wing and add to canvas. Relocate it to match it's copy on the canvas (right around H500, V390). Erase the bits of the wing that cover the girl's shoulder and arm.
Open Frame2, resize to 75% and rotate right. Add to main canvas, centered at H170, V450.
Open charm, resize to 75%, and add to main canvas, centered at H140, H430.
Open bow2, resize to 50% and add to main canvas, centered at H140, V370.
Open Wire deco, and add to main canvas. Image -> Free rotate -> Left 17 degrees and relocate to H400, V600.
Starting with the frame layer (Raster 3) and working upward, add a drop shadow of choice to the elements on the tag except for Copy of Raster 3 (the frame copy).
I am using offsets of vertical & horizontal 4, opacity 80, blur 35 and color black (#000000).
On the materials pallet, set your foreground color to transparent and you background color to very dark green (#1b1e1b).
Using font of choice, add copyright information to the tag. For the PinUp3 tube, that information is:
(c)James Jacks inaneglory.deviantart.com Your_MTALicense#
I am using Trebuchet MS, which is a windows system font, 4 points, bold and centered. I then fit the text to path to wrap it around the frame.
It is outside the scope of this tutorial to explain how to do that.
Add a white drop shadow to the text to make it stand out against the background.
You can add the tagged by information at this time as well.
Save the artist's copy of your work as a .pspimage file.
Using font or alpha of choice, add name of choice to tag. I'm an alpha whore, so I'm using the Trickster alpha by Gemini Creationz.
I have the name centered at H500, v600, and added a matching drop shadow to it. Remember that where your name is located will depend on the length of the name and the size of the alpha or font you are using.
Drop the White background layer and merge visible. Resize to 75%, and save as a .png file and you're all done.
I hope you enjoyed this tutorial. If you should have a problem, please feel free to E-Mail Me and I'll be happy to help you out.
No comments:
Post a Comment