This tutorial was written by Dianna Richards of Digicats (and Dogs)/Di Before Dawn Tutorials. Any resemblance to any other tutorial, published or unpublished, living, dead or undead, is purely coincidental.
Please do not rebroadcast, redistribute or otherwise claim this tutorial or any part there of as your own work.
Items you will need to complete this project:
TheSteam Valley taggers kit by Digicats (& Dogs). This is a PTU kit that is available at Stargazer Scraps.
Tubes of choice. I am using I See Something you Don't, by Fantasio. This is a PTU tube, and you must have a license to use this tube, which is available at My Tubed Art.
Mask of choice. I am using the Grunge26 mask by Nik's Scripts & Scraps which is part of her PSP Masks Mega Pack.
Font(s) and/or alpha of choice. I am using Century Gothic which is a Windows System font. If you do not have it, you can download it HERE.
I am also using the Voyager Now alpha by Lady Noelle Buttons and Bows. This is a PTU alpha. Please consult Lady Noelle's blog for purchasing information.
Note that H# and V# refer to horizontal and vertical coordinates on your canvas ruler grid. Make sure you have View -> Rulers checked in order to see the ruler grid.
When I say "Add to your canvas" I expect that you will copy and paste it as a new layer, unless otherwise stated in the tutorial.
This tutorial assumes you have a working knowledge of PSP. It was written using PSP X3, but should work in PSP 8 and up.
To begin, open a new raster layer canvas, 800 x 800 pxl, flood fill white.
Open paper of choice. I am using DCD_StVa_Paper20. Layers -> Load/Save Mask -> Load mask from Disk and select mask of choice. I am using Grunge26 by Nik's Scripts and Scrap. Make sure the fit to canvas box is checked, then click on load.
Edit -> Copy Special -> Copy Merged and add to main canvas, centered.
Open DCD_StVa_Frame07 and add to main canvas, centered.
Click on paper layer to activate. Open DCD_St_Va_Gears and resize to 75%. Image -> Mirror. Add to main canvas, centered at H600, V400.
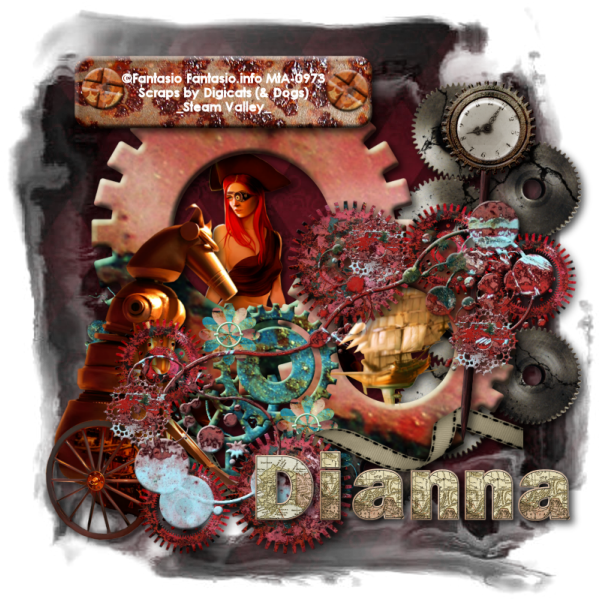
Open tubes of choice. All the tubes I am using come from Fantasio's I See Something you Don't. Resize all layers to 75%. Copy the woman with scull and add to main canvas, centered at H340, V420. Copy Flying Ship and add to main canvas, centered at H525, V450.
Return to the top layer, Raster 2, the frame layer.
Open DCD_StVa_Ribbon03 and resize to 75%. Add to main canvas, centered at H400, V600.
Open DCD_StVa_Steam Sticker and add to main canvas, centered at H650, V350.
Mirror the Steampunk Dog tube and add to main canvas, centered at H200, V500.
Open DCD-StVa_Deco1 and add to main canvas, centered at H450, V500.
With your selection tool sent to rectangle, replace, feather 0, select the front part of the flying ship tube. Right click on Raster 5 on the layers pallet and -> Promote Selection to layer.
Right click on the promoted selection, and go to Arrange -> Bring to top.
Selections -> Select None.
Open DCD_StVa_Tag02. On the materials pallet, set both your foreground and background colors to white (#ffffff). Using font of choice, add the copyright information to the tag. For the Fantasio tube, that information is:
©Fantasio Fantasio.info MtA_License#
I am using Century Gothic, 4 points, bold and centered. I also added the background credits and tagged by information at this point.
Merge visible and add to main canvas, centered at H300, V125.
Starting with Raster 3, the gears layer and working upward on you layers pallet add a drop shadow of choice to each of the elements on your main canvas, except the promoted selection. I am using offsets, vertical and horizontal of 5 each, opacity of 75%, blur of 15 and color black (#000000).
You should now save the artist's copy of your tag as a .pspimage file.
Using font or alpha of choice, add desired name to tag. I am using the Voyager Now alpha by Lady Noelle, and have centered at my name at H550, V650. I then added a drop shadow to match the used on the rest of the tag.
Drop the white background layer and merge visible, resize to 75% (600 x 600 pixels) and save as a .png file and you are all done.
I hope you enjoyed this tutorial. If you should have a problem, please feel free to E-Mail Me and I'll be happy to help you out.
No comments:
Post a Comment