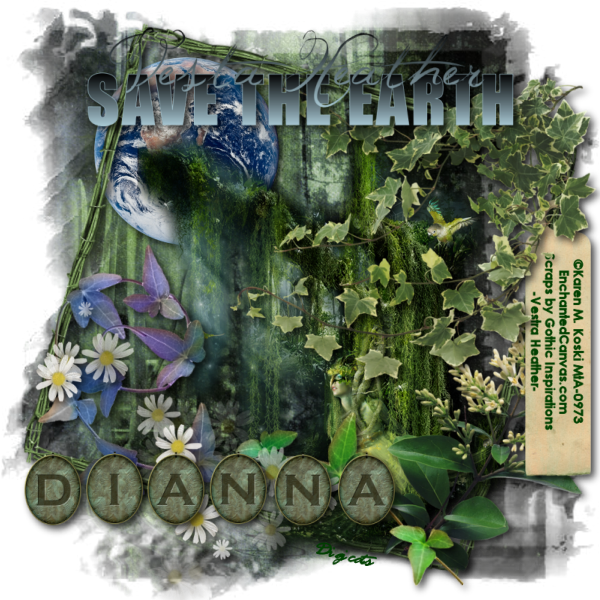
This tutorial was written by Dianna Richards of Digicats (and Dogs)/Di Before Dawn Tutorials. Any resemblance to any other tutorial, published or unpublished, living, dead or undead, is purely coincidental.
Please do not rebroadcast, redistribute or otherwise claim this tutorial or any part there of as your own work.
Items you will need to complete this project:
The Vestra Heather taggers kit by Gothic Inspirations, This is a PTU kit that is part of the new Earth Day collab at Stargazer Scraps. It is free with a $10 purchase, or you can purchase the collab outright for $12.50.
Tube of choice. I am using Earth, by Karen M. Koski. This is a PTU tube, and you must have a license to use this tube, which is available at My Tubed Art.
Mask of choice. I am using the Grunge31 mask by Nik's Scripts & Scraps which is part of her PSP Masks Mega Pack.
Font(s) and/or alpha of choice. I am using Century Gothic which is a Windows System font. If you do not have it, you can download it HERE.
I am also using the Charmed alpha by C. Papier. This is a free to use alpha that may be downloaded at the link provided.
Note that H# and V# refer to horizontal and vertical coordinates on your canvas ruler grid. Make sure you have View -> Rulers checked in order to see the ruler grid.
When I say "Add to your canvas" I expect that you will copy and paste it as a new layer, unless otherwise stated in the tutorial.
This tutorial assumes you have a working knowledge of PSP. It was written using PSP X3, but should work in PSP 8 and up.
To begin, open a new raster layer canvas, 800 x 800 pxl, flood fill white.
Open paper of choice I am using Paper3-GI_VestaHeather. Resize to 800 x 800 pixels. Layers -> Load/Save Mask -> Load mask from Disk and select mask of choice. I am using Grunge31 by Nik's Scripts and Scraps. Make sure the fit to canvas box is checked, then click on load.
Edit -> Copy Special -> Copy Merged, then add to main canvas, centered.
Open Earth and resize to 40%. Add to main canvas, centered at H250, V200.
Open Frame5 and resize to 75%. Add to main canvas, centered. Image -> Free rotate -> Rotate right, 15 degrees.
Open tube of choice. I am using Earth by Karen M. Koski. Copy tube 3, and add to main canvas, centered at H425, V450.
Open Ivy and resize to 75%. Add to main canvas, centered at H550, V300.
Open Leaves1 and rotate right, then Mirror. Add to main canvas, centered at H600, V300. Image -> Free Rotate -> Rotate right, 30 degrees.
Open Daisies and resize to 75%. Add to main canvas, centered at H600, V250.
Open Floral1, resize to 75%, and mirror. Click on Raster 4, the tube layer, to activate, then add to main canvas, centered at H600, V600. Using your eraser tool erase the bits that fall below the frame on the bottom of the canvas.
Open Tag and resize to 75%. Rotate left. On the materials pallet, set both your foreground and your background colors to dark green (#004000). Using font of choice, add copyright information to the tag. for the Earth tube, that information is:
©Karen M. Koski EnchantedCanvas.com MtA-(License#)
I am using Century Gothic, 4 points, bold and centered. I also added the background credits and tagged by information at this point.
Merge visible, then rotate tag right. Copy and add to main canvas, centered at H750, V450.
Return to top layer.
Open WordArt and resize to 75%. Add to main canvas, centered at H400, V100.
Starting with Raster 2 on your layers pallet, the earth layer, and working upward, add a drop shadow of choice to each of the elements on your main canvas. I am using offsets, Vertical and horizontal of 5 each, opacity of 75%, blur of 15 and color black (#000000).
You should now save the artist's copy of your tag as a .pspimage file.
Using font or alpha of choice, add desired name to tag. I am using the Charmed alpha by C. Papier. I have my name centered at H275, V650, and added a drop shadow to match the rest of the elements on the canvas.
Drop the white background layer and merge visible, resize to 75% (600 x 600 pixels) and save as a .png file and you are all done.
I hope you enjoyed this tutorial. If you should have a problem, please feel free to E-Mail Me and I'll be happy to help you out.
No comments:
Post a Comment