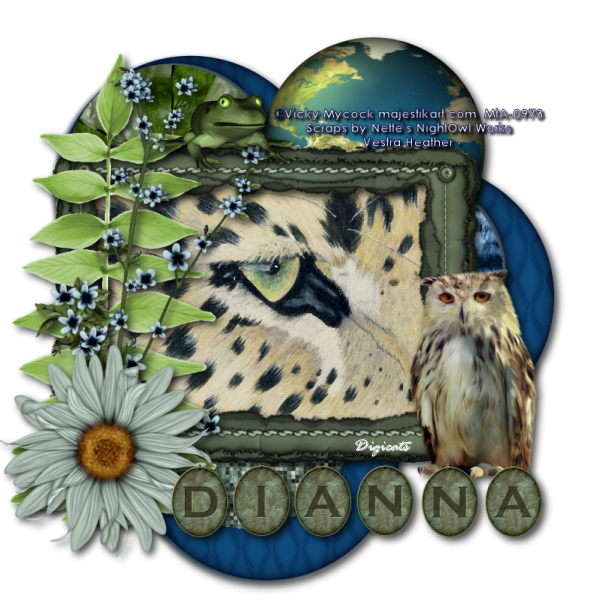
This tutorial was written by Dianna Richards of Digicats (and Dogs)/Di Before Dawn Tutorials. Any resemblance to any other tutorial, published or unpublished, living, dead or undead, is purely coincidental.
Please do not rebroadcast, redistribute or otherwise claim this tutorial or any part there of as your own work.
Items you will need to complete this project:
The Vestra Heather taggers kit by Nette's NightOwl Works, This is a PTU kit that is part of the new Earth Day collab at Stargazer Scraps. It is free with a $10 purchase, or you can purchase the collab outright for $12.50.
Tube of choice. I am using Watching, by Majestik Art. This is a PTU tube, and you must have a license to use this tube, which is available at My Tubed Art.
Font(s) and/or alpha of choice. I am using Century Gothic which is a Windows System font. If you do not have it, you can download it HERE.
I am also using the Charmed alpha by C. Papier. This is a free to use alpha that may be downloaded at the link provided.
Note that H# and V# refer to horizontal and vertical coordinates on your canvas ruler grid. Make sure you have View -> Rulers checked in order to see the ruler grid.
When I say "Add to your canvas" I expect that you will copy and paste it as a new layer, unless otherwise stated in the tutorial.
This tutorial assumes you have a working knowledge of PSP. It was written using PSP X3, but should work in PSP 8 and up.
To begin, open a new raster layer canvas, 800 x 800 pxl, flood fill white.
Open nnw ed quilted frame and resize to 50%. Copy and add to main canvas three times located at (1) H250, V250, (2) H550, V400, and (3) H300, V600.
Open paper of choice and resize to 50%. I am using nnw ed paper 3. Copy. With your magic wand, click inside frame 1. Selections -> Modify -> Expand, 8 pixels.
Edit -> Paste into selection. Selections - Select none.
Repeat with second and third papers of choice using frames 2 and 3. I am using paper11 and paper5, respectively.
Open nnw ed earth and resize to 50%. Add to main canvas, centered at H500, V200.
Open nnw ed cluster2 and resize to 65%. Add to main canvas, centered at H350, V400.
Open tube of choice. I am using Watching by Majestik Art. Copy the Image layer and add to main canvas, centered at H350, V400. (Right over the frame layer.)
On the layers pallet, right click on the frame layer, Raster 5 and go to Arrange -> Bring to Top.
With your magic wand, click anywhere outside the frame layer to select. On the layers pallet, click on the image layer, Raster 6, and press the delete key.
Selections -> Select none. Return to top layer.
Open nnw ed leaves and resize to 75%. Add to main canvas, centered at H150, V400.
Open nnw ed blossom and mirror. Resize to 75%, and add to main canvas, centered at H200, V400.
Open nnw ed daisy and resize to 35%. Add to main canvas, centered at H150, V600.
Open nnw ed frog and resize to 35%. Add to main canvas, centered at H300, V175.
Open nnw ed owl2 and resize to 35%. Add to main canvas, centered at H625, V500.
On the Materials pallet, set your foreground color to Dark Blue (#000040), and your background color to white (#000000). Using font of choice, add copyright information to the tag. For the watching tube, that information is:
©Vicky Mycock majestikart.com MtA-(License #)
I am using Century Gothic, 4 points, bold and centered. I also added the optional background credits and tagged by information at this point. I have my credits centered at H550, V170.
Using the following settings add a drop shadow to your copyright info: offsets of 3 each, opacity of 100, blur of 5 and color black (#000000).
Starting with Raster 1, the first frame layer, and working upward on your layer pallet, add a drop shadow of choice to each of the elements on your main canvas, except for the tube layer, Raster 6, and the copyright layer. I am using offsets, vertical and horizontal, or 5 each, opacity of 75, blur of 15 and color black (#000000).
You should now save the artist's copy of your tag as a .pspimage file.
Using font or alpha of choice, add desired name to tag. I am using the Charmed alpha by C. Papier. I have my name centered at H475, V670, and added a drop shadow to match the rest of the elements on the canvas.
Drop the white background layer and merge visible, resize to 75% (600 x 600 pixels) and save as a .png file and you are all done.
I hope you enjoyed this tutorial. If you should have a problem, please feel free to E-Mail Me and I'll be happy to help you out.
No comments:
Post a Comment