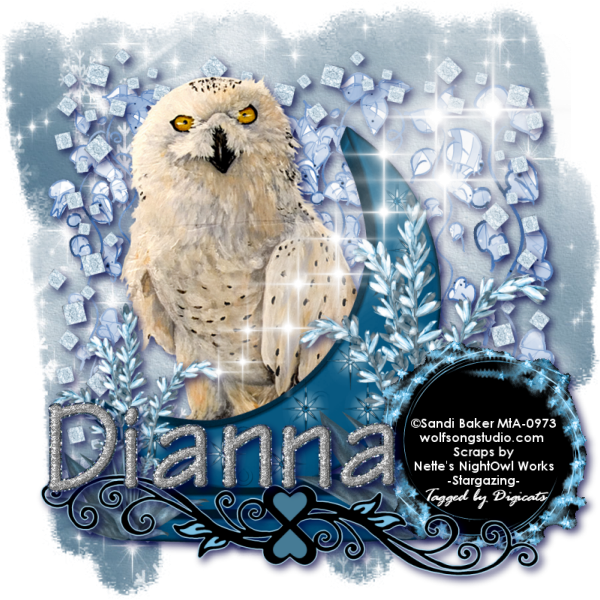
This tutorial was written by Dianna Richards of Digicats (and Dogs)/Di Before Dawn Tutorials. Any resemblance to any other tutorial, published or unpublished, living, dead or undead, is purely coincidental.
Please do not rebroadcast, redistribute or otherwise claim this tutorial or any part there of as your own work.
Items you will need to complete this project:
The Stargazing taggers kit by Nette's NightOwl Works. This is a PTU kit that is available at Stargazers Scraps.
Tube of choice. I am using Snow Owl, by Sandi Baker. This is a PTU tube, and you must have a license to use this tube, which is available at My Tubed Art.
Mask of choice. I am using the Nik_020908_13 mask by Nik's Scripts & Scraps which is part of her PSP Masks Mega Pack.
Font(s) and/or alpha of choice. I am using Century Gothic which is a Windows System font. If you do not have it, you can download it HERE.
The Moonbeam alpha by Julie It Is. This is a free to use alpha that you may download from Julie's blog HERE. Be sure to leave her a thank you if you download.
Note that H# and V# refer to horizontal and vertical coordinates on your canvas ruler grid. Make sure you have View -> Rulers checked in order to see the ruler grid.
When I say "Add to your canvas" I expect that you will copy and paste it as a new layer, unless otherwise stated in the tutorial.
This tutorial assumes you have a working knowledge of PSP. It was written using PSP X3, but should work in PSP 8 and up.
To begin, open a new raster layer canvas, 800 x 800 pxl, flood fill white.
Open paper of choice. I am using nnw sg paper9. Resize to 800 x 800 pixels. Layers -> Load/Save Mask -> Load Mask from Disk. I am using Nik_020908_13. Make sure the fit to canvas box is checked, then click on load.
Edit -> Copy Special -> Copy Merged, then add to main canvas, centered.
Open nnw sg vines and resize to 75%. Add to main canvas, centered at H400, V350.
Open nnw sg diamond border and resize to 75%. Add to main canvas, centered.
Open tube of choice. I am using Snow Owl by Sandi Baker. Copy the tube layer and add to main canvas, centered.
Open nnw sg moon flowers and resize to 75%. Add to main canvas centered at H400, V450.
Using your erase tool, erase the bits of the tube that show to the right and left of the moon flowers element. Return to top layer.
Open a second paper of choice. Use something sort of solid colored - I am using nnw sg paper 6. Open nnw sg star circle and resize to 50%. Copy and paste onto the paper your have just chosen.
using your magic wand (feather set to 0), click anywhere outside the star circle to select. Selections, invert. Selections -> Modify -> Contract 3 pixels Edit -> Copy Special -> Copy Merged, then add to your main canvas, centered at H650, V600.
On the materials pallet, set your foreground color to transparent, and your background color to white (#ffffff). Using font of choice, add the copyright information to the canvas, centering over the Star Circle "tag" you just created. For the Snow Owl tube, that information is:
©Sandi Baker wolfsongstudio.com MtA-0973
I am using Century Gothic, 4 points, bold and centered. I also added the additional background credits and tagged by information at this point. I have my credits centered at H650, V600.
Open nnw sg doodle1 and resize to 75%. Add to main canvas, centered at H400, V700.
Starting with the Vine layer, Raster 2, and working upward, add a drop shadow of choice to each of the elements on your main canvas, except the copyright layer (Vector 1).
I am using offsets - vertical and horizontal - of 5 each, opacity of 75%, blur of 15 and color of dark blue (#000040).
Open nnw sg whitish sparkes and resize to 75%. Mirror. Add to main canvas, centered at H500, V300.
You should now save the artist's copy of your tag was a .pspimage file.
Using font or alpha of choice, add desired name to tag. I am using the Moonbeam Alpha by Julie It Is. I have my name centered at H300, V600, and added a drop shadow to match the rest of the elements on the canvas.
Drop the white background layer and merge visible, resize to 75% (600 x 600 pixels) and save as a .png file and you are all done.
I hope you enjoyed this tutorial. If you should have a problem, please feel free to E-Mail Me and I'll be happy to help you out.
No comments:
Post a Comment