This tutorial was written by Dianna Richards of Digicats (and Dogs)/Di Before Dawn Tutorials. Any resemblance to any other tutorial, published or unpublished, living, dead or undead, is purely coincidental.
Please do not rebroadcast, redistribute or otherwise claim this tutorial or any part there of as your own work.
Items you will need to complete this project:
The Hocus Pocus taggers kit by Grunge and Glitter Scraps. This kit is available for purchase at Sophisti-Scraps as well as other fine stores.
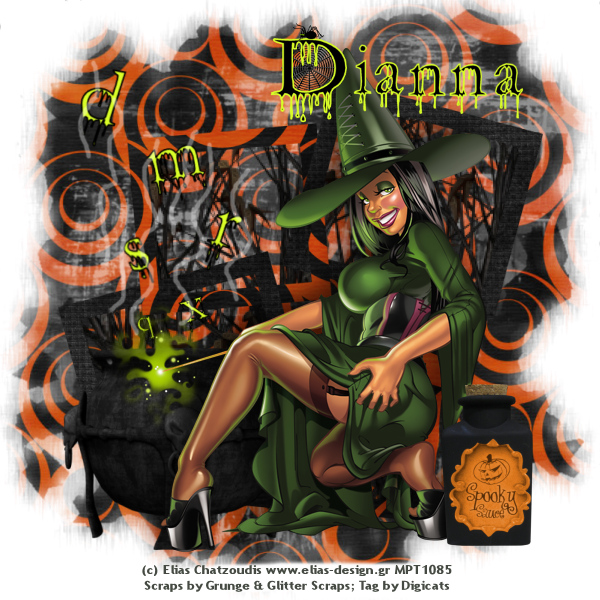
Tube of choice. I am using psp10758 Hocus Pocus by Elias Chatzoudis. You must have a license to use this tube, which is available at www.mypsptubes.com.
Wee Scots Mask #222 which you can download HERE.
Alpha of choice. I am using the "Creepy Alpha" by Winter's Loft which is a FTU alpha available for download on her blog.
Note that H# and V# refer to Horizontal and vertical coordinates on your canvas grid. Make sure you have View, Rulers checked in order to see the ruler grid.
When I say "Add to your canvas" I expect that you will copy and paste it as a new layer, unless otherwise state in the tutorial.
This tutorial assumes you have a working knowledge of PSP. It was written using PSP X1, but should work in PSP 8 and up.
Open a new raster canvas 800 x 800 pxls., flood fill White.
Open GG_Hocus Pocus-paper. Layers --> Load/Save Mask --> Load mask from Disk. Find WSL Mask 222. Make sure the Fit to canvas box it checked and then click on load.
Edit --> Copy Merged and add to canvas, centered.
Using your pick tool, expand the boundaries out to fit the canvas.
Open dead Bush, enlarge to 200%, and add to canvas, centered. Open Frame 1, and add to canvas, centered.
On the Materials pallet, click on the paper layer, raster 1, and set to invisible. Then activate the bush layer.
Using your eraser tool, erase all the parts of the bush that are not inside the frames area. (You might want to set your eraser to Corel_01_04, as there's a lot of it.)
click on the frame layer to activate it.
Open Cauldron, resize to 75% and add to canvas centered at H250, V600.
Open alpha of choice. I am using Creepy SC g&b by Winter's Loft. Select letters at random and place the on your canvas over the cauldron. Use your pick tool to resize the ones closer to the cauldron smaller, with the ones further up, larger. you can also tilt them to taste.
Resize canvas to 75%, 600 x0 600 Pxls. Open my psp10758 Elias Chatzoudis Hocus Pocus (or tube of choice).
Copy the tube layer, and add to your canvas, centered. Add a drop shadow of choice to tube. I am using Vertical and Horizontal offsets of -10 each, Opacity of 60, blur of 35, color #000000 black.
On the layer menu, click to activate your paper layer and make it visible. Then reselect your tube layer (which may be raster 12 depending upon how many letters you used).
Using the drop down box in the upper left hand corner of the layers pallet, add a new raster layer. On the materials pallet, set your foreground color to white (#ffffff).
Click on your paint brush tool, and set it to Corel_01_002, size 5, hardness 25. Change the opacity level to 35.
Using your brush, draw some wavy lines over the cauldron to make it look like steam is coming out. (See example.) Painting over the letters is fine.
Open Bottle 2, resize to 50%, and add to canvas, centered at H500, V500.
Use your erase tool to erase any of the background below 560 or 570 on the vertical scale.
Add your copyright info and license number to the tag. You can then save your artist's copy as a .pspimage.
Using the same or similar alpha to the one you used earlier, add you name (or desired name) to the tag, centered at around H400, V80. Resize to taste.
Drop (delete) the white background layer, merge visible and save as a .png file, and your all done!
I hope you enjoyed this tutorial. If you should have a problem, please feel free to E-Mail Me and I'll be happy to help you out.
No comments:
Post a Comment