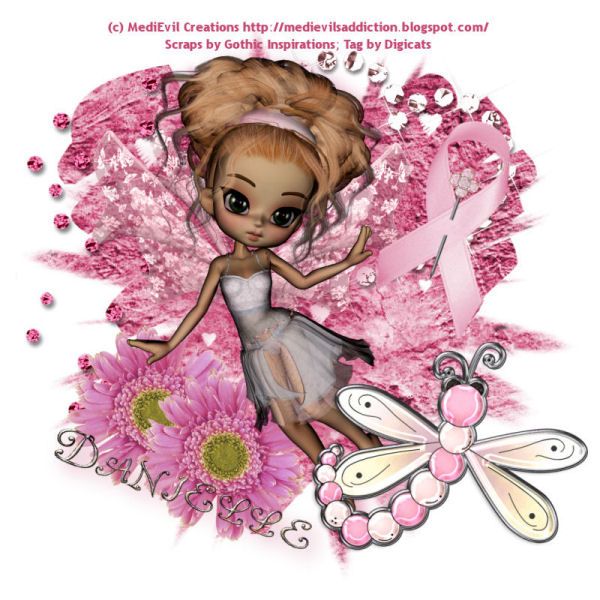
This tutorial was written for my friend's daughter, Danielle, who at the age of 5 is too young to appreciate either breasts, or breast cancer. She was however, born with a congenial heart defect and has been through two open heart surgeries in her life and faces yet a 3rd, sometime before the age of 12. She can totally sympathize with anyone who has an "ouchie on their chest".
This tutorial was written by Dianna Richards of Digicats (and Dogs)/Di Before Dawn Tutorials. Any resemblance to any other tutorial, published or unpublished, living, dead or undead, is purely coincidental.
Please do not rebroadcast, redistribute or otherwise claim this tutorial or any part there of as your own work.
Items you will need to complete this project:
The BCA Taggers Kit from Gothic Inspirations, which is a FTU kit. (Remember that FTU is not the same is "Free to Share" and please leave a thank you when you download it.)
Tube of choice. I am using Gossamer by MediEvil Creations, which is available at TKO Scraps. According to Medi, Gossamer Fairies roam the Earth making things all nice and sparkly. Danielle is very much into pink AND sparkly!
Wee Scots Mask #202 which you can download HERE.
Alpha or Font of choice. I am using the VintageLicious Alpha by Delicious Scraps, which is a FTU alpha.
Note that H# and V# refer to Horizontal and vertical coordinates on your canvas grid. Make sure you have View, Rulers checked in order to see the ruler grid.
When I say "Add to your canvas" I expect that you will copy and paste it as a new layer, unless otherwise state in the tutorial.
This tutorial assumes you have a working knowledge of PSP. It was written using PSP X1, but should work in PSP 8 and up.
To begin, open a new canvas, 800 x 800 pxls, flood fill white.
Open Paper6-GI_BCA. Select layers --> Load/save mask from Disk --> Load Mask from Disk and find WSL Mask # 202. Make sure the fit to canvas box is check, then click on load.
Edit --> Copy Merged and add to your canvas, centered.
Open Diamond Bling, resize to 75% and add to canvas centered at H200, V350.
Open Flower 1, resize to 50% and add to canvas centered at H200, V550. Duplicate and move the copy to H300, V600.
Open Heart Pink Diamond and add to canvas, centered at H500, V250. Image --> Free Rotate --> Rotate Right, 20 degrees.
Open tube of choice. I am using Gossamer2 by MediEvil Creations. To use the tube, erase Medi's Watermark and resize to 75%. Add to canvas, centered at H350, V380.
Open Gossamer Wing8A, resize to 75%, and add to canvas centered at H335, V300. On the layers pallet, drag the wings under the tube layer.
Click on the tube layer to active, then go to layers --> merge --> merge down to merge the wings with the tube.
Add a drop shadow of choice to the tube. I am using vertical and horizontal offsets of 10 each, opacity of 65%, blur of 35% and color of Raspberry (#c74a74).
Open Dragonfly, and erase the charm ring at the top. Resize to 75% and add to canvas at H600, V600.
Open BCA Ribbon2, resize to 50% and add to canvas, centered at H600, V300. Image --> Free Rotate and rotate right, 20 degrees.
Open Diamond Pin and resize to 25%. Add to canvas, centered at H600, V300. Image --> Free Rotate and rotate right, 20 degrees. Using your eraser tool, erase a small portion of the pin near the center, so that it appears to be stuck through the ribbon.
On the Materials Pallet, set your foreground color to transparent and your background color to #c74a74. Using font of choice (I amusing Trebuchet MS, 4 Points, bold, centered) add the copyright and tagged by watermark to your tag. For the Gossamer tube the copyright info is:
(c) MediEvil Creations http://medievilsaddiction.blogspot.com/
You can now save the artists copy of your tag as a .pspimage.
Using your font or alpha of choice add the name of choice to your tag, centered at around H250, V650, depending upon the length of the name. Image --> Free Rotate and rotate right, 20 degrees. You can add a drop shadow to the name if you wish.
You can either save the tag with the white background as a .jpg file, or without it as a .png file. If you are going to save as a .png file, click on the white background on the layers pallet and choose delete. Otherwise, select Layers --> Merge -- Merge visable. Once you've deleted the white background, you are going to merge visible as well.
Resize the tag to 75% - or 600 x 600 pxls.
Save as either a .jpg file or a .png file and your all finished!
I hope you enjoyed this tutorial. If you should have a problem, please feel free to E-Mail Me and I'll be happy to help you out.
No comments:
Post a Comment