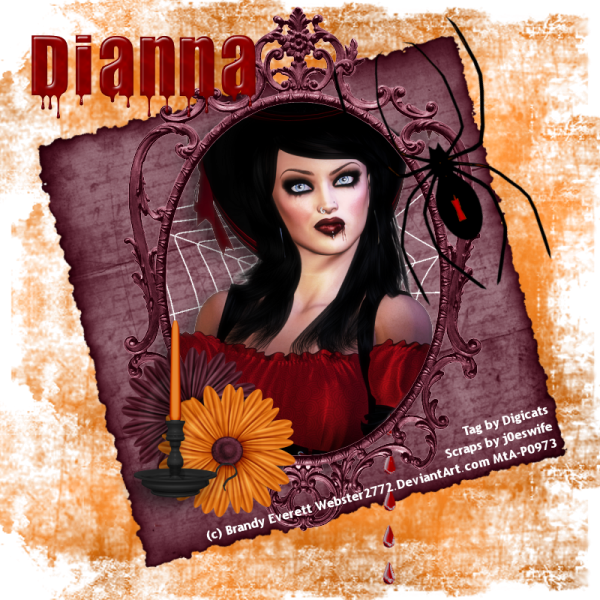
This tutorial was written by Dianna Richards of Digicats (and Dogs)/Di Before Dawn Tutorials. Any resemblance to any other tutorial, published or unpublished, living, dead or undead, is purely coincidental.
Please do not rebroadcast, redistribute or otherwise claim this tutorial or any part there of as your own work.
Items you will need to complete this project:
The Boo to You mega taggers kit by Scraps by j0eswife. This kit is available for purchase at Digital Chaos and other fine stores.
Tube of choice. I am using Brandy Everett's Bloody Mary tube, which is available at Mistaken Art. You must have a license to use this tube which can be obtained at Mistaken Art.
Wee Scots Mask #85 which you can download HERE.
Alpha or font of choice. I am using the Bloody alpha by Designs by Sarah Bryan. This is a FTU alpha, part of the Gothic Inspirations Hallows Eve Blog train. You can download it HERE.
Note that H# and V# refer to Horizontal and vertical coordinates on your canvas grid. Make sure you have View, Rulers checked in order to see the ruler grid.
When I say "Add to your canvas" I expect that you will copy and paste it as a new layer, unless otherwise state in the tutorial.
This tutorial assumes you have a working knowledge of PSP. It was written using PSP X1, but should work in PSP 8 and up.
To begin, open a raster layer canvas, 800 x 800 pxls, flood fill white.
Open SBJ_Paper 60. Select Layers --> Load/Save Mask --> Load Mask from Disk and locate WSL Mask 83. Make sure the fit to canvas box is checked, and click on Load.
Edit --> Copy Merged then add to you canvas, centered.
Open Old Paper 1, resize to 60 percent and add to your canvas, centered. Go to Image --> Free Rotate and rotate Left, 15 degrees.
Open the Blood Mary tube by Brandy Everett, copy the tube layer and add to your canvas, centered.
Open Fancy Frame 1, and add to your canvas centered at H400, V360.
Using your eraser tool, erase all the parts of the tube that fall outside of the frame, including all the parts in between the fancy scroll work.
Open Web. Set the foreground color on you materials pallet to white (#ffffff) and using your paint bucket tool, flood fill the web white. Click on the old paper layer to active it.
Resize the web to 75% and add the canvas, centered at H410, V390. Using your eraser tool, erase any parts of the web that show outside of the frame.
Click on the tube later to active it, and add a drop shadow of choice to the tube. I am using a horizontal offset of 10, a vertical offset of -10, opacity of 65, blur of 35, color black (#000000).
Click on the frame layer to activate it, and open Flower 03, resize to 50% and add to canvas, centered at H250, V550. Open Flower 04, resize to 50% and add to canvas, centered at H300, V600.
Open Candle 04, resize to 50% and add to canvas, centered at H250, V550. Add a drop shadow of choice to to the candle. I am using the same setting as for the tube.
Open Spider 03, and add to canvas. Select Image --> Free Rotate and rotate left, 25 degrees. Center the spider at H590, V215.
Open SBJ Drips 1. Using your Selection tool set to rectangle, select the second from last row of drips, and copy. Click on the Old Paper layer to active it, and add the drips to the canvas, centered H520, V590.
On the materials pallet, set your foreground color to red (#C00000). Click on your color change tool and set the tolerance for 15, and the edge softness to 20. Click on the drips to colorize them to red.
On the layers pallet, click on the spider to select it and change the orange spot on his back to red.
Add you copyright info and save your artist's copy as a .pspimage. In adding the copyright, I typed the information out and then used the free rotate option to rotate it left, 15% to match the old paper.
On the materials pallet, I had my foreground color set to transparent and my background color set for white, and I am using Trebuchet MS, Size 4 Points, Bold and align right.
For the Bloody Mary tube, the copyright info is:
(c) Brandy Everett Webster2772.DeviantArt.com YOUR MtA License #
Using the optional alpha of choice, add your name to the tag. I am using the Bloody Alpha created by Designs by Sarah Bryan, which is a FTU alpha, part of the Gothic Inspirations Hallows Eve blog train.
Resize to taste and center around H180, V100 depending upon the length of name you are using.
Delete the white background layer, then select layers --> merge --> merge visible. Resize your tag to 75%, 600 x 600 pxls. and save as a .png file and your all done!
I hope you enjoyed this tutorial. If you should have a problem, please feel free to E-Mail Me and I'll be happy to help you out.
No comments:
Post a Comment