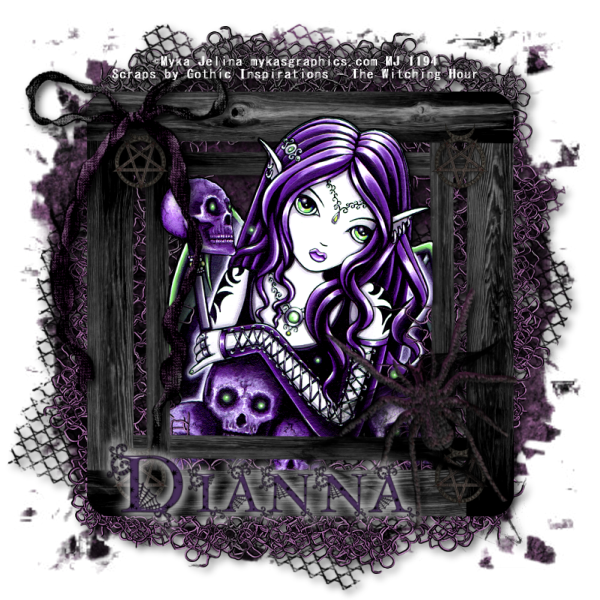
This tutorial was written by Dianna Richards of Digicats (and Dogs)/Di Before Dawn Tutorials. Any resemblance to any other tutorial, published or unpublished, living, dead or undead, is purely coincidental.
Please do not rebroadcast, redistribute or otherwise claim this tutorial or any part there of as your own work.
I wanted to write this using her two freebie samplers but I could not fine the Sunshine and Lollipops one, so I used the PTU kit instead. So, items you will need to complete this project:
The Witching Hour taggers kit by Gothic Inspirations, which is a PTU kit that is available at Gothic Inspiration.com.
Tube of choice. I am using Belladonna, by Myka Jelina. This is a PTU tube, and you must have a license to use it, which is available at Myka's Graphics.com.
Mask of choice. I am using the Shambles mask by Nik's Scripts & Scraps which is part of her PSP Masks Mega Pack.
Font(s) and/or alpha of choice. I am using MS Gothic which is a Windows System font. If you do not have it, you can download it HERE.
I am also using the Goth Chic alpha by Whispy's D'zines, which is a FTU alpha you may download at whispysdzines.blogspot.com.
Note that H# and V# refer to Horizontal and vertical coordinates on your canvas grid. Make sure you have View, Rulers checked in order to see the ruler grid.
When I say "Add to your canvas" I expect that you will copy and paste it as a new layer, unless otherwise state in the tutorial.
This tutorial assumes you have a working knowledge of PSP. It was written using PSP X3, but should work in PSP 8 and up.
To begin, open a new raster layer canvas, 800 x 800 pxl, flood fill white.
Open paper of choice. I am using Paper9-GI_TheWitchingHour. Layers -> Load/Save mask -> Load Mask from Disk and select mask of choice. I am using Shambles by Nik's Scripts and Scraps. Make sure the fit to canvas box is checked, then click on load.
Resize to 90%. Edit -> Copy Special -> Copy Merged and add to main canvas, centered.
Open Mesh-GI_TheWitchingHour and Resize to 90%. dd to main canvas, centered. Image -> Free Rotate -> Rotate Right, 20 degrees.
Open Frame2-GI_TheWitchingHour and add to main canvas, centered.
Open tube of choice. I am using Belladonna by Myka Jelina. Copy Layer 3, and add to main canvas, centered.
On the Layers pallet, right click on Raster 3, the frame layer and duplicate. Right click on Copy of Raster 3 -> Arrange -> Bring to Top.
With your selection tool set to rectangle, replace select the top half of frame copy, Copy of Raster 3, and delete.
Selections -> Select none.
Using your eraser tool, erase just a bit of the wing on the right hand side to make it fit into the frame. Return to top layer.
Open Bow-GI_TheWitchingHour and resize to 75%. Add to main canvas, centered at H175, V160.
Open Cobweb-GI_TheWitchingHour and resize to 50%. Add to main canvas, centered at H550, V600.
Open Spider-GI_TheWitchingHour and resize to 75%. Add to main canvas, centered at H575, V550. Image -> Free Rotate -> Rotate left, 17 degrees.
On the Materials Pallet, set your foreground color to transparent and your background color to white (#ffffff). Using font of choice add copyright information to the tag. For the Belladonna tube that information is:
©Myka Jelina mykasgraphics.com Your MJ License#
(Note the change in artist's url if you purchased this tube from CILM.)
You should also add the background credit and tagged by information at this time. I am using MS Gothic, 4 points, bold and centered and have my copyright information located at H400, V90.
Starting with Raster 2 on your layers pallet and working upward, add a drop shadow of choice to each of the elements on your canvas, except for the frame layer copy, Copy of Raster 3. I am using offsets, vertical and horizontal of 5 each, opacity of 75%, blur of 15 and color black (#000000).
You can now save the artist's copy of your tag as a .pspimage file.
Using font or alpha of choice add name of choice to tag. I am using the Gothic Chic alpha by Whispy's D'zines and have my name centered at H350, V600.
Using the same settings as above, add a white drop shadow to the name. Then repeat using offsets of -5 each, leaving all other settings the same.
Drop the white background layer, and merge visible. Resize to 75% (600 x 600 pixels) and save as a .png file and you are all done!
Note that if you are planning on using the tag on Facebook, you may wish to save it as a .jpg as Facebook does not handle .pngs well.
I hope you enjoyed this tutorial. If you should have a problem, please feel free to E-Mail Me and I'll be happy to help you out.
No comments:
Post a Comment