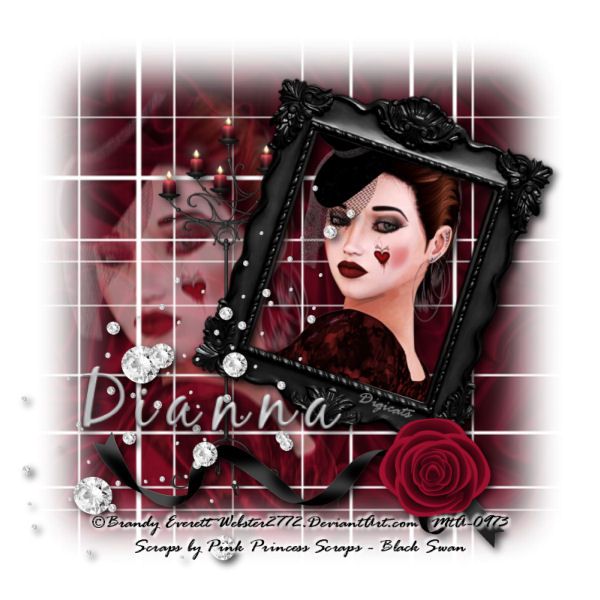
This tutorial was written by Dianna Richards of Digicats (and Dogs)/Di Before Dawn Tutorials. Any resemblance to any other tutorial, published or unpublished, living, dead or undead, is purely coincidental.
Please do not rebroadcast, redistribute or otherwise claim this tutorial or any part there of as your own work.
Items you will need to complete this project:
The Black swan taggers kit by Pink Princess Scraps, which is a PTU kit that can be purchased at Scraps and the City.
Tube of choice. I am using Clandestine Meeting, by Brandy Everett. You must have a license to use this tube, which is available at My Tubed Art.com.
Mask of choice. I am using Wee Scots Mask #194 which you can download HERE.
Font(s) and/or alpha of choice. I am using Rage Italic, which you can download from free from Acid Fonts.
I am also using the metallic gel alpha by Marie Stones. This is a FTU alpha that can be downloaded from Free Digital Scrapbooking.
Note that H# and V# refer to Horizontal and vertical coordinates on your canvas grid. Make sure you have View, Rulers checked in order to see the ruler grid.
When I say "Add to your canvas" I expect that you will copy and paste it as a new layer, unless otherwise state in the tutorial.
This tutorial assumes you have a working knowledge of PSP. It was written using PSP X3, but should work in PSP 8 and up.
To begin, open a new raster layer canvas, 800 x 800 pxl, flood fill white.
Open paper of choice. I am using pp2. Layers -> Load/Save Mask -> Load Mask from Disk and select mask of choice. I am using using Wee Scots Lass mask # 194. Make sure the fit to canvas box is checked, then click on load.
Edit -> Copy Special -> Copy Merged and add to main canvas, centered.
Open Ele4, and add to main canvas, centered at H500, V350. Image -> Free Rotate -> Rotate right, 18 degrees.
Open tube of choice, I am using Clandestine Meeting by Brandy Everett.
Click on paper layer, Raster 1, to active. Copy the tube and add to main canvas, centered at H250, V400. On the Layers pallet, set your opacity level to 60%.
Adjust -> Blur -> Motion Blur -> Strength 15%, Angle 0.
On the layers pallet, set your blend mode to screen.
Returning to the tube file, resize to 65%. Copy the tube layer again and add to the main canvas, centered at H500, V350. Image -> Free Rotate -> Rotate right, 18 degrees.
Return to the top layer, the frame layer.
Open Ele45, and rotate right. Add to main canvas, centered at H400, V650.
Open Ele17 and resize to 50%. Add to main canvas, centered at H580, V630 (or right in the middle of the bow on the ribbon).
Open Ele6 and resize to 75%. On the layers pallet, click on raster 3 to activate, then add the candelabra to your main canvas, centered at H300, V400.
Open Ele28, and add to main canvas, centered at H250, V500.
On the layers pallet, set your foreground color to transparent and your background color to black (#000000). Using font of choice add copyright information to the tag. For the Clandestine Meeting tube that information is:
©Brandy Everett Webster2772.DeviantArt.com Your MtA_License#
I am using Rage Italic, 6 points, bold and centered. I also add the background credits and tagged by information at this time.
Note that Rage Italic does not support the © symbol, so you will have to change that part of the line to a different font.
I have my credits, centered at H400, V725. Using the following settings, add a white drop shadow to the text: Offsets of 3 each, opacity of 100, blur of 5, color (#ffffff). Repeat using offsets of -3 each and leaving all other settings the same.
Starting with Raster 7, the candelabra layer, and working upward add a drop shadow to each of the elements on your main canvas, I am using offsets, vertical and horizontal of 5 each, opacity of 75%, blur of 15 and color black (#000000).
You can now save the artist copy of your tag as a .pspimage file.
Using font or alpha of choice add name of choice to tag. I am using the silver gel alpha and have centered my name at or around H300, V550. I then added a drop shadow to match the rest of the tag.
Layers -> Merge Visible.
Resize your canvas to 75% (600 x 600 pixels) and save as a .jpg file and you are all done!
I hope you enjoyed this tutorial. If you should have a problem, please feel free to E-Mail Me and I'll be happy to help you out.
No comments:
Post a Comment