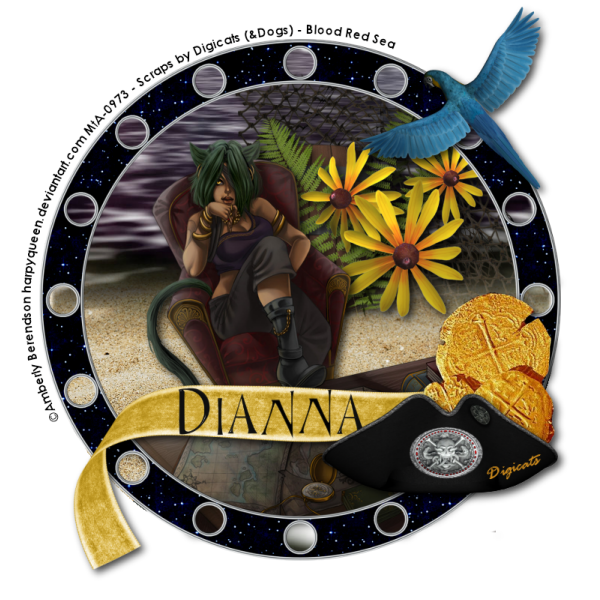
This tutorial was written by Dianna Richards of Digicats (and Dogs)/Di Before Dawn Tutorials. Any resemblance to any other tutorial, published or unpublished, living, dead or undead, is purely coincidental.
Please do not rebroadcast, redistribute or otherwise claim this tutorial or any part there of as your own work.
Items you will need to complete this project:
The Blood Red Sea taggers kit by Digcats (& Dogs). This is a PTU kit that can be purchased at Stargazer Scraps.
Tube of choice. I am using Captain's Quarters, by ©Amberly Berendson. This is a PTU tube, and you must have a license to use this tube, which is available at My Tubed Art.
Font(s) choice. I am using Century Gothic which is a Windows System font. If you do not have it, you can download it HERE.
The Black Epoxy alpha by Marie Stones. This is a FTU alpha that may be downloaded at the link provided.
Note that H# and V# refer to Horizontal and vertical coordinates on your canvas grid. Make sure you have View, Rulers checked in order to see the ruler grid.
When I say "Add to your canvas" I expect that you will copy and paste it as a new layer, unless otherwise state in the tutorial.
This tutorial assumes you have a working knowledge of PSP. It was written using PSP X3, but should work in PSP 8 and up.
To begin, open a new raster layer canvas, 800 x 800 pxl, flood fill white.
Open paper of choice. I am using DCD_BRS_Paper16.
Edit -> Copy and add to main canvas, centered.
Open DCD_BRS_Frame04 and add to main canvas, centered. Using your magic wand tool, click anywhere outside the frame area. With the selection still active, click on Raster 1 and delete. Return to the Frame layer, Raster 2.
Open Amberly Berendson's Captain's Quarters, copy tube2 and add to main canvas, centered at H400, V450.
Right click on the frame layer, Raster 2 -> Arrange -> Bring to Top. Using your eraser tool, erase the bit of the tube that hangs outside of the frame.
Click on the Raster 1, the paper layer to activate. Open DCD_BRS_Netting and add to main canvas, centered at H500, V350.
Open DCD_BRS_Sand and add to main canvas, centered at H400, V500. Using your magic wand tool, right click anywhere outside the frame area on Raster 2 to select. With the area still selected, click on Raster 5, the sand layer and press the delete key.
Open DCD_BRS_Barrel and resize to 50%. Add to main canvas, centered at H425, V300.
Open DCD_BRS_Fern and resize to 50%. Add to main canvas, centered at H500, V275.
Open DCD_BRS_Black Eyed Susans and resize to 50%. Add to main canvas, centered at H525, V300.
Selections -> Select none.
Return to top layer, Raster 2.
Open DCD_BRS_Ribbon05 and resize to 75%. Add to main canvas, centered at H400, V600.
Open DCD_BRS_PiecesofEight and resize to 50%. Add to main canvas, centered at H650, V500.
Open DCD_BRS_Hat, and resize to 50%. Add to main canvas, centered at H600, V600.
Open DCD_BRS_Parrot03 and resize to 50%. Add to main canvas, centered at H600, V130.
Using your eraser tool, erase any bits of the background elements that may fall outside the frame area. You will want a nice clean edge on the frame if you are going to bind your text to the outside of it (next step).
On the materials pallet, set your foreground color to transparent and your background color to black (#000000). Using font of choice, add the copyright information to the tag. For the Captain's Quarter tube, that information is:
©Amberly Berendson harpyqueen.deviantart.com Your MtA-License#
You should also add the background credits and tagged by information at this point. I am using Century Gothic, 4 points, bold and centered and have bound my text to path to align to the outside edge of the frame. It is beyond the scope of this tutorial to teach you to do that, but if you do not know how to do this, you can find a tutorial for it HERE.
Using the following settings, add a drop shadow to your text: Offsets 3 each, opacity 100%, blur 5 color white (#ffffff). Repeat using offsets of -3 each, leaving all other settings the same.
On the layers pallet, return to Raster 4, the netting layer. Add a drop shadow of choice to each of the times on your main canvas, except for the sand layer (Raster 5), the Frame layer, Raster 2, and the copyright layer. I am using offsets, vertical and horizontal of 5 each, opacity of 75%, blur of 15, and color black (#000000).
You may now save the artist's copy of your tag as a .pspimage file.
Using font or alpha of choice, add name of choice to tag. I am using the Black Epoxy Alpha, and have name centered over the ribbon at H350, V550. Use your pick tool to adjust to taste.
Drop the white background layer, and merge visible. Resize to 75% (600 x 600 pixels). Save as a .png file, and you are all done!
If you are planning on using the tag on Facebook, you might want to save it as a .jpg file, as Facebook's handling of .pngs has changed and the tags look better with the white background on them.
I hope you enjoyed this tutorial. If you should have a problem, please feel free to E-Mail Me and I'll be happy to help you out.
No comments:
Post a Comment