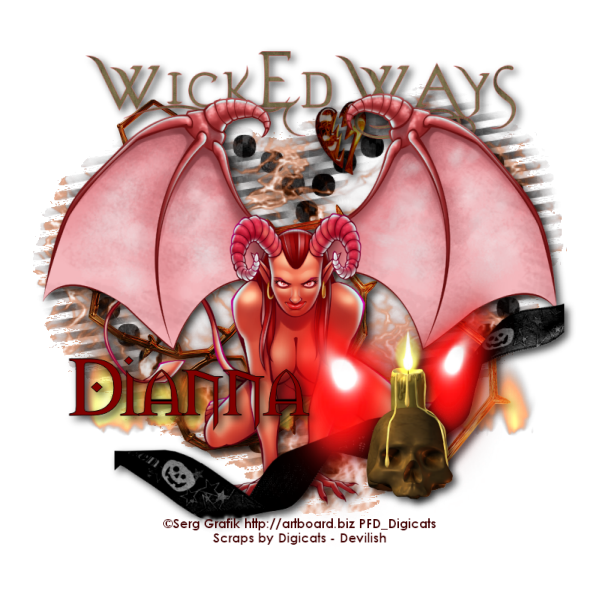
This tutorial was written by Dianna Richards of Digicats (and Dogs)/Di Before Dawn Tutorials. Any resemblance to any other tutorial, published or unpublished, living, dead or undead, is purely coincidental.
Please do not rebroadcast, redistribute or otherwise claim this tutorial or any part there of as your own work.
Items you will need to complete this project:
The Devilish taggers kit by Digcats (& Dogs). This is a PTU kit that can be purchased at Scraps and the City.com.
Tube of choice. I am using Succubus, by Serg Grapik. This is a PTU tube, and you must have a license to use this tube, which is available at Pics for Design.com.
Font(s) choice. I am using Century Gothic which is a Windows System font. If you do not have it, you can download it HERE.
I am also using Morpheus, which is a FTU font that can be downloaded at OutlawByDesign.com.
Note that H# and V# refer to Horizontal and vertical coordinates on your canvas grid. Make sure you have View, Rulers checked in order to see the ruler grid.
When I say "Add to your canvas" I expect that you will copy and paste it as a new layer, unless otherwise state in the tutorial.
This tutorial assumes you have a working knowledge of PSP. It was written using PSP X3, but should work in PSP 8 and up.
To begin, open a new raster layer canvas, 800 x 800 pxl, flood fill white.
Open paper of choice. I am using DCD_Devil_Paper8. Layers -> Load/Save Mask -> Load Mask from Disk and select mask of choice. I am using using Wee Scots Lass mask 173. Make sure the fit to canvas box is checked, then click on load.
Edit -> Copy Special -> Copy Merged and add to main canvas, centered.
Open DCD_Devil_Smoke1, and add to main canvas, centered. With you magic wand tool, click anywhere outside the masked paper layer on Raster 1 to select. With the area still selected, activate Raster 2 on the layers pallet, and then click delete.
Open DCD_Devil_Thorns02 and add to main canvas, centered.
Open DCD_Devil_Wicked Ways WA, and add to main canvas, centered at H400, V150.
Open DCD_Devil_Flames and reize to 75%. Add to main canvas, centered at H400, V550.
Open tube of choice. I am using Succubus by Grafik. Resize to 65%, and add to main canvas, centered.
Open DCD_Devil_Ribbon03 and resize to 75%. Add to main canvas, centered at H450, V550.
Open DCD_Devil_Glowing Eyes and add to main canvas, centered at H500, V500.
Open DCD_Devil_Candle02 and resize to 75%. Add to main canvas, centered at H550, V550.
On the Materials pallet, set your foreground color to transparent, and your background color to dark red (#400000). Using font or alpha of choice, add the copyright information to the tag. For the Succubus tube, that information is:
©Serg Grafik http://artboard.biz Your PFD_License#
You should also add the background credits and tagged by information at this point as well. I am using Century Gothic, 4 points, bold and centered and have my copyright located at H400, V700.
Add a white drop shadow to the text using the following settings: Offsets 3 each, opacity of 100%, blur if 5 and color (#ffffff). Repeat using offsets of -3 each and leaving all other settings the same.
Starting with Raster 3, the thorns layer and working upward, add a drop shadow to each of the elements on the main canvas, except for the fire line, the glowing eyes and the copyright layer. I am using offsets, vertical and horizontal, of 5 each, opacity of 75%, blur of 15 and color black (#000000).
You can now save the artist's copy of your tag as a .pspimage file.
Using font or alpha of choice, add desired name to the tag. I am using Morpheus, which is a FTU font, 24 points, bold and centered and have my foreground color set to black (#000000) and by background color set to Red (#800000). I have centered my name Hat H250, V500. I then added a drop shadow to match the rest of the elements on the canvas.
Drop your white background layer, and merge visible. Resize to 75% (600 x 600 pixels) and add save as a .png file and you are all done.
If you are planning on using the tag on Facebook, you might want to save it as a .jpg file, as Facebook's handling of .pngs has changed and the tags look better with the white background on them.
I hope you enjoyed this tutorial. If you should have a problem, please feel free to E-Mail Me and I'll be happy to help you out.
No comments:
Post a Comment