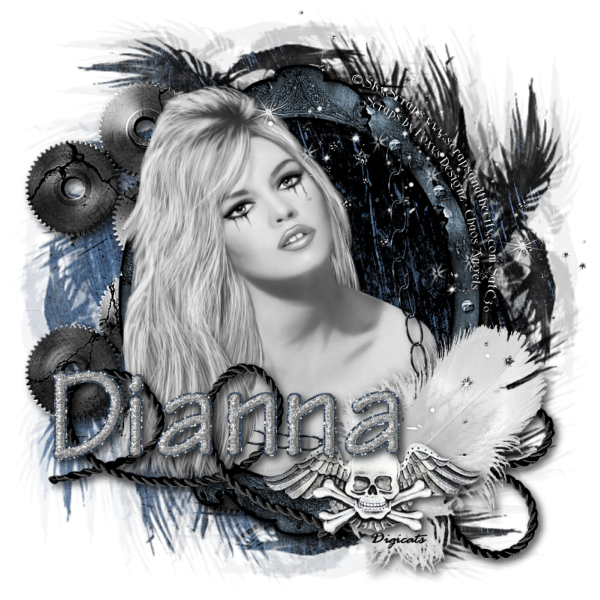
This tutorial was written by Dianna Richards of Digicats (and Dogs)/Di Before Dawn Tutorials. Any resemblance to any other tutorial, published or unpublished, living, dead or undead, is purely coincidental.
Please do not rebroadcast, redistribute or otherwise claim this tutorial or any part there of as your own work.
Items you will need to complete this project:
The Chaos Angels taggers kit by Foxys Designz, This is a PTU kit can be purchased at Stargazer Scraps.
Tube of choice. I am using Brigitte, by Sky Scraps. This is a PTU tube, and you must have a license to use this tube, which is available at ScrapsandtheCity.com.
Mask of choice. I am using Wee Scots Mask #59 which you can download HERE.
Font(s) and/or alpha of choice. I am using Scythe, which is a free to use font that can be downloaded HERE.
I am also using the Moonbeam alpha by Julie It Is. This is a free to use alpha that you may download from Julie's blog HERE. Be sure to leave her a thank you if you download.
Note that H# and V# refer to horizontal and vertical coordinates on your canvas ruler grid. Make sure you have View -> Rulers checked in order to see the ruler grid.
When I say "Add to your canvas" I expect that you will copy and paste it as a new layer, unless otherwise stated in the tutorial.
This tutorial assumes you have a working knowledge of PSP. It was written using PSP X3, but should work in PSP 8 and up.
To begin, open a new raster layer canvas, 800 x 800 pxl, flood fill white.
Open paper of choice. I am using Paper8_FD. Layers -> Load/Save Mask -> Load Mask from Disk and select mask of choice. I am using Wee Scots Lass mask #59. Make sure the fit to canvas box is checked, then click on load.
Edit -> Copy Special -> Copy Merged and add to main canvas, centered.
Open Element33_FD and add to main canvas, centered at H200, V400.
Open Element30_FD and add to main canvas, centered.
Open tube of choice. I am using Brigitte by Sky Scraps. Resize to 75%, then copy Layer 2, and add to main canvas, centered at H375, V375.
On the layers pallet, right click on the frame layer and duplicate. Right click on the frame layer copy and go to Arrange -> Bring to top.
Set your selection tool to rectangle-replace and select the left hand side of the frame layer copy (to the H300 mark). Tap your delete kit.
Selections -> Select None.
Using your eraser tool, erase the bit of chain (and tiny bit of frame) on the left hand side so that it looks like it's vanising under the girl's hair.
Using your selection tool again, select the top bit of the frame and delete.
Selections -> Select None.
Open Element11_FD and flip. Add to main canvas centered at H400, V600.
Open Element43_FD and resize to 75%. Add to main canvas, centered at H575, V600.
Open Element10_FD and resize to 75%. Add to main canvas, centered at H500, V650.
Starting with the gear layer, raster 2 and working upward, add to drop shadow of choice to each of the items on the main canvas.
I am using offsets, vertical and horizontal of 5 each, opacity of 75%, blur of 15 and color black (#000000).
On the Materials Pallet, set your foreground color to transparent and your background color to (#ffffff).
Using font of choice add copyright information to the tag. For the Brigitte tube, that information is:
©Sky Scraps www.scrapsandthecity.com Your SacT License#.
I am using the font Scythe, 4 points, bold and centered. I then fit my text to path. Because I needed to rotate the text to get it to the right side of the frame, I used a circle, rather than an oval for the path. It makes it easier to move.
It is beyond the scope of this tutorial to explain how to bind text to path, but you can find a tutorial explaining this procedure at Michele's Paint Shop Newbie 101.
Also note that the Scythe font does not support the © character, so you will need to switch to a different font for that one character.
(*Tip: when I am composing white text, I change the background color to medium gray so I can read it and make sure there are no misspellings.)
Once you have your text where you want it, add a drop shadow to the text using the following settings: Offsets of 3 each, opacity of 100, blur of 5 and color black (#000000). Repeat, using offsets of -3 each and leaving all other settings the same.
Open Element19_FD and add to main canvas, centered at H550, V300.
You can now save the Artist's Copy of your tag as a .pspimage file.
using font or alpha of choice add name of choice to tag. I am using the Moonbeam alpha by Julie It Is. I have my name centered at H300, V550 and have added a drop shadow to match the rest of the elements on the canvas.
Delete the white background layer and merge visible. Resize to 75% (600 x 600 pixels) and save as a .png file and you are all done.
Note that if you are planning on using the tag on Facebook, you may wish to save it as a .jpg as Facebook does not handle .pngs well.
I hope you enjoyed this tutorial. If you should have a problem, please feel free to E-Mail Me and I'll be happy to help you out.
No comments:
Post a Comment