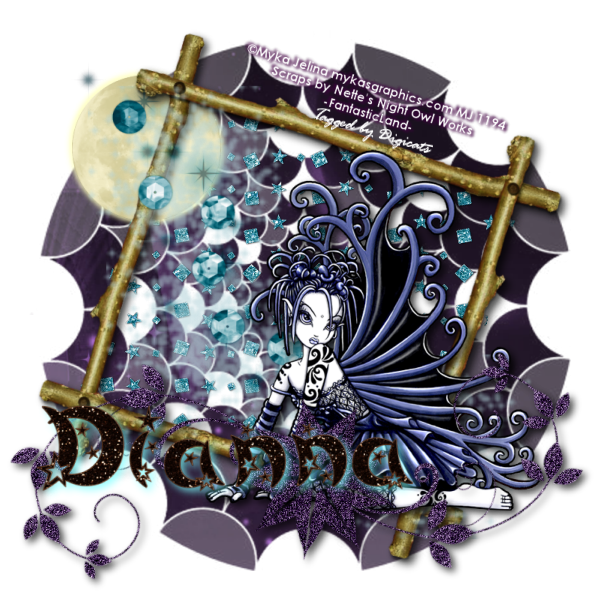
This tutorial was written by Dianna Richards of Digicats (and Dogs)/Di Before Dawn Tutorials. Any resemblance to any other tutorial, published or unpublished, living, dead or undead, is purely coincidental.
Please do not rebroadcast, redistribute or otherwise claim this tutorial or any part there of as your own work.
Items you will need to complete this project:
The Fantasticland taggers kit by Nette's Nightowl Work which is a PTU kit available at Scraps and the City.com.
Tube of choice. I am using Sophia, by Myka Jelina. You must have a license to use this tube, which is available at Myka's Graphics.com.
Mask of choice. I am using the Step Into the Light mask by Nik's Scripts & Scraps which is part of her PSP Masks Mega Pack.
Font(s) and/or alpha of choice. I am using Century Gothic which is a windows system font. If you do not have it, you can download it HERE.
I am also using the Bewitched alpha by Gemini Creationz. This is a PTU alpha available at Scraps and the City.com.
Note that H# and V# refer to horizontal and vertical coordinates on your canvas ruler grid. Make sure you have View -> Rulers checked in order to see the ruler grid.
When I say "Add to your canvas" I expect that you will copy and paste it as a new layer, unless otherwise stated in the tutorial.
This tutorial assumes you have a working knowledge of PSP. It was written using PSP X3, but should work in PSP 8 and up.
To begin, open a new raster layer canvas, 800 x 800 pxl, flood fill white.
Open paper of choice. I am using 7nnwflandpaper. Layers -> Load/save Mask - Load mask from disk and select mask of choice. I am using StepIntoTheLight by Nik's Scripts and Scraps.
Resize to 85%. Edit -> Copy Special -> Copy Merged and add to main canvas, centered.
Open NNwflandbling2 and add to main canvas, centered.
Open nnwflandtwigframe4, and resize. Add to main canvas, centered. Image -> Free Rotate -> Rotate right, 17 degrees.
Using your magic wand, click anywhere outside the frame area to select. With the area still selected, click on Raster 2 on the layer pallet and press the delete key.
Selections - Select none.
Return to top layer.
Open nnwflandsparkle3, resize to 75% and add to main canvas, centered.
Open tube of choice. I am using Sophia by Myka Jelina. Copy the Sophia layer and add to main canvas, centered at V500, V450.
Open nnwflandflowerdoodle1. Resize to 75%, but make sure you UNCLICK the resize all layers button before you do it. Image, free rotate -> rotate left, 45 degrees. Copy and add to main canvas, centered at H400, V625.
Open nnwflandmoon1 and resize to 200 pixels wide. You can reclick the resize all layers button.
On the layers pallet, click on raster 2, the bling layer. Add the moon to your pallet, centered at H200, V200. Add a drop shadow to the moon using the following settings:
Offsets 3 each, opacity 100, blur 10, color Light yellow (#ffffc0). Repeat using offsets of -3 each, leaving all other settings the same.
Return to top layer.
On the materials pallet, set your foreground color to transparent, and your background color to white (#ffffff).
Using font of choice, add copyright information to your canvas. For the Myka Jelina tube, that information is:
©Myka Jelina mykasgraphics.com Your MJ_License#
I am using Century Gothic, 4 points, bold and centered. I centered my text at H500, V130, then I free rotated it right, 17 degrees to match the angle on the frame.
I also added my background credit and tagged by information at this point.
Using the following settings, add a drop shadow to the text:
Offsets of 3 each, opacity of 100%, blur of 5, color dark purple (#400040). Repeat using offsets of -3 each, leaving all other settings the same.
Click on raster 6, the doodle layer. Go to Adjust -> Add/Remove Noise -> Add Noise and use the settings of Gaussian, Noise: 85, and check the Monochrome box. Click on OK.
Add drop shadow of choice to the following layers:The frame layer - Raster 3
The tube layer - Raster 5
The doodle layer - Raster 6
I am using offsets, vertical and horizontal of 5 each, opacity of 75, blur of 15 and color black (#000000).
You can now save the artists copy of your tag as a .pspimage file.
Using font or alpha of choice, add name of choice to tag. I am using the Bewitched Alpha by Gemini Creationz.
I have centered my name at H300, V600. Since this is a dark alpha, I am using a light drop shadow. Use same settings as for the tube layer above, but change the color to sky blue (#80ffff).
Drop the white background layer, and resize your tag to 75% (600 x 600 pixels). Save as a .png file and you are all done!
If you are planning on using the tag on Facebook, you may wish to save it as a .jpg with a white background layer, as this displays better on Facebook.
I hope you enjoyed this tutorial. If you should have a problem, please feel free to E-Mail Me and I'll be happy to help you out.
No comments:
Post a Comment