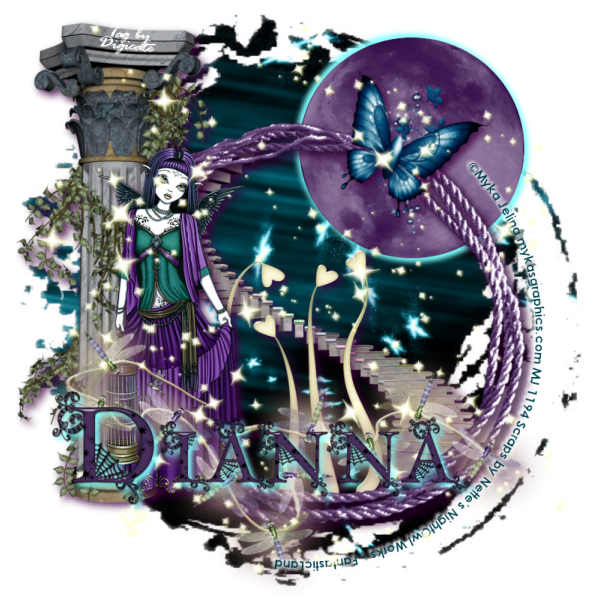
This tutorial was written by Dianna Richards of Digicats (and Dogs)/Di Before Dawn Tutorials. Any resemblance to any other tutorial, published or unpublished, living, dead or undead, is purely coincidental.
Please do not rebroadcast, redistribute or otherwise claim this tutorial or any part there of as your own work.
Items you will need to complete this project:
The Fantasticland taggers kit by Nette's Nightowl Work which is a PTU kit available at Scraps and the City.com.
Tube of choice. I am using Avery, by Myka Jelina. You must have a license to use this tube, which is available at Myka's Graphics.com.
Mask of choice. I am using the Grunge99 mask by Nik's Scripts & Scraps which is part of her PSP Masks Mega Pack.
Font(s) and/or alpha of choice. I am using Century Gothic which is a windows system font. If you do not have it, you can download it HERE.
I am also using the Goth Chic alpha by Whispy's D'zines, which is a FTU alpha you may download at whispysdzines.blogspot.com.
Note that H# and V# refer to horizontal and vertical coordinates on your canvas ruler grid. Make sure you have View -> Rulers checked in order to see the ruler grid.
When I say "Add to your canvas" I expect that you will copy and paste it as a new layer, unless otherwise stated in the tutorial.
This tutorial assumes you have a working knowledge of PSP. It was written using PSP X3, but should work in PSP 8 and up.
To begin, open a new raster layer canvas, 800 x 800 pxl, flood fill white.
Open paper of choice. I am using nnwflandpaper14. Layers -> Load/Save Mask -> Load Mask from Disk and select mask of choice. I am using Grunge99 by Nik's Scripts and Scraps. Make sure the fit to canvas box is checked, then click on load.
Resize to 85%. Edit -> Copy Special -> Copy Merged and add to main canvas, centered.
Open NNwflandmoon2 and resize to 45%. Add to main canvas, centered at H550, V200.
Open nnwflandstairs and resize to 75%. Add ot main canvas, centered.
Open nnwflandheartsprig2 and resize to 50%. Add to main canvas, centered at H400, V500.
Open nnwflandframe7 and add to main canvas, centered at H500, V400.
Using your eraser tool, erase the bits of the stair that fall outside the frame on the left hand side. Return to top layer.
Open nnwflandcolumn1 and resize to 75%. Add to main canvas, centered at H150, V350.
Open tube of choice. I am using Avery by Myka Jelina. Copy the full body layer and add to main canvas, centered at H200, V450.
Open nnwflandfairylights1, resize to 75% and add to main canvas, centered at H400, V600.
Open NNwflandbfly11 and resize to 25%. Add to main canvas, centered at H550, V200. Image -> Free Rotate -> Rotate Right, 18 degrees.
On the materials pallet, set your foreground color to transparent and your background color to teal (#004350). Using font of choice add copyright information to the tube. For the Avery tube, that information is:
©Myka Jelina mykasgraphics.com Your MJ License#
I am using Century Gothic, 4 points, bold and centered and have fit by text to path. It is beyond the scope of this tutorial to explain how to fit text to path, but you can find a tutorial covering this subject HERE.
You should also add the background credits and tagged by information at this time.
Using the following settings, add a drop shadow to the text: Offsets 3 each, opacity 100%, blur 5, and color white (#FFFFFF). Make sure you rotate the text to the desired location BEFORE you apply the drop shadow.
Repeat, using offsets of -3 each and leaving all other settings the same.
Click on raster 2, the moon layer to activate. Using the following settings, add a drop shadow to the moon: offsets of 5 each, opacity of 100%, blur of 10, color light blue (#80ffff). Repeat using offsets of -5 each, leaving all other settings the same.
Starting the the stair layer, Raster 3 and working upward add a drop shadow to each of the elements on your main canvas: Offsets, vertical and horizontal of 5 each, opacity 85%, blur 15 and color dark purple (#400040).
Do NOT add a drop shadow to the copyright info as you have already done that.
Open nnwflandpixdust and add to main canvas, centered.
You can now save the artist's copy of your tag as a .pspimage file.
Using font or alpha of choice, add desired name to tag. I am using the Goth Chic alpha by Whispy's D'zines and have my name centered at H350, V600.
Add a drop shadow to the name to match the setting you used for the drop shadow on the MOON, Raster 2: offsets of 5 each, opacity of 100%, blur of 10, color light blue (#80ffff).
Delete the white background layer and merge visible. Resize to 75% (600 x 600 pixels) and save as a .png file and you are all done.
If you are planning on using the tag on Facebook, you may wish to save it as a .jpg with a white background layer, as this displays better on Facebook.
I hope you enjoyed this tutorial. If you should have a problem, please feel free to E-Mail Me and I'll be happy to help you out.
No comments:
Post a Comment