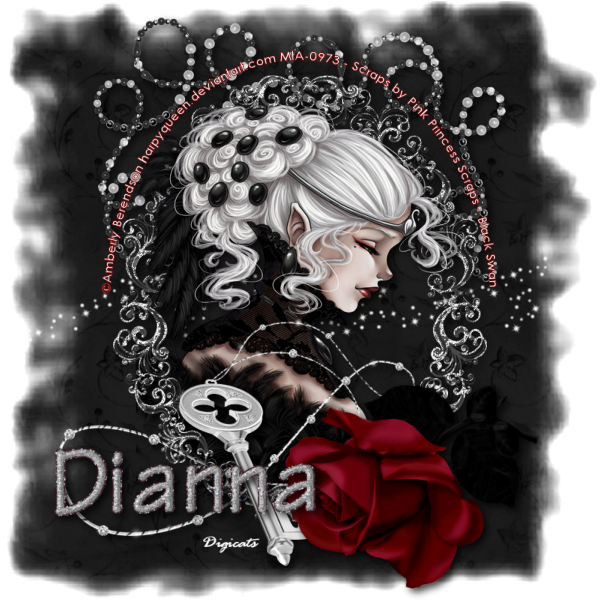
This tutorial was written by Dianna Richards of Digicats (and Dogs)/Di Before Dawn Tutorials. Any resemblance to any other tutorial, published or unpublished, living, dead or undead, is purely coincidental.
Please do not rebroadcast, redistribute or otherwise claim this tutorial or any part there of as your own work.
Items you will need to complete this project:
The Black Swan taggers kit by Pink Princess Scraps, which is a PTU kit that can be purchased at Scraps and the City.
Tube of choice. I am using Black Swan, by Amberly Berendson. You must have a license to use this tube, which is available at My Tubed Art.com.
Mask of choice. I am using the Soft Frazzled Edges mask by Nik's Scripts & Scraps which is part of her PSP Masks Mega Pack.
Font(s) and/or alpha of choice. I am using Century Gothic which is a windows system font. If you do not have it, you can download it HERE.
I am also using the Moonbeam alpha by Julie It Is. This is a free to use alpha that you may download from Julie's blog HERE. Be sure to leave her a thank you if you download.
Note that H# and V# refer to Horizontal and vertical coordinates on your canvas grid. Make sure you have View, Rulers checked in order to see the ruler grid.
When I say "Add to your canvas" I expect that you will copy and paste it as a new layer, unless otherwise state in the tutorial.
This tutorial assumes you have a working knowledge of PSP. It was written using PSP X3, but should work in PSP 8 and up.
To begin, open a new raster layer canvas, 800 x 800 pxl, flood fill white.
Open paper of choice. I am using PP7. Layers -> Load/Save Mask -> Load Mask from Disk and select mask of choice. I am using Softened Frazzled Edges by Nik's Scripts and Scraps. Make sure the fit to canvas box is checked, then click on load.
Edit -> Copy Special -> Copy Merged and add to main canvas, centered.
Open ele29 and rotate right. Effects -> Artistic Effects -> Chrome. Set flaw to 4, brightness to 75 and color to white (#ffffff). Uncheck the use original color box if necessary.
Add to main canvas, centered.
Open tube of choice. I am using Black Swan by Amberly Berendson. Copy the tube layer, and add to main canvas, centered.
On the layers pallet, right click on Raster 2 and duplicate. Right click on Copy of Raster 2 and go to Arrange -> Bring to Top.
With your selection tool set to rectangle, replace, select the top half of copy of raster 2 and delete.
Selections -> Select none.
Using your eraser tool, erase the bits of the tube that are outside the bottom half of the frame layer.
Return to top layer.
Open ele52, copy and add to main canvas, centered at H300, V600.
Open ele15. Click on Raster 1, the paper layer, to activate and add to the main canvas, centered.
Open Ele27 and add to main canvas, centered at H400, V200.
Return to top layers
Open Ele48, and resize to 75%. Add to main canvas, centered at H550, V650.
On the Materials pallet, set your foreground color to red (#800000) and your background color to white (#ffffff). Using font or alpha of choice add the copyright information to your main canvas. For the Black Swan tube, that information is:
©Amberly Berendson harpyqueen.deviantart.com Your MtA-License#
I am using Century Gothic, 4 points, bold and centered and have fit my text to path to the outside of the frame. It is beyond the scope of this tutorial to explain how to do that, however, you can find a tutorial detailing this procedure HERE.
I also added my background credits and tagged by information at this point.
Starting with Raster 6, the beads layer and working upward, add a drop shadow to each of the elements on your main canvas, except for the frame layer copy and the copyright information.
I am using offsets, vertical and horizontal of 5 each, opacity of 75, blur of 15, and color black.
You may now save the artist's copy of your tag as a .pspimage file.
Using font or alpha of choice, add name of choice to tag. I am using the Moonbeam alpha by Julie It Is, and I used my color correction tool to change the blue background on the lettering to red.
I have my name centered at H250, V650. I also added a drop shadow to match the one on the rest of the tag.
Drop your white background layer, and merge visible. Resize to 75% (600 x0 600 pixels) and save as a .png file and you are all done!
I hope you enjoyed this tutorial. If you should have a problem, please feel free to E-Mail Me and I'll be happy to help you out.
No comments:
Post a Comment