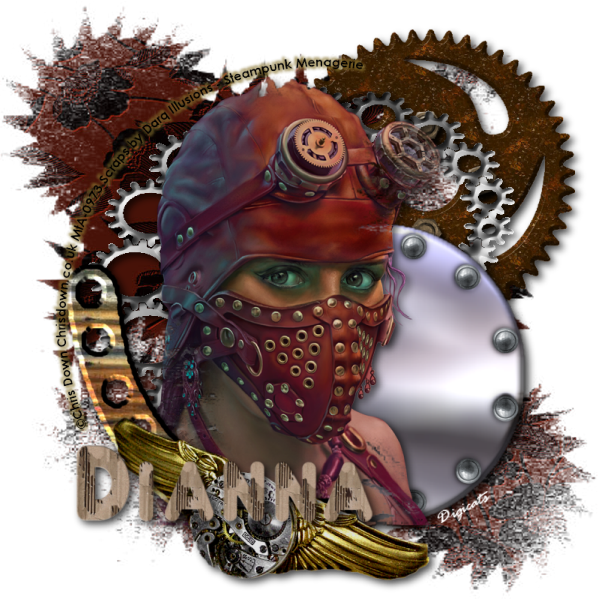
This tutorial was written by Dianna Richards of Digicats (and Dogs)/Di Before Dawn Tutorials. Any resemblance to any other tutorial, published or unpublished, living, dead or undead, is purely coincidental.
Please do not rebroadcast, redistribute or otherwise claim this tutorial or any part there of as your own work.
Items you will need to complete this project:
The Steampunk Menagerie taggers kit by Darq Illusions which is a PTU kit available at Butterfly Blush Designs.
Tube of choice. I am using Escape, by Chris Down. You must have a license to use this tube, which is available at My Tubed Art.com.
Mask of choice. I am using the Sprockets and Gears mask by Nik's Scripts & Scraps which is part of her PSP Masks Mega Pack.
Font(s) and/or alpha of choice. I am using Century Gothic which is a windows system font. If you do not have it, you can download it HERE.
I am also using the Corrugated alpha by Elyane Araujo, which is a PTU, full size alpha.
Note that H# and V# refer to horizontal and vertical coordinates on your canvas ruler grid. Make sure you have View -> Rulers checked in order to see the ruler grid.
When I say "Add to your canvas" I expect that you will copy and paste it as a new layer, unless otherwise stated in the tutorial.
This tutorial assumes you have a working knowledge of PSP. It was written using PSP X3, but should work in PSP 8 and up.
To begin, open a new raster layer canvas, 800 x 800 pxl, flood fill white.
Open paper of choice. I am using paper12. Layers -> Load/Save Mask -> Load Mask from Disk and select mask of choice. I am using Sprockets and Gears by Nik's Scripts & Scraps. Make sure the fit to canvas button is checked, then click on load.
Edit -> Copy Special -> Copy Merged and add to main canvas, centered.
Open Element3 and resize to 75%. Add to main canvas, centered at H570, V240.
Open tube of choice. I am using Escape by Chris Down. Add to main canvas, centered. Layers -> Load/Save Mask -> Load Mask from Disk and select the same mask you used for the paper layer. Make sure the fit to canvas button is checked, then click on load.
On the layers pallet, activate Mask - Raster 3. Layers -> Merge -> Merge down.
Open element5 and resize to 75%. Image -> rotate left. Add to main canvas centered at H280, V500.
Open element10. On the layers pallet, click on Raster 2 to activate, then add element 10 to the main canvas, centered.
Open element 6 and resize to 75%. Add to main canvas, centered at H500, V500.
Return to top layer, Raster 4
Open element18, and resize to 75%. Add to main canvas, centered at H350, V700. Adjust -> Brightness and Contrast -> Brightness/Contrast -> Brightness -35, Contrast 11.
On the materials pallet, set your foreground color to transparent and your background color to black (#00000). Using font of choice add copyright information to the canvas. For the Escape tube, that information is:
©Chris Down Chrisdown.co.uk Your MtA_License#
I am using Century Gothic, 4 points, bold and centered and have fit the text to path to curve around the tag. I also add the background credits and tagged by information at this time.
Using the following settings, add a drop shadow to the copyright: Offsets of 3 each, opacity of 100, blur of 5, color old gold (#8c7732). Repeat using offsets of -3 each and leaving all other settings the same.
Starting with Raster 2, the gear layer and working upward, add a drop shadow of choice to each of the elements on the canvas. I am using offsets, vertical and horizontal of 5 each, opacity of 75, blur of 15 and color black (#000000).
You can now save the Artist's Copy of your tag as a .pspimage file.
Using font or alpha of choice add desired name to tag. I am using the Corrugated alpha by Elyane Araujo. There's a perfectly good alpha that comes with the kit, but the colors weren't working for me, so...I went with what I consider an old standby of mine.
I have my name centered at H300, V650, and have added a drop shadow to it to match the rest of the tag.
Drop the white background layer and merge visible. Resize to 75% (600 x 600 pixels) and save as a .png file, and you are all done.
I hope you enjoyed this tutorial. If you should have a problem, please feel free to E-Mail Me and I'll be happy to help you out.
No comments:
Post a Comment