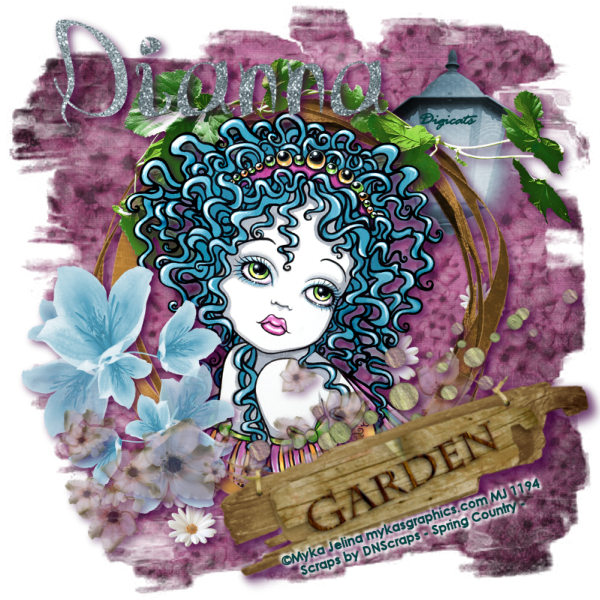
This tutorial was written by Dianna Richards of Digicats (and Dogs)/Di Before Dawn Tutorials. Any resemblance to any other tutorial, published or unpublished, living, dead or undead, is purely coincidental.
Please do not rebroadcast, redistribute or otherwise claim this tutorial or any part there of as your own work.
Items you will need to complete this project:
The Spring Country taggers kit by DN Scraps which is a PTU kit available at Scrappetizing.com.
Tube of choice. I am using Buttercup, by Myka Jelina. You must have a license to use this tube which can be obtained at Myka's Graphics.
Mask of choice. I am using the BrickTrim mask by Nik's Scripts & Scraps which is part of her PSP Masks Mega Pack.
Font(s) and/or alpha of choice. I am using Century Gothic which is a windows system font. If you do not have it, you can download it HERE.
I am also using the Alpha Tibo (2) by Digiscrap.ch. This is a FTU alpha that may be downloaded HERE.
Note that H# and V# refer to horizontal and vertical coordinates on your canvas ruler grid. Make sure you have View -> Rulers checked in order to see the ruler grid.
When I say "Add to your canvas" I expect that you will copy and paste it as a new layer, unless otherwise stated in the tutorial.
This tutorial assumes you have a working knowledge of PSP. It was written using PSP X3, but should work in PSP 8 and up.
To begin, open a new raster layer canvas, 800 x 800 pxl, flood fill white.
Open paper of choice. I am using countrypaper21. Go to Layers -> Load/Save Mask -> Load Mask from Disk and select mask of choice. I am using BrickTrim by Nik's Scripts and Scraps. Make sure the fit to canvas box is checked, then click on load.
Edit -> Copy Special -> copy Merged and add to main canvas, centered.
Open springcountryflowers2 and resize to 75%. Add to main canvas, centered at H400, V550.
Open springcountrysropeframe and resize to 75%, Add to main canvas, centered.
Open tube of choice. I am using Buttercup by Myka Jelina. Copy Layer 4 and add to main canvas, centered.
On the Layers pallet, right click on the frame layer, Raster 3, and duplicate. Right click again on the Copy of Raster 3, and go to arrange, Bring to Top.
With your selection tool set to rectangle, replace, select the top half of the frame layer copy (Copy of Raster3) and delete.
Selections -> Select none.
Using your eraser tool, erase the bits of the tube that fall outside the frame on the bottom half.
Return to top layer.
Open springcountrysweetflowers2 and resize to 25%. Add to main canvas, centered at H175, V525.
Open springcountryflowers3 and resize to 75%. Add to main canvas, centered at H400, V600.
Open springcountrylight3 and resize to 50%. On the layers pallet, click on the paper layer to activate, then add the light centered at H600, V200.
Return to top layer.
Open springcoutrystones2, resize to 75%, and add to main canvas, centered at H550, V500.
Open springcoutryleafs. Click on Raster 3, the frame layer and add the leafs to the top of the frame, centered at H400, V215. Using your eraser tool, erase the bit of the leaf stem that is hanging off on the left hand side.
Open springcountrygarden and erase the rope hanger. Resize to 75%, and add to main canvas, centered at H550, V600. Image -> Free Rotate -> Rotate left, 17 degrees.
On the Materials pallet, set both your foreground and your background colors to dark teal (#004040). Using font of choice, add copyright information to the tube. For the Buttercup tube, that information is:
©Myka Jelina mykasgraphics.com (License#)
I am using Century Gothic, 4 points, bold and centered. I then free rotated my text left, 17 degrees and located it under the garden sign at H550, V700. I also added the optional background credits and tagged by information at this point.
Using the following settings, add a white drop shadow to the text: offsets 3 each, opacity of 100%, blur of 15 and color #ffffff. Repeat using offsets of -3 each, while leaving all other settings the same.
Starting with the light layer and working upward on your layers pallet, add a drop shadow of choice to each of the elements on the main canvas except for the frame copy, Copy of Raster 3. I am using offsets - vertical and horizontal - of 5 each, opacity of 75%, blur of 15 and color of dark purple (#400040).
You should now save the artist's copy of your tag as a .pspimage file.
Using font or alpha of choice add desired name to tag. I am using Alpha Tibo (2) by Digiscrap.ch. I have centered my name at H300, V100 and have added a drop shadow to match the rest of the tag.
Drop the white background layer and merge visible. Resize to 75% (600 x 600 pixels) and save as a .png file and you are all done.
I hope you enjoyed this tutorial. If you should have a problem, please feel free to E-Mail Me and I'll be happy to help you out.
(Great - now I've got hayfever to go along with my cold!)
No comments:
Post a Comment