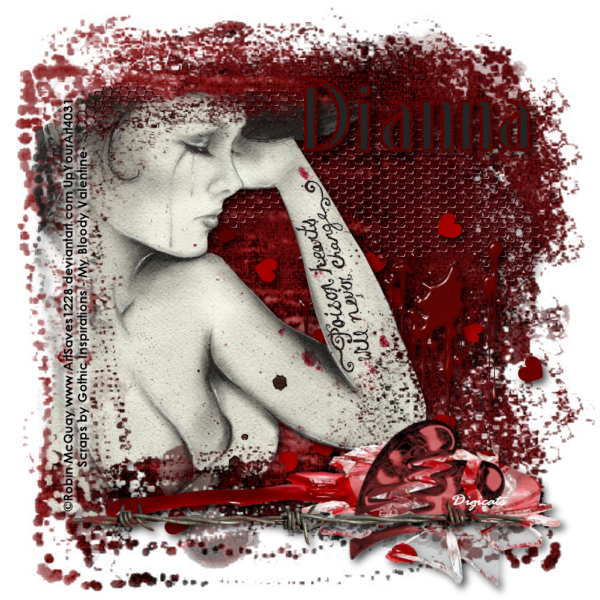
This tutorial was written by Dianna Richards of Digicats (and Dogs)/Di Before Dawn Tutorials. Any resemblance to any other tutorial, published or unpublished, living, dead or undead, is purely coincidental.
Please do not rebroadcast, redistribute or otherwise claim this tutorial or any part there of as your own work.
Items you will need to complete this project:
The My Bloody Valentine taggers kit by Gothic Inspirations, This is a PTU kit which is available at Gothic Inspirations.com.
Tube of choice. I am using Poison Hearts, by Robin McQuay. This is a PTU tube, and you must have a license to use this tube, which is available at Up Your Art.com.
Mask of choice. I am using the Paint Splatter mask by Nik's Scripts & Scraps which is part of her PSP Masks Mega Pack.
Font(s) and/or alpha of choice. I am using Century Gothic which is a Windows System font. If you do not have it, you can download it HERE.
I am also using the Gothique Romance Alpha Black by Whispy's D'zines. This alpha is no longer commercially available, so please use a font, or different alpha that you like.
Note that H# and V# refer to horizontal and vertical coordinates on your canvas ruler grid. Make sure you have View -> Rulers checked in order to see the ruler grid.
When I say "Add to your canvas" I expect that you will copy and paste it as a new layer, unless otherwise stated in the tutorial.
This tutorial assumes you have a working knowledge of PSP. It was written using PSP X3, but should work in PSP 8 and up.
To begin, open a new raster layer canvas, 800 x 800 pxl, flood fill white.
Open paper of choice. I am using Paper17-GI_MyBloodyValentine. Resize to 800 x 800 pixels. Layers -> Load/Save Mask-> Load Mask from Disk and select mask of choice. I am using Splattered Paint by Nik's Scripts and Scraps. Make sure the fit to canvas box is checked, then click on load.
Edit -> Copy Special -> Copy Merged and add to main canvas, centered.
Open Mesh and add to main canvas, centered at H400, V250.
Open Heart Spill and add to main canvas, centered at H400, V450.
Open Blood Splatter 4 and paste to main canvas, centered at H550, V450.
Open tube of choice. I am using Poison Hearts by Robin McQuay. Copy the tube layer from your tube of choice and paste as a new image. Go to Layers -> Load/Save Mask -> Load Mask from Disk and select the same mask you used on the paper. Make sure the fit to canvas box is checked, then click on load.
Edit -> Copy Special -> Copy Merged and add to your main canvas, centered at H300, V400.
Open BloodyBrokenHeart and add to main canvas, centered at H450, V675.
Open Barbwire and resize to 75%. Add to main canvas, centered at H400, V700.
On the materials pallet, set your foreground color to transparent and your background color to black (#000000). Using font of choice, add copyright information to the tag. For the Robin McQuay tube, that information is:
©Robin McQuay www.ArtSaves1228.deviantart.com UpYourArt(License#)
I am using Century Gothic, 4 points, bold and centered. I free rotated my information left, 90 degrees, and located it at H100, V400, on the left side of the tag. I also add the background credits and tagged by information at this point.
Using the following settings, add a white drop shadow to your credits: offsets of 3 each, opacity of 100, blur of 15 and color white #ffffff. Repeat using offsets of -3 each and leaving all other settings the same.
Starting with the mesh layer, raster 2 and working upward, add a drop shadow of choice to each of the elements on your main canvas (except for the copyright layers). I am using offsets, vertical and horizontal of 5 each, opacity of 75%, blur of 15 and color black (#000000).
You can now save the artist's copy of your tag as a .pspimage file.
Using font or alpha of choice, add desired name to tag. I am using the Gothique Romance Alpha Black by Whispy's D'zines, and have centered my name at H550, V150. I then added a drop shadow to match the rest of the tag.
Drop the white background layer, and merge visible. Resize to 75% (600 x 600 pixels) and save as a .png file and you are all done.
I hope you enjoyed this tutorial. If you should have a problem, please feel free to E-Mail Me and I'll be happy to help you out.
No comments:
Post a Comment