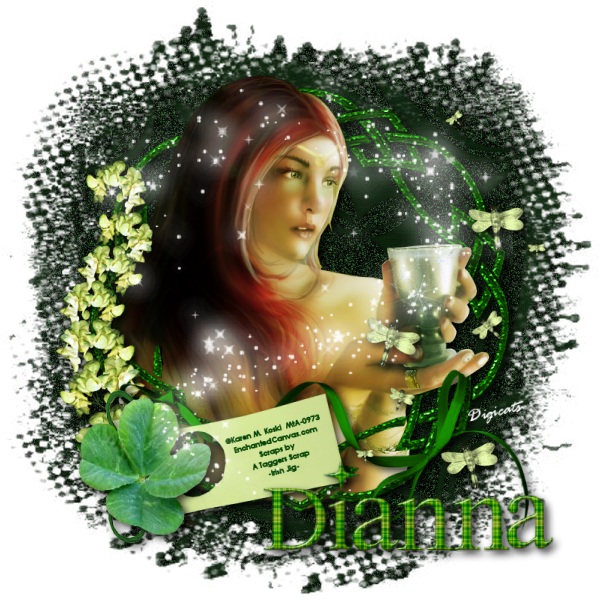
This tutorial was written by Dianna Richards of Digicats (and Dogs)/Di Before Dawn Tutorials. Any resemblance to any other tutorial, published or unpublished, living, dead or undead, is purely coincidental.
Please do not rebroadcast, redistribute or otherwise claim this tutorial or any part there of as your own work.
Items you will need to complete this project:
An Irish Jig taggers kit by A Taggers Scrap, This is a PTU kit is part of the new collab at StargaZer Scraps. It is free with a $10 purchase, or you can purchase the collab outright for $12.50 (but with all the fabulous designs in the shop, why would you want to purchase it when you can get it for free?)
Tube of choice. I am using Gypsy, by Karen M. Koski. This is a PTU tube, and you must have a license to use this tube, which is available at My Tubed Art.
Mask of choice. I am using the Grunge121 mask by Nik's Scripts & Scraps which is part of her PSP Masks Mega Pack.
Font(s) and/or alpha of choice. I am using Century Gothic which is a Windows System font. If you do not have it, you can download it HERE.
I am also using the Plaid alpha by Jen's Sweet Temptations, which is a PTU alpha.
Note that H# and V# refer to horizontal and vertical coordinates on your canvas ruler grid. Make sure you have View -> Rulers checked in order to see the ruler grid.
When I say "Add to your canvas" I expect that you will copy and paste it as a new layer, unless otherwise stated in the tutorial.
This tutorial assumes you have a working knowledge of PSP. It was written using PSP X3, but should work in PSP 8 and up.
To begin, open a new raster layer canvas, 800 x 800 pxl, flood fill white.
Open paper of choice. I am using paper6. Edit -> Load/Save Mask -> Load Mask from disk and select mask of choice. I am using Grunge121 by Nik's Scripts and Scraps. Make sure the fit to canvas box is checked, then click on load.
Edit -> Copy Special - Copy Merged and add to main canvas, centered.
Open Frame1, and add to main canvas, centered.
Open tube of choice. I am using Gypsy by Karen M. Koski. copy the tube layer and add to main canvas, centered.
On the layers pallet, right click on the frame layer, Raster2 and duplicate. Right click again on the Copy of Raster 2 layer and go to Arrange -> Bring to top.
With your selection tool set to rectangle, replace, select the top half of the frame copy layer and delete.
Using your eraser tool, erase the bits of the tube that fall below the frame layer on the bottom.
Return to top layer.
Using your eraser tool, erase the bits of the frame layer copy that are covering the parts of the tube around the hands and the hair, to make it look like it flowing more natural into the image.
Open Greenery2, and add to the main canvas, centered at H150, V450.
Open ribbon3, and add to the main canvas, centered at H400, V600.
Open clover and add to main canvas, centered at H200, V625.
Open Tag and rotate left. On your materials pallet, set your foreground and your background colors to dark green (#004000). Using font or alpha of choice add copyright information to the tag. For the Gypsy tube, that information is:
©Karen M. Koski EnchantedCanvas.com MtA-(License#)
I am using Century Gothic, 10 points, bold and centered. I then free rotated the text left, 15 degrees to match the angel of the tag. I also added the optional background credits and tagged by information at this point.
Using your eraser tool, erase the long ribbons on the tag, leaving only the bow and the tag.
Layers -> Merge -> Merge visible, then copy and past the tag to the main canvas at H300, V500, or right over the clover on the main canvas.
On the layers pallet, right click on the clover, Raster 6, and to to arrange, bring to top.
Open Dragonflies, and add to main canvas, centered at H600, V400.
Starting with Raster 2, the frame layer, add a drop shadow of choice to the each items on the main canvas except for the frame layer copy. I am using offsets, vertical and horizontal of 5 each, opacity of 75, blur of 15, and color of black #000000.
Open fairy dust and add to main canvas, centered.
You can now save the artist's copy of your tag as a .pspimage file.
Using font or alpha of choice, add desired name to the tag. I am using the plaid alpha by Jen's Sweet Temptations. I have centered the name at H550, V675, and added a drop shadow to match the one used on the rest of the elements on the main canvas.
Drop the white background layer and merge visible, resize to 75% (600 x 600 pixels) and save as a .png file and you are all done.
I hope you enjoyed this tutorial. If you should have a problem, please feel free to E-Mail Me and I'll be happy to help you out.
No comments:
Post a Comment