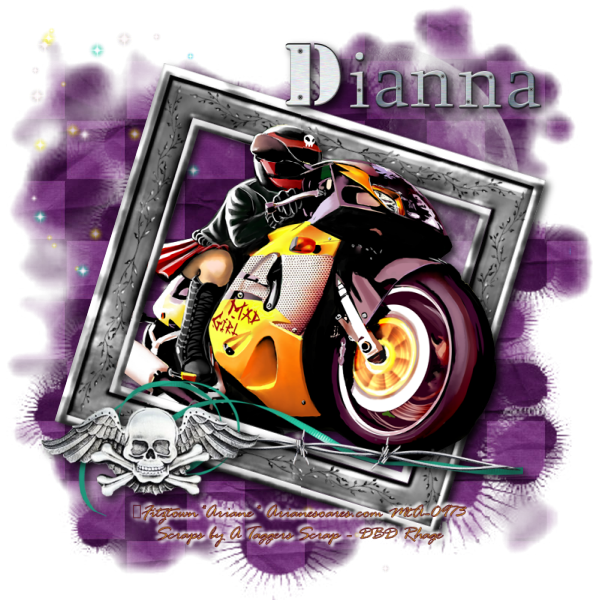
This tutorial was written by Dianna Richards of Digicats (and Dogs)/Di Before Dawn Tutorials. Any resemblance to any other tutorial, published or unpublished, living, dead or undead, is purely coincidental.
Please do not rebroadcast, redistribute or otherwise claim this tutorial or any part there of as your own work.
Items you will need to complete this project:
The Black Dagger Brotherhood - Rhage taggers kit by A Taggers Scrap. This is a PTU kit that is available at Stargazers Scraps.
Tube of choice. I am using Mad Girl Bike, by Fitztown*Ariane*. This is a PTU tube, and you must have a license to use this tube, which is available at My Tubed Art.com.
Mask of choice. I am using the Galaxy mask by Nik's Scripts & Scraps which is part of her PSP Masks Mega Pack.
Font(s) and/or alpha of choice. I am using Rage Italic, which you can download from free from Acid Fonts.
I am also using the Metal Alpha by Katrin's Design. This alpha is no longer commercially available, so please pick something else you like instead.
Note that H# and V# refer to Horizontal and vertical coordinates on your canvas grid. Make sure you have View, Rulers checked in order to see the ruler grid.
When I say "Add to your canvas" I expect that you will copy and paste it as a new layer, unless otherwise state in the tutorial.
This tutorial assumes you have a working knowledge of PSP. It was written using PSP X3, but should work in PSP 8 and up.
To begin, open a new raster layer canvas, 800 x 800 pxl, flood fill white.
Open Paper of choice. I am using Paper12. Layers -> Load/Save Mask -> Load Mask from Disk and select mask of choice. I am using Galaxy by Nik's Scripts & Scraps. Make sure the fit to canvas box is checked, then click on load.
Edit -> Copy Special -> Copy Merged and add to main canvas, centered.
Open Soft Moon and add to main canvas, centered at H600, V250.
Open Starlight and add to main canvas, centered.
Open frame2, and add to main canvas, centered. Image -> Free rotate -> Rotate right, 17 degrees.
Open tube of choice. I am using MadGirlBike by Fitztown Ariane. Copy the tube layer and add to main canvas, centered.
On the layers pallet, right click on the frame layer, Raster 5 and duplicate. Right click on the copy of Raster 5 layer and go to Arrange -> Bring to Top.
With your selection tool set to rectangle - replace, select the right half of the frame copy, Copy of Raster 5, and delete.
Selections -> Select none.
Select the bit of the helmet that is didn't clear the frame on the top. Click on the tube layer, Raster 6 on the main canvas, then Right Click and promote Selection to layer. Right click on the promoted Selection and go to Arrange -> Bring to top.
Selections -> Select none.
Using your eraser tool, erase the bit of the rear wheel of the motorcycle that shows below the frame layer.
Return to top layer.
Open Ribbon and resize to 75%. Add to main canvas, centered at H400, V600.
Open barbedwire and resize to 75%. Add to main canvas, centered at H400, V600.
Open charm, and resize to 75%. Add to main canvas, centered at H200, V600.
On the Materials pallet, set your foreground color to maroon (#5e1526) and your background color to gold (#d19c1f). Using font of choice add copyright information to the canvas. For the Mad Girl Bike tube, that information is:
©Fitztown*Ariane* Arianesoares.com Your MtA_License#
I am using Rage Italic LET, 6 points bold and centered. I've also add the background credits and tagged by information at this point.
Using the following settings, add a white drop shadow to the credits: Offsets 3 each, opacity of 100%, blur of 5 and color #ffffff. Repeat using offsets of -3 each, leaving all other settings the same.
Starting with the frame layer, raster 5 and working upward add a drop shadow to each of the elements on your main canvas, except for the Frame layer copy, Copy of Raster5, and the Promoted Selection layer.
I am using offsets, vertical and horizontal of 5 each, opacity of 75%, blur of 15, and color black (#000000).
You may now save the artist's copy of your tag as a .pspimage file.
Using font or alpha of choice add desired name to tag. I am using the Metal Alpha by Katrin's Design. I have centered my name at H500, V100. I have added a drop shadow to the name to match the rest of the tag.
Drop the white background layer and merge visible, resize to 75% (600 x 600 pixels) and save as a .png file, and you are all done.
I hope you enjoyed this tutorial. If you should have a problem, please feel free to E-Mail Me and I'll be happy to help you out.
No comments:
Post a Comment