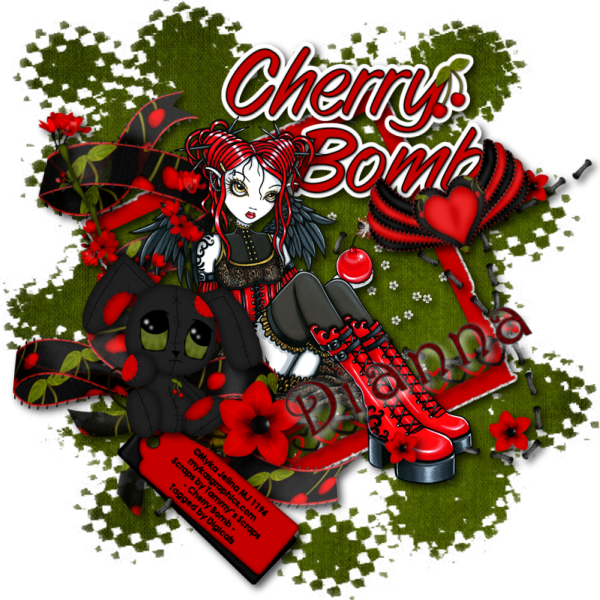
This tutorial was written by Dianna Richards of Digicats (and Dogs)/Di Before Dawn Tutorials. Any resemblance to any other tutorial, published or unpublished, living, dead or undead, is purely coincidental.
Please do not rebroadcast, redistribute or otherwise claim this tutorial or any part there of as your own work.
Items you will need to complete this project:
The Cherry Bomb taggers kit by Tammy's Scraps. This is a PTU kit which is available at Stargazer Scraps.
Tube of choice. I am using Abigail, by Myka Jelina. You must have a license to use this tube, which is available at Myka's Graphics.com.
Mask of choice. I am using the Nik-021208_102 mask by Nik's Scripts & Scraps which is part of her PSP Masks Mega Pack.
Font(s) and/or alpha of choice. I am using Century Gothic which is a windows system font. If you do not have it, you can download it HERE.
I am also using the Gothique Romance Alpha Red by Whispy's D'zines. This alpha is no longer available, so please choose something else you like instead.
Note that H# and V# refer to horizontal and vertical coordinates on your canvas ruler grid. Make sure you have View -> Rulers checked in order to see the ruler grid.
When I say "Add to your canvas" I expect that you will copy and paste it as a new layer, unless otherwise stated in the tutorial.
This tutorial assumes you have a working knowledge of PSP. It was written using PSP X3, but should work in PSP 8 and up.
To begin, open a new raster layer canvas, 800 x 800 pxl, flood fill white.
Open paper of choice. I am using Cherry Bomb Paper 2. Go to Layers -> Load/Save Mask -> Load Mask from Disk and select mask of choice. I am using I am using Nik-021208_102. Make sure the fit to canvas box is checked, then click on load.
Edit -> Copy Special - Copy Merged and add to main canvas, centered.
Open Cherry Bomb Doodle 3 and add to main canvas, centered.
Open Cherry Bomb Frame2 and add to main canvas, centered. Image - Free Rotate -> Rotate Left, 25 degrees.
Open Cherry Bomb Sticker 1 and resize to 65%. Add to main canvas, centered at H475, V160.
Open Cherry Bomb Interlaced Hearts 1 and resize to 75%. Add to main canvas, centered. Image -> free rotate -> rotate left, 25 degrees. Relocate to H470, V560, right over the inside bottom edge of the frame.
Open Cherry Bomb Bow 7 and mirror. Add to main canvas, centered at H250, V400.
Open tube of choice. I am using Abigail by Myka Jelina. Copy Layer 1, and add to main canvas. centered.
Open Cherry Bomb Cherry Blossom 2 and add to main canvas, centered at H200. V400. Image - Free Rotate -> Rotate left, 12 degrees
With your selection tool set to rectangle, replace, select the part of the bow what is below the tube's hand & tail. Right click on Raster 4 on the layers pallet and Promote Selection to Layer.
Selections -> Select None
Open Cherry Bomb Bunny 1 and resize to 50%. Add to main canvas, centered at H225, V475.
Open Cherry Bomb Flower with Stitching and add to main canvas, centered at H500, V450. Using your eraser tool, erase the bits of the stitching that fall over the tube layer.
Open Cherry Bomb Heart With Wings, and resize to 35%. Add to main canvas, centered at H600, V275. Image -> Free rotate -> Free Rotate left, 20 degrees.
Open Cherry Bomb Tag 1. On the materials pallet, set your foreground & background colors to black (#000000). Using font of choice add copyright information the tag. For the Abigail tube that information is:
©Myka Jelina mykasgraphics.com (License #)
I am using Century Gothic, 12 point, bold and centered. I then free rotated my text right, 42 degrees to match the angle of the tag. I also added the optional background credits and tagged by information at this point.
Merge visible, then resize the tag to 75% On the layers pallet, click on the promoted selection layer to activate, then add to main canvas, centered at H257, V600. Erase the large red unused portion on the right of the tag with your eraser tool. Also erase the portion of the stitching where it overlaps the tag.
Starting with the doodle layer, raster 2 and working upward, add a drop shadow of choice to each of the elements on your main canvas, except for the Promoted Selection. I am using offsets - vertical and horizontal - of 5 each, opacity of 75%, blur of 15 and color black (#000000).
You can now save the artist's copy of your tag as a .pspimage file.
Using font or alpha of choice, add name of choice to tag. I am using the Gothique Romance Alpha Red by Whispy's D'zines. I located my name at H550, V500, then free rotated it left, 25 degrees to match the angle of the frame. Finally I added a drop shadow, using the same settings as for the rest of the tag, but changing the color to white (#ffffff).
Drop the white background layer and merge visible. Resize to 75% (600 x 600 pixels) and save as a .png file and you are all done.
I hope you enjoyed this tutorial. If you should have a problem, please feel free to E-Mail Me and I'll be happy to help you out.
No comments:
Post a Comment