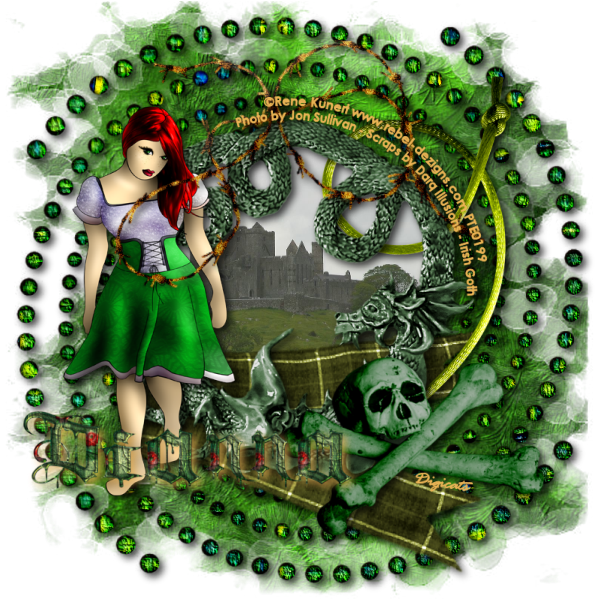
This tutorial was written by Dianna Richards of Digicats (and Dogs)/Di Before Dawn Tutorials. Any resemblance to any other tutorial, published or unpublished, living, dead or undead, is purely coincidental.
Please do not rebroadcast, redistribute or otherwise claim this tutorial or any part there of as your own work.
Items you will need to complete this project:
The Irish Goth taggers kit by Darq Illusions which is a PTU kit available at Butterfly Blush Designs.
The Rock of Chasel Castle Ruins photo, which is a public domain image, what can be downloaded HERE. Note that because you are using a tube on the tag you CAN NOT use a copyrighted photo as well. If you choose to use a different photo it must be something you have taken personally, or an image that has been placed in the Public Domain. DO NOT simply grab and image off the internet and use it as such an image is likely copyrighted. It must be specifically in Public Domain.
Tube of choice. I am using Irish Lovey, by Rene Kunert. You must have a license to use this tube, which is available at PSP Tubes Emporium.
Mask of choice. I am using the Bacteria mask by Nik's Scripts & Scraps which is part of her PSP Masks Mega Pack.
Font of choice. I am using Century Gothic which is a windows system font. If you do not have it, you can download it HERE.
Note that H# and V# refer to horizontal and vertical coordinates on your canvas ruler grid. Make sure you have View -> Rulers checked in order to see the ruler grid.
When I say "Add to your canvas" I expect that you will copy and paste it as a new layer, unless otherwise stated in the tutorial.
This tutorial assumes you have a working knowledge of PSP. It was written using PSP X3, but should work in PSP 8 and up.
To begin, open a new raster layer canvas, 800 x 800 pxl, flood fill white.
Open paper of choice. I am using DI_irishgoth_paper18. Go to Layers -> Load/Save Mask -> Load Mask from Disk and select mask of choice. I am using Bacteria by Nik's Scripts and Scraps. Make sure the fit to canvas box is checked, then click on load.
Edit -> Copy Special -> Copy Merged and add to main canvas, centered.
Open DI_irishgoth_element53. Add to main canvas, centered.
Open DI_irishgoth_frame4 and add to main canvas, centered.
Open Rock of Cashel photo and resize to 50%. Click on Raster 2, the beads element, then copy can add the castle to your main canvas, centered.
Using your pick tool manually adjust the placement of the castle in the frame.
Once you are happy with the placement of your photo, activate your magic wand, and click anywhere outside of the frame layer on Raster 3 to select. With the area still selected, click on Raster 4 on the layers pallet and hit the delete key.
Use your eraser tool to clean up the edges, then return to top layer.
Open Irish Lovey by Rene Kunert and activate Layer 4. Image -> Mirror, then copy and add to main canvas, centered at H200, V400.
Open DI_irishgoth_element43 and add to main canvas, centered at H400, V225.
Open DI-Irishgoth_element33 and add to main canvas, centered at H400, V600.
Open DI_Irishgoth_element61 and mirror. Click on Raster 7 - the ribbon layer - to activate, then add to main canvas centered at H550, V350.
Return to top.
Open DI_Irishgoth_element36 and resize to 75%, Add to main canvas, centered at H550, V600.
On the materials pallet, set both your foreground color and your background color to Goldenrod (#ecb556). Using font of choice, add the copyright information to the tag. For the Irish Lovey tube that information is:
©Rene Kunert www.rebel-dezigns.com PTE(License#)
I am using Century Gothic, 4 points, bold and centered, and have fit my text to path to match the outside of the frame. It is beyond the scope of this tutorial to explain how to do this, a separate tutorial on the subject is available HERE.
I also added the optional background credits and tagged by information at this time. For the Cashal Castle photo, the credit is "Photo by Jon Sullivan".
Starting with the beads layer - Raster 2 - and working upward on the layers pallet, add a drop shadow of choice to each of the elements on the main canvas except for the photo layer, Raster 4. I am using offsets - vertical and horizontal of 5 each - opacity of 75, blur of 15 and color black (#000000).
You should now save the artist's copy of your tag as a .pspimage file.
Using font or alpha of choice add desired name to tag. I am using the alpha included in the kit. I have my name centered at H250, V600, and have added a drop shadow to it to match the rest of the tag except that I have changed the shadow color to Goldenrod (#ecb556).
Drop the white background layer and merge visible. Resize to 75% (600 x 600 pixels) and save as a .png file, and you are all done.
I hope you enjoyed this tutorial. If you should have a problem, please feel free to E-Mail Me and I'll be happy to help you out.
Oh wow!!!! I am honored!! Thank you so much for the tutorial!! I will post it on my site also :D
ReplyDelete