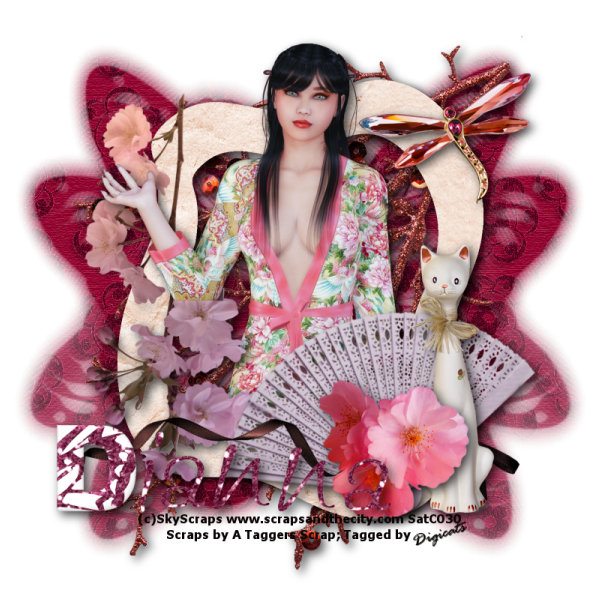
It's been so frickin' cold out, I felt the need to do something warm...
This tutorial was written by Dianna Richards of Digicats (and Dogs)/Di Before Dawn Tutorials. Any resemblance to any other tutorial, published or unpublished, living, dead or undead, is purely coincidental.
Please do not rebroadcast, redistribute or otherwise claim this tutorial or any part there of as your own work.
Items you will need to complete this project:
The Asian Dreams taggers kit by A Taggers Scrap. This is a PTU kit that is available at Scraps and the City.
Tube of choice. I am using Kim, by Sky Scraps. This is a PTU tube, and you must have a license to use this tube, which is available at Scraps and the City.
Mask of choice. I am using Wee Scots Mask #245 which you can download HERE.
Font(s) and/or alpha of choice. I am using Tahoma, which is a windows system font, and the Purple Dream alpha by Digiscrap.ch. This is a free to use alpha that you may download at the link provided.
Note that H# and V# refer to Horizontal and vertical coordinates on your canvas grid. Make sure you have View, Rulers checked in order to see the ruler grid.
When I say "Add to your canvas" I expect that you will copy and paste it as a new layer, unless otherwise state in the tutorial.
This tutorial assumes you have a working knowledge of PSP. It was written using PSP X3, but should work in PSP 8 and up.
To begin, open a new raster layer canvas, 800 x 800 pxl, flood fill white.
Open paper of choice. I am using Paper5. Layers -> Load/Save Mask -> Load Mask from Disk and select mask of choice. I am using Wee Scots Lass mask # 245. Make sure the fit to canvas box is checked, then click on load.
Edit -> Copy Special -> Copy Merged and add to main canvas, centered. Open branch, and add to main canvas, centered. Using your eraser brush, erase the bit of the branch that falls above the masked paper on the top right hand tip only.
Open frame4, and add to main canvas, centered.
Open tube of choice. I am using SkyScraps Kim1. Resize to 75%, and add to main canvas, centered at H350, V350.
On the layers pallet, right click on the frame, Raster 3, and duplicate.
Drag the copy of the frame (copy of Raster 3) over the tube layer.
With your selection tool set to rectangle, replace, select the top half of the frame copy (Copy of Raster 3) and delete.
Selections -> Select none.
Using your eraser tool, erase just the little bit of the tube that appears under the bottom of the frame on on the left hand side.
Click on Copy or Raster 3 to activate.
Open fan3. Resize to 65% and add to main canvas, centered at H500, V550. Image -> Free Rotate -> Rotate left 17 degrees.
Open ribbon1, resize to 75%, and add to main canvas, centered at H400, V600.
Open cat and add to main canvas, centered at H600, V500.
Opem blossom1, resize to 65% and add to main canvas, centered at H525, v600.
Open dragonfly, resize to 65% and add to main canvas, centered at H600, V175.
Click on the frame layer (Raster 3) to activate. Open blossom2, rotate right and mirror. Resize to 75%, and add to main canvas, centered at H230, V380.
On the layers pallet, right click on blossom2 and duplicate. Drag the duplication over the frame copy (Copy of Raster 3).
With your selection tool set to rectangle, replace, select the top half of the blossom2 copy (Copy of Raster 10) and delete.
Selections -> Select none.
On the layers pallet, click on the branch layer (Raster 2). Beginning with this layer and working upward, add a drop shadow of choice to the elements on your main canvas except for Raster 10 (the blossom2 layer) and the Copy of Raster 3.
I am using offsets, vertical and horizontal of 5 each, opacity of 75, blur of 20, and color black (#000000).
On the materials pallet set your foreground color to transparent and your background color to off black (#0b0606).
Click on Raster 9 to active. Using font of choice, add the copyright to your tag. For the Kim tube that information is:
(c)SkyScraps www.scrapsandthecity.com Your SATC_License#
You can also add the background and tagged by credits at this time. I have located my information at H400, V700, and am using the font Tahoma, 4 points, bold and centered.
You may now save the artist's copy of your tag as a .pspimage file.
Using font or alpha of choice, add name of choice to tag. I am using the Purple Dream alpha by Digiscrap.ch, which is a free to use, full size alpha. When composing the name, I resize her alpha sheets to 35% and compose the names on a separate canvas, merge visible, then copy them over to the main canvas. (I can then resize them if I need to usually down to 75%, but in this case, I didn't need to do any resizing beside the initial resize to the sheet.)
I have centered the name at H300, V625. The actual location of your name may vary depending upon the size of the font or alpha you are using and the length of the name.
Add a matching drop shadow to the name.
Delete the white background layer, and merge visible. Resize your tag to 75% (600 x 600 pixels) and save as a .png file, and you're all done.
Note that if you are planning on using the tag on Facebook, you may wish to save it as a .jpg as Facebook does not handle .pngs well.
I hope you enjoyed this tutorial. If you should have a problem, please feel free to E-Mail Me and I'll be happy to help you out.
No comments:
Post a Comment