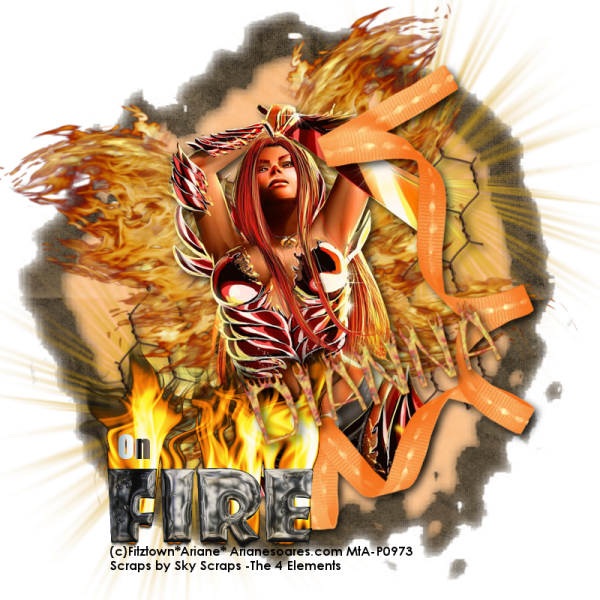
This tutorial was written by Dianna Richards of Digicats (and Dogs)/Di Before Dawn Tutorials. Any resemblance to any other tutorial, published or unpublished, living, dead or undead, is purely coincidental.
Please do not rebroadcast, redistribute or otherwise claim this tutorial or any part there of as your own work.
Items you will need to complete this project:
The 4 Elements taggers kit by Sky Scraps, which is a PTU kit that can be purchased at Scraps and the City.
Tube of choice. I am using Die Bastard, by Ariane Soares. This is a PTU tube, and you must have a license to use this tube, which is available at MIStaken Art.
Mask of choice. I am using Nik's Fireball mask by Nik's Scripts & Scraps which is part of her PSP Masks Mega Pack.
Font(s) and/or alpha of choice. I am using the fonts Impact and Century Gothic, both of which are Windows System fonts. The Fire alpha was created Anika. It is/was a FTU alpha but I just checked her blog and the download link no longer works. However, it appears that alpha was made using the Cheap Fire font, and you can download that from Acid Fonts (it's free).
Note that H# and V# refer to Horizontal and vertical coordinates on your canvas grid. Make sure you have View, Rulers checked in order to see the ruler grid.
When I say "Add to your canvas" I expect that you will copy and paste it as a new layer, unless otherwise state in the tutorial.
This tutorial assumes you have a working knowledge of PSP. It was written using PSP X3, but should work in PSP 8 and up.
To begin, open a new raster layer canvas, 800 x 800 pxl, flood fill white.
Open paper of choice. I am using SkyScraps-T4E-paper1. Layers -> Load/Save Mask -> Load Mask from Disk -> and select mask of choice. I am using Nik's Fireball. Make sure the fit to canvas box is checked, then click on load.
Edit -> Copy Special -> Copy Merged and add to main canvas, centered.
Using the same mask, repeat with SkyScraps-T4E-paper3, but resize the masked paper 85% before adding it to the main canvas.
Open SkyScraps-T4E-CW, and add to main canvas centered. Image -> Free Rotate ->Rotate left, 17 degrees.
Open tube of choice. I am using Fitztown - Ariane's Die Bastard. Copy the tube layer and add to main canvas, centered.
Open SkyScraps-T4E-R2 and add to main canvas, centered. Image -> Free Rotate -> Rotate right, 45 degrees.
Relocate the Ribbon to H550, V400. Using your eraser tool, erase the bits of the tube that appear below the ribbon on the right hand side.
Click on Raster 3 - the chicken wire - to activate. Open Sky Scraps-E1 and add to main canvas, centered at H550, V300.
Right click on the element and duplicate, then mirror. Layers -> Merge -> Merge down.
Image -> Free Rotate -> Rotate Left, 20 degrees. Relocate to H375, V325. Use your pick tool to make any fine adjustments necessary to the placement.
Click on the Ribbon layer, Raster 5 to activate. Open SkyScraps-T4E-Fire and add to main canvas centered at H275, V575.
Click on Raster 2, the second masked paper layer. Open SkyScraps-sun and add to the main canvas, centered at H550, V250.
Right click on the sun on the layer pallet (Raster 8), duplicate, then image -> mirror, image -> flip.
Click on the word art layer (Raster 7) to activate. On the materials pallet, set your foreground color to transparent and your background color to a metallic Chrome gradient. There is a default one that came with all my PSP versions, so you should have it. Using the font Impact (which is a windows system font), size 10, bold and centered, type the word "on" just over the "F" in the word Fire. Use your pick tool to fine tune the text location.
Add a drop shadow of choice to the chicken wire, the tube layer and the ribbon. I am using offsets, vertical and horizontal of 5 each, opacity of 75%, blur of 15, color black (#000000).
On the materials pallet, reset your background color to black (#000000). Using font of choice, add the copyright information to your tag. for the Die Bastard tube, that information is:
(c)Fitztown*Ariane* Arianesoares.com Your MTA_License#
I am using Century Gothic, 4 points, bold and left aligned. You can also add the background information and the tagged by information at this point.
You can now save the artist's copy of your tag as a .pspimage file.
Using font for alpha of choice, add name of choice to tag. I have free rotated my name 20 degrees, left and located it at H500, V500. You location may vary depending upon the size of the font/alpha you are using and the length of the name.
Add matching drop shadow to the name.
Drop the white background layer, resize to 75% (600 x 600 pixels) and save as a .png file and you're all done.
If you are planning on using the tag on Facebook, you might want to save it as a .jpg file, as Facebook's handling of .pngs has changed and the tags look better with the white background on them.
I hope you enjoyed this tutorial. If you should have a problem, please feel free to E-Mail Me and I'll be happy to help you out.
No comments:
Post a Comment