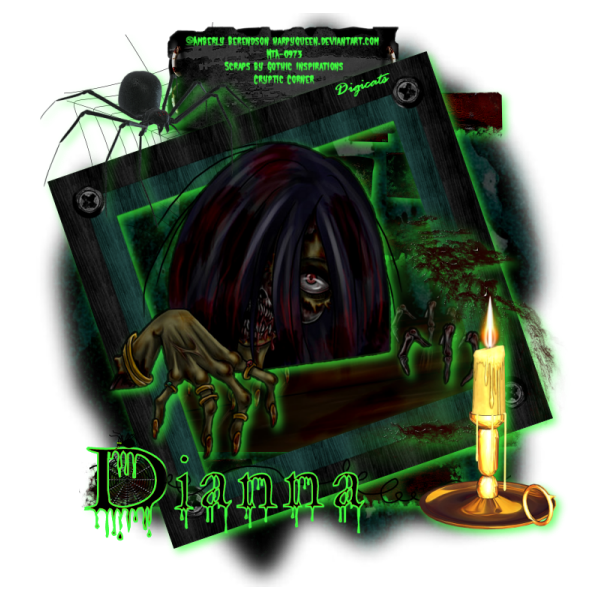
No, it's not Halloween. It's um...Gothic! Yeah, that's it! Gothic!
This tutorial was written by Dianna Richards of Digicats (and Dogs)/Di Before Dawn Tutorials. Any resemblance to any other tutorial, published or unpublished, living, dead or undead, is purely coincidental.
Please do not rebroadcast, redistribute or otherwise claim this tutorial or any part there of as your own work.
Items you will need to complete this project:
The Cryptic Corner taggers kit by Gothic Inspirations, which is a PTU kit that is available at Gothic Inspiration.com.
Tube of choice. I am using From the Crypt, by Amberly Berendson. You must have a license to use this tube, which is available at My Tubed Art.com.
Mask of choice. I am using the NiksMask16 mask by Nik's Scripts & Scraps which is part of her PSP Masks Mega Pack.
Font(s) and/or alpha of choice. I am using the font Castle Dracustein, which is a FTU font that may be dowloaded HERE, and the Creepy Alpha by Winter's Loft.
Note that H# and V# refer to Horizontal and vertical coordinates on your canvas grid. Make sure you have View, Rulers checked in order to see the ruler grid.
When I say "Add to your canvas" I expect that you will copy and paste it as a new layer, unless otherwise state in the tutorial.
This tutorial assumes you have a working knowledge of PSP. It was written using PSP X3, but should work in PSP 8 and up.
To begin, open a new raster layer canvas, 800 x 800 pxl, flood fill white.
Open paper of choice. I am using Paper4-GI_CrypticCorner. Layers -> Load/Save Mask -> Load Mask from Disk and select mask of choice. I am using NikMask16 by Nik's Scripts and Scraps. Make sure the fit to canvas box is checked, then click on load.
Resize to 90%. Edit -> Copy Special -> Copy Merged and add to main canvas, centered.
Open Brick-GI_CrypticCorner and add to main canvas, centered.
Open tube of choice. I am using From the Crypt by Amberly Berendson. Copy Layer 1, and add to the main canvas, centered.
Open Frame2-GI_CrypticCorner, and resize to 80%. Add to main canvas, centered. Image -> Free Rotate -> Rotate left, 19 degrees.
Going back to the tube, copy Layer 2 and add to main canvas, centered. It should, automatically line up with Raster 3. If it doesn't use your pick tool to make the necessary adjustments.
Using your eraser tool, erase the parts of Raster 3 that are visible outside the frame layer.
Return to the top layer. Open String-GI_CrypticCorner and resize to 600 pixels wide. Add to the main canvas, centered at H400, V650.
Open Candle and resize to 75%. Add to main canvas, centered at H650, V550.
On the layer pallet, click on Raster 1, the paper layer to active. Open Web-GI_CrypticCorner and resize to 50%. Add to the main canvas, centered at H250, V200. Return to top layer, Raster 7.
Open Spider-GI_CrypticCorner and resize to 75%. Image -> Mirror. Add to main canvas, centered at H200, V200.
Click on Raster 4, the frame layer to activate. Open Splatter-GI_CrypticCorner and resize to 75%. Add to main canvas, centered at H600, V450.
On the layers pallet, click on the web layer, Raster 8. Starting with that layer and working upward, add a drop shadow to the elements on your main canvas except for the first tube layer, Raster 3. I am using offsets, vertical and horizontal of 5 each, opacity of 75, blur of 15 and color of bright lime green (#40ff40).
Open Tab. Using font of choice add copyright information to the tag. For the From the Crypt tube, that information is:
©Amberly Berendson harpyqueen.deviantart.com Your MTA_License#
I am using Castle Dracustein, 4 points, bold and centered and color of #40ff40, which should match the drop shadow. You should add the background credits and tagged by line at this time as well.
Put the info up near the top of the tag, as the bottom part is going to be covered. And make sure it's large enough to read once the tag is resized.
Merge Visible, then resize the tag to 75%. On the Main Canvas, click on Raster 2, the brick layer, to activate. Add the tag to your main canvas, centered at H380, V110 (or there abouts). Make sure none of the copyright information is covered up.
You can now save the artist's copy of your tag as a .pspimage file.
Using font or alpha of choice, add desired name to tag. I am using the Creepy alpha and, once I'd composed the name on a separate canvas, used the color changer to get the creepy stuff to match the rest of the the tag.
I have the name centered at H300, V650. Given the alpha I'm using, I didn't need to add a drop shadow to it, but if necessary, add a matching drop shadow to the name.
Drop the white background layer and merge visible. Resize to 75%, 600 x 600 pixels, and save as a .png file and you are all done!
Note that if you are planning on using the tag on Facebook, you may wish to save it as a .jpg as Facebook does not handle .pngs well.
I hope you enjoyed this tutorial. If you should have a problem, please feel free to E-Mail Me and I'll be happy to help you out.
Ha..ha...that is sooo Halloweeny, you might be able to pull off Gothic if you got rid of the bright neon green glow...but I'm a HUGE fan of Halloween all the time, yep all year round , and I love the tut!! Thank you so much. WoOt!
ReplyDelete