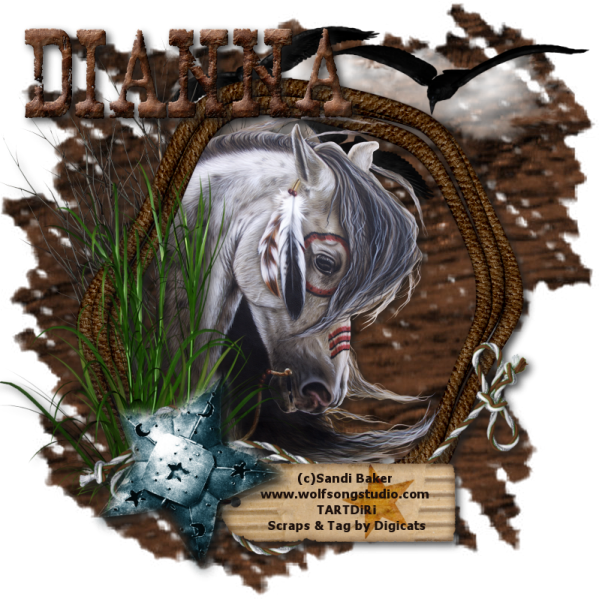
This tutorial was written by Dianna Richards of Digicats (and Dogs)/Di Before Dawn Tutorials. Any resemblance to any other tutorial, published or unpublished, living, dead or undead, is purely coincidental.
Please do not rebroadcast, redistribute or otherwise claim this tutorial or any part there of as your own work.
Items you will need to complete this project:
My Wild, Wild West taggers kit. This is a PTU kit that is available at Scrappetizing (and other fine online boutiques).
Tube of choice. I am using 18SaBa by Sandi Baker. You must have a license to use this PTU tube, which is available at My Tag Art.
Mask of choice. I am using the Rope Burns mask by Nik's Scripts & Scraps which is part of her PSP Masks Mega Pack.
Font(s) and/or alpha of choice. I am using Tahoma which is a Windows sytems font, and the Rawhide Alpha by Wenchd Grafix. This was a FTU alpha but it is no longer available for download. (Sorry!)
Note that H# and V# refer to Horizontal and vertical coordinates on your canvas grid. Make sure you have View, Rulers checked in order to see the ruler grid.
When I say "Add to your canvas" I expect that you will copy and paste it as a new layer, unless otherwise state in the tutorial.
This tutorial assumes you have a working knowledge of PSP. It was written using PSP X3, but should work in PSP 8 and up.
To begin, open a new raster layer canvas, 800 x 800 pxl, flood fill white.
Open paper of choice. I am using DCD_WWW_Paper04. Layers -> Load/Save Mask -> Load Mask from Disk. Open mask of choice. I am using Rope Burns by Nik's Scripts & Scraps. Make sure the "Fit to Canvas" button is checked, then click on load.
Edit -> Copy Special -> Copy Merged and add to main canvas, centered.
Open DCD_WWW_Dead Bush03 and add to main canvas, centered at H250, V350.
Open DCD_WWW-Frame06. Adjust -> Brightness and Contrast ->Brightness/Contrast -> Brightness -50 (Contrast 0).
Add to main canvas, centered.
Open tube of choice. I am using 18SABA by Sandi Baker. Copy the tube layer and add to main canvas, centered.
On the layers pallet, right click on Raster 4 (the frame layer) and duplicate. Drag the duplication over the tube layer.
With you selection tool set to Rectangle, replace, select the right half of the frame copy and deleted.
Selections -> Select none.
Open DCD_WWW-Scrub Grass02 and add to main canvas, centered at H200, V450.
Open DCD_WWW_String04, resize to 75% and add to main canvas, centered at H400, V600.
Open DCD-WWW-Star02, resize to 75% and add to main canvas, centered at H250, V625.
Click on Raster 2, the background layer to activate. Open DCD_WWW_Ravens Cluster, resize to 75% and add to main canvas, centered at H500, V150.
Starting with the next layer, Raster 3 and working upward, add a drop shadow of choice to each of the elements on the main canvas, except for the frame copy (Copy of Raster 4).
I am using offsets, vertical and horizontal of 5 each, opacity of 85, blur of 15, color off black (#202020).
Open DCD_WWW_Tag02 and rotate left. On the materials pallet, set your foreground color to transparent and your background color to Dark Brown (#1b100c).
Using font of choice, add the copyright information to the tag. For the Sandi Baker tube that information is:
(c)Sandi Baker www.wolfsongstudio.com Your_TART_License#
I am using Tahoma, 4 points, bold and centered. Merge visible.
On the layers pallet, click on the string layer (Raster 7). Add the tag to the main canvas, centered at H400, V675.
Add a drop shadow to the tag to match the rest of the elements.
You can now save the artist's copy of your tag as a .pspimage file.
Using font or alpha of choice, add name of choice to the tag. I am using the Rawhide alpha by Wenchd Grafix. I have my name centered at H250, V100. Your location may vary slightly due to the size of the font or alpha you are using the length of the name you are using.
Add a drop shadow to the name to match the rest of the tag.
Delete the white background layer, and merge visible. Resize to 75% (600 x 600 pixels) and save as a .png file and you are all done.
Optionally, you can keep the background and save as a .jpg file.
I hope you enjoyed this tutorial. If you should have a problem, please feel free to E-Mail Me and I'll be happy to help you out.
No comments:
Post a Comment