Please do not rebroadcast, redistribute or otherwise claim these tutorials or any part there of as your own work.
Items you will need to complete these projects:
The Stargazing collaboration kit. This kit is available for FREE with an $8 purchase at Stargazer Scraps, or it may be purchased outright for the same price. It is available EXCLUSIVELY at Stargazer Scraps.
The Snow Overlay-SM, which I made for a tut once upon a time a while ago, and which you can snag HERE.
Various masks by Wee Scots Lass which you can download HERE.
Font(s) choice. I am using MS Gothic which is a Windows System font. If you do not have it, you can download it HERE.
The Moonbeam alpha by Julie It Is. This is a free to use alpha that you may download from Julie's blog HERE. Be sure to leave her a "thank you" if you download.
Note that H# and V# refer to Horizontal and vertical coordinates on your canvas grid. Make sure you have View -> Rulers checked in order to see the ruler grid.
When I say "Add to your canvas" I expect that you will copy and paste it as a new layer, unless otherwise stated in the tutorial.
These tutorials assumes you have a working knowledge of PSP. They were written using PSP X3, but should work in PSP 8 and up.
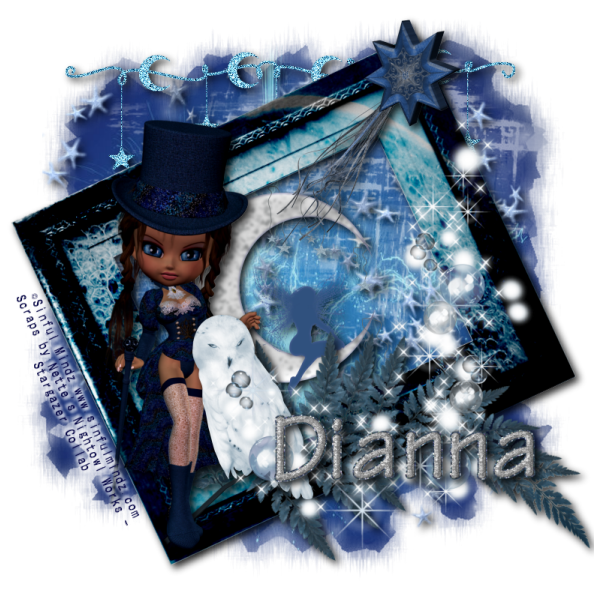
Nette's Nightowl Works "Mistress of Stars" tutorial

To begin, open a new canvas, 800 x 800 pixels, flood filled white.
Open nnw sg paper 17. Layers -> Load/Save mask -> Load Mask from Disk and select Wee Scots Lass mask #222. Make sure the fit to canvas button is checked, then click on load.
Image -> Resize to 85% then go to Edit -> Copy Special -> Copy Merged and add to main canvas, centered.
Open NNW sg star bling2, Resize to 75%, and add to main canvas, centered.
NNw sg moon and stars border. Resize to 600 pixels, then to go to Adjust -> Add/Remove Noise -> add noise -> gaussian, 100%. Add to main canvas, centered at H400, V150.
NNW sg fairy on moon and resize to 35%. Add to main canvas, centered.
Open NNW sg frame2, and add to main canvas, centered. Image -> Free Rotate -> Rotate Left, 25 degrees.
Open NNW SG Wand, and resize to 35%. Add to main canvas, centered at H500, V175.
NNW sg fern, mirror, then go to image -> Free Rotate -> Rotate Right, 45 degrees. Resize to 65%, then add to main canvas, centered at H500, V600.
Using your eraser tool, erase the bit of the stem that's off to the left of the frame.
Open SM Eliza1-1, and resize to 65%. Add to main canvas, centered at H200, V450.
Open Owl, resize to 35%, and add to main canvas, centered at H350, V550.
Open NNW sg bubble dust, resize to 65% and add to main canvas, centered at H500, V450.
Starting with Raster 2, the star bling layer, and working upward, add a drop shadow to each of the elements on your main canvas, except for the bubble dust layer, Raster 10.
I am using offsets, vertical and horizonal of 5 each, opacity of 85%, blur of 15, and color black (#000000).
Using font of choice add the copyright information to the tag. I am using MS Gothic, 4 points, bold, and centered. For the Sinful Mindz tube included in the kit, that information is:
©Sinful Mindz www.sinfulmindz.com.
You can also add the background credits and tagged by information at this time.
Go to image -> Free Rotate -> Rotate Right, 65 degrees and line the text up on the left hand side of the frame. Add a drop shadow to the text using the following settings:
Offsets, vertical and horizontal of 3 each, opacity of 100%, blur of 5 and color white (#ffffff). Repeat using offsets of -3 each, and leaving all other fields unchanged.
You can now save the artist's copy of your tag as a .pspimage file.
Using font or alpha of choice, add name of choice to tag. I have the name centered at H550, V600 and am using the Moonbeam alpha by Julie It is. Add a drop shadow to the name to match the rest of the elements on the canvas (not the copyright).
Drop the white background layer and merge visible. Resize to 75% (600 x 600 pixels) and save as a .png file image and you are all done!
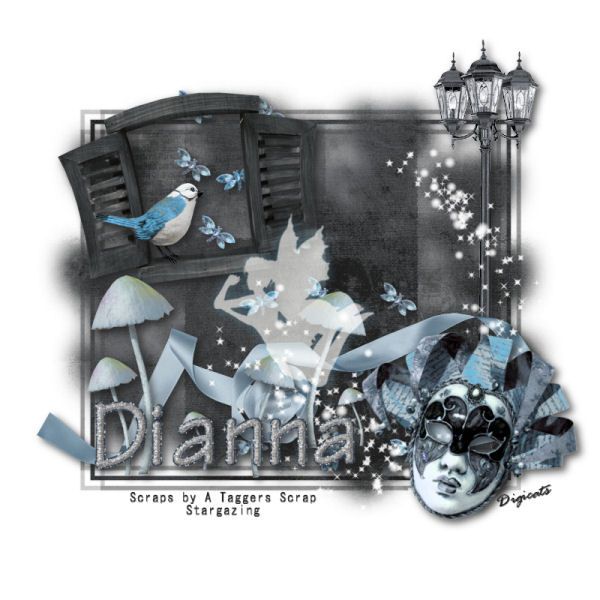
A Taggers Scrap "Starlight" tutorial

To begin, open a new canvas, 800 x 800 pixels, flood filled white.
Open Paper 17. Layers -> Load/Save mask -> Load Mask from Disk and select Wee Scots Lass mask #187. Make sure the fit to canvas button is checked, then click on load.
Edit -> Copy Special -> Copy Merged and add to main canvas, centered.
Open Butterflies, and add to main canvas, centered.
Open Frame2 and resize to 50%. Add to main canvas, centered at H250, V250.
Open Lamp, and add to main canvas, centered at H650, V350.
Open Bird and resize to 50%. Image -> Mirror, then add to main canvas, centered at H200, V300.
Open Ribbon12 and go to image -> flip. Add to main canvas, centered at H440, v520.
Open Mushrooms, and add to main canvas, centered at H300, V500.
Open Fairy, and resize to 50%. Add to main canvas, centered. Go to Image -> Free Rotate -> Rotate right, 37 degrees. On the layers pallet, change the opacity level to 86%.
Open Fairy Dust, and go to image -> Mirror. Add to main canvas, centered at H500, V450.
Open Mask2, and resize to 75%. Add to main canvas, centered at H625, V575. Go to Image -> Free Rotate -> Rotate right, 15 degrees.
Using font of choice, add the scrap credits and tagged by info to the main canvas, As there is is a scraps only tag, there is no copyright. I am using MS Gothic, 4 points, bold, and centered, with the color #202020. I have the credits centered at H330, V670.
On the layers pallet click on Raster 2, the butterfly layer to activate. Starting there and working upward, add a Drop Shadow to each of the elements on your main canvas, except for the Fairy and the Fairy Dust layers.
I am using offsets, vertical and horizontal of 5 each, opacity of 75, blur of 15, and color of #202020.
You can now save the artist's copy of your tag as a .pspimage file.
Using font or alpha of choice, add name of choice to tag. I have the name centered at H300, V550 and am using the Moonbeam alpha by Julie It is. Add a drop shadow to the name to match the rest of the elements on the canvas.
Layers -> Merge Visible and resize to 75% (600 x 600 pixels), save as a .jpg file and you are all done.
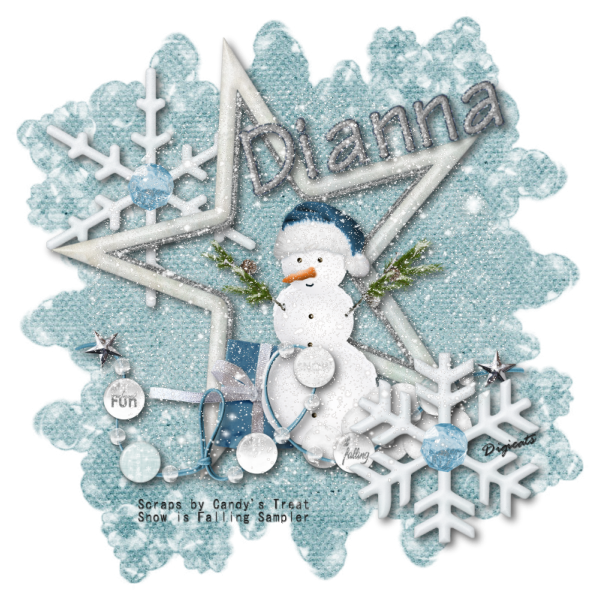
Candy's Treats "Snow is Falling" tutorial

To begin, open a new canvas, 800 x 800 pixels, flood filled white.
Open paper of choice. I am using Winter-block3. Layers -> Load/Save mask -> Load Mask from Disk and select Wee Scots Lass mask #277. Make sure the fit to canvas button is checked, then click on load.
Edit -> Copy Special -> Copy Merged and add to main canvas, centered.
Open Snowflake5, and add to main canvas, centered at H200, V250.
Open Frame 4, and add to main canvas, centered at H350, V350.
Open Winter Gift and add to main canvas, centered at H325, V525.
Open Snowman2 and add to main canvas, centered at H450, V450.
Open Snowstring and add to main canvas, centered at H400, V550.
Open Snowflake7 and add to main canvas, centered at H600, V600.
On the layers pallet, click on Raster 2, the snowflake5 layer to active. Starting with that layer and working upward, add a drop shadow to each of the main elements on your canvas.
I am using offsets, vertical and horizontal of 5 each, opacity of 75, blur of 15, and color of #202020.
Using font of choice, add the scrap credits and tagged by info to the main canvas, As there is is a scraps only tag, there is no copyright. I am using MS Gothic, 4 points, bold, and centered, with the color #202020. I have the credits centered at H330, V675.
You can now save the artist's copy of your tag as a .pspimage file.
Using font or alpha of choice, add name of choice to tag. I have the name centered at H550, V175 and am using the Moonbeam alpha by Julie It is.
Image -> Free Rotate -> Rotate Left, 15 degrees to match the angle of the frame. Add a drop shadow to the name to match the rest of the elements on the canvas.
Drop the white background layer, then go to Layers -> Merge Visible and resize to 75% (600 x 600 pixels). Open Snow Overlay-SM, and add to main canvas, centered. Merge visible (again) and save as a save as a .png file and you are all done.
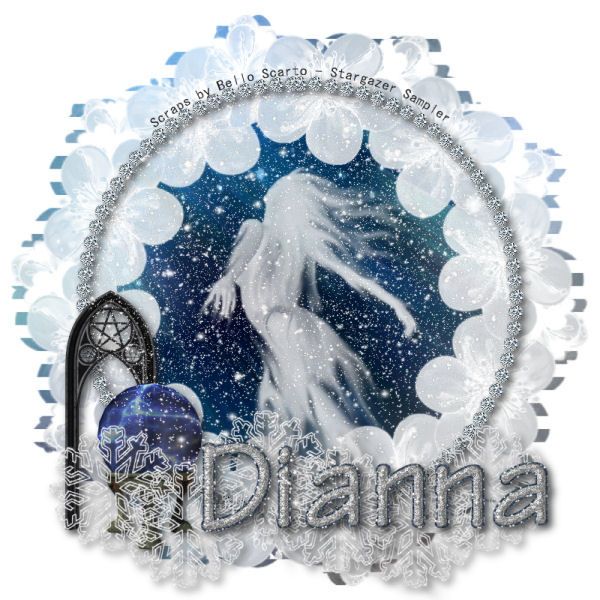
Bello Scarto "Mystical Night" tutorial

To begin, open a new canvas, 800 x 800 pixels, flood filled white.
Open Paper5. Layers -> Load/Save mask -> Load Mask from Disk and select Wee Scots Lass mask #274. Make sure the fit to canvas button is checked, then click on load.
Edit -> Copy Special -> Copy Merged and add to main canvas, centered.
Open Element3 and add to main canvas, centered.
Open Element5, resize to 75% and add to main canvas, centered at H440, V510.
Open Element10, resize to 50% and add to main canvas, centered at H150, V550.
Open Element 6, resize to 50% and add to main canvas, centered at H200, V615.
Open Element 12, resize to 50% and add to main canvas, centered at H150, v650 and again at H250, V700.
Layers -> Merge Down. copy the new Raster 6, and add to main canvas, centered at H400, V650.
On the layers pallet, click on Raster 6, and duplicate. Image -> Mirror.
Starting with Raster 2 on the layers pallet, the element 3 (frame) layer and working upward, add a drop shadow of choice to each of the elements on your main canvas.
I am using offsets, vertical and horizontal of 5 each, opacity of 75, blur of 15, and color of #202020.
Using font of choice, add the scrap credits and tagged by info to the main canvas, As there is is a scraps only tag, there is no copyright. I am using MS Gothic, 4 points, bold, and centered, with the color #202020. I have the credits centered at H400, V100, and have fit object to patch so they match the curve of the frame.
(It is beyond the scope of this tutorial to explain how to do that, however if you do not know how to do this you can find a tutoril for it HERE.
Using font or alpha of choice, add name of choice to tag. I have the name centered between H500 and H550 (depending on the length), and V175 and am using the Moonbeam alpha by Julie It is.
Add a drop shadow to the name to match the rest of the elements on the canvas.
Go to Layers -> Merge Visible and resize to 75% (600 x 600 pixels). Open Snow Overlay-SM, and add to main canvas, centered. Merge visible (again) and save as a save as a .jpg file and you are all done.
I hope you enjoyed these tutorials. If you are planning on using any of these tags on Facebook, be sure to save them as .jpg files with white backgrounds, as those look better on Facebook.
If you should have a problem, please feel free to E-Mail Me and I'll be happy to help you out.
No comments:
Post a Comment