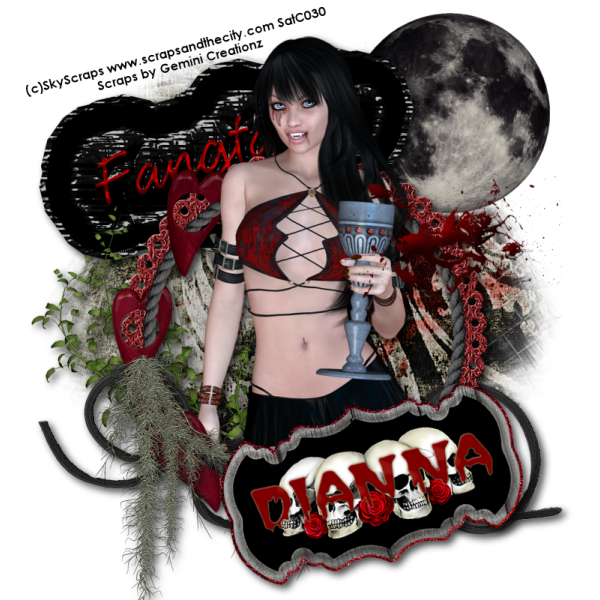
This tutorial was written by Dianna Richards of Digicats (and Dogs)/Di Before Dawn Tutorials. Any resemblance to any other tutorial, published or unpublished, living, dead or undead, is purely coincidental.
Please do not rebroadcast, redistribute or otherwise claim this tutorial or any part there of as your own work.
Items you will need to complete this project:
The True Blood taggers kit by Gemini Creationz. This is a PTU kit that is available at Scraps and the City.
Tube of choice. I am using Dakota, by Sky Scraps. This is a PTU tube, and you must have a license to use this tube, which is available at Scraps and the City.
Mask of choice. I am using Wee Scots Mask #141 which you can download HERE.
Font(s) and/or alpha of choice. I am using Century Gothic, which is a windows system font, and the Bloody Mess alpha by Marie Stones. This is a free to use alpha that you may download at the link provided.
Note that H# and V# refer to Horizontal and vertical coordinates on your canvas grid. Make sure you have View, Rulers checked in order to see the ruler grid.
When I say "Add to your canvas" I expect that you will copy and paste it as a new layer, unless otherwise state in the tutorial.
This tutorial assumes you have a working knowledge of PSP. It was written using PSP X3, but should work in PSP 8 and up.
To begin, open a new raster layer canvas, 800 x 800 pxl, flood fill white.
Open paper of choice. I am using gcz-trubld-paper6. Layers -> Load/Save Mask -> Load Mask of Choice. I am using Wee Scots Lass Mask #141. Make sure the "Fit to Canvas" button is checked, then click on load.
Edit -> Copy Special -> Copy Merged and add to main canvas, centered.
Open gcz-trubld-moon, resize to 50% and add to main canvas, centered at H600, V150.
Add a drop shadow to the moon, Offsets vertical and horizontal of 3 each, opacity 75, blur 10, Color white (#ffffff). Repeat with offsets of -3 each.
Open gcz-trubld-greenry, and add to main canvas, centered at H200, V450.
Open gcz-trubld-leather-strap and add to main canvas, centered at H400, V600.
Open gcz-trubld-frame2 and add to main canvas, centered at H400, V450
Open tube of choice. I am using Dakota by Sky Scraps. Resize to 75%, Copy Layer 1, and add to main canvas H400, V350.
On the layers pallet, right click on the frame layer, Raster 5, and duplicate.
Drag the duplication over the tube layer. With your selection tool set to rectangle, replace, select the top half of Copy of Raster 5, and delete.
Selections -> Select None.
Open gcz->gcz-trubld-moss. Resize to 50%, and add to main canvas, centered at H325, V670. (Some of the element will run off the canvas. That's okay.)
On the layers pallet, click on the moon layer, Raster 2 to activate. Open gcz-trubld-sign and add to your main canvas, centered at H300, V200.
Start with the sign and working upward a drop shadow to each of the elements on your canvas, except the frame copy, Copy of Raster 5.
I am using offsets, vertical and horizontal, of 5 each, opacity of 75, blur of 15 and color black (#000000).
On the materials pallet, set your foreground color to transparent, and your background color to black (#000000). Using font of choice, add copyright information to the tag. For the Dakota tube, that information is:
(c)SkyScraps www.scrapsandthecity.com Your SatC_License#
You can also add the background credits and taggered by information at this point. I centered my credits at H235, V65, then free rotated them left, 15 degrees to match the angle on the sign.
Open gcz-trubld=splat2. Adjust -> Brightness and Contrast -> Brightness of -35, Contrast of 11. Click on okay. Resize to 75% and add to main canvas, centered at H600, V325.
Effects -> 3D Effects -> Inner Bevel. Bevel 2, Width: 18, Smoothness: 100, Depth: 20, Ambience: 37, Shininess: 20, Light -> Color Red (#800000), Angle: 318, Intensity: 40, Elevation: 30 -> OK
You can now save the artist's copy of your tag as a .pspimage.
Open gcz-trubld-tag3. Using font or alpha of choice add name of choice to tag 3. I am using the Blood Mess Alpha. Once you have composed the name on the tag, merge visible, then add to the main canvas centered at H500, V650.
Image -> Free Rotate -> rotate left 15 degrees.
Add a matching drop shadow to the tag.
Drop the white background layer, and merge visible. Resize to 75% (600 x 600 pixels) and save as a .png file, and you are all done.
I hope you enjoyed this tutorial. If you should have a problem, please feel free to E-Mail Me and I'll be happy to help you out.
Thank you for writing up this tutorial using my kit.
ReplyDeleteHugs,
Vicki