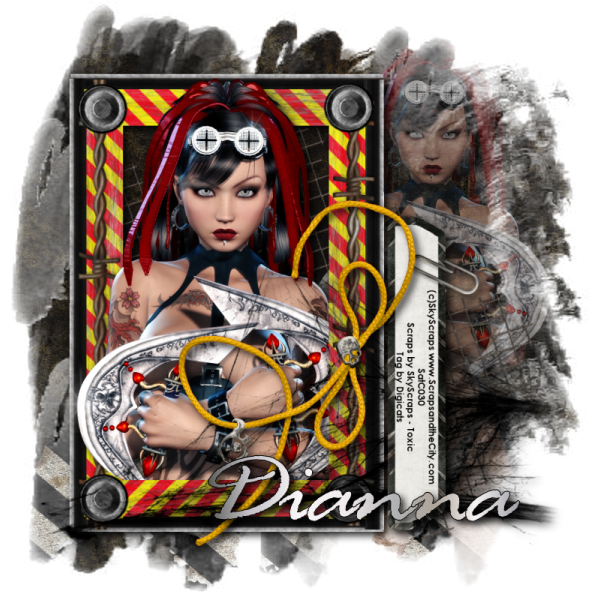
This tutorial was written by Dianna Richards of Digicats (and Dogs)/Di Before Dawn Tutorials. Any resemblance to any other tutorial, published or unpublished, living, dead or undead, is purely coincidental.
Please do not rebroadcast, redistribute or otherwise claim this tutorial or any part there of as your own work.
Items you will need to complete this project:
the Toxic taggers kit by Sky Scraps, which is a PTU kit that can be purchased at Scraps and the City.
Tube of choice. I am using Tanya, by Sky Scraps. This is a PTU tube, and you must have a license to use this tube, which is available at Scraps and the City.
Mask of choice. I am using Grunge by Nik's Scripts & Scraps which is part of her PSP Masks Mega Pack.
Font(s) and/or alpha of choice. I am using the font Century Gothic, which is a Windows System font, and the Rage Italic LET font, which you can download at Acid Fonts.com.
Note that H# and V# refer to Horizontal and vertical coordinates on your canvas grid. Make sure you have View, Rulers checked in order to see the ruler grid.
When I say "Add to your canvas" I expect that you will copy and paste it as a new layer, unless otherwise state in the tutorial.
This tutorial assumes you have a working knowledge of PSP. It was written using PSP X3, but should work in PSP 8 and up.
To begin, open a new raster layer canvas, 800 x 800 pxl, flood fill white.
Open paper of choice. I am using SkyScraps-Toxic-pp11.
Open Tanya-2 and add to paper, centered at H600, V400. On the layers pallet, set your opacity level to 50%.
Layers -> Merge -> Merge visible.
Layers -> Load/Save Mask -> Load Mask of Choice. I am using Nik's Grunge1. Make sure the fit to canvas box is checked, then click on load.
Edit -> Copy Special -> Copy Merged and add to main canvas, centered.
Open SkyScraps-Toxic-MetalE1, and add to main canvs, centered. Image -> Free Rotate -> Rotate right, 27 degrees.
Open SkyScraps-Toxic-Frame15 and rotate left. Resize to 75% Add to main canvas, centered at H300, V400.
Open Tonya, and resize to 75%. Add to main canvas, centered at H300, V400.
On the layers pallet, right click on Raster 3, the frame layer and duplicate. Drag the duplication over the tube layer, Raster 4.
with you selection tool set to rectangle, replace, select the top half of the frame copy, Copy of Raster 3, and delete.
Repeat on the left hand side (only) of the Copy from Raster 3, selecting from about H630 upward to H400, where the deletion cut off last time.
Selections -> Select none.
Using your eraser tool, erase just the wee bit of the frame on the left and side there it overlaps the blade. Leve the litte round bolt.
Open SkyScraps-Toxic-Web2, and add to main canvas, centered at H400, V550.
Open SkyScraps-Toxic-Ribbon3, resize to 75% and add to main canvas, centered at H400, V500.
Open Skyscraps-Toxic-Tag2 and using your selection tool, select only the top tag box (the one with the paper clip). Copy and past as a new image.
Using font of choice, add copyright information to the tag. I am using Century Gothic, 4 points, bold and centered. You can also add the background credits and tagged by information at this time.
Merge visible and resize tag to 75% and rotate right. Add to main canvas, centered at H575, V500.
Right click on the tag layer, raster 7, and go to Arrange -> Move Down.
Starting with Raster 2 and working upward, add a drop shadow to each of the elements on your main canvas except for the frame copy (Copy of Raster 3).
I am using offsets, vertical and horizontal of 5 each, opacity of 85, blur of 15, color black (#000000).
You can now save the artist's copy of your tag as a .pspimage file.
Using font or alpha of choice, add name of choice to tag. I am using Rage Italic, 36 points, bold and centered and have the name centered at H475, V700. I have my foreground color set to black and my background color set to a Metal Steel gradient.
Add a drop shadow to the name.
Drop your white background layer and merge visible. Resize to 75% (600 x 600 pixels) and save as a .png file and you are all done.
If you are planning on using the tag on Facebook, you might want to save it as a .jpg file, as Facebook's handling of .pngs has changed and the tags look better with the white background on them.
I hope you enjoyed this tutorial. If you should have a problem, please feel free to E-Mail Me and I'll be happy to help you out.
No comments:
Post a Comment