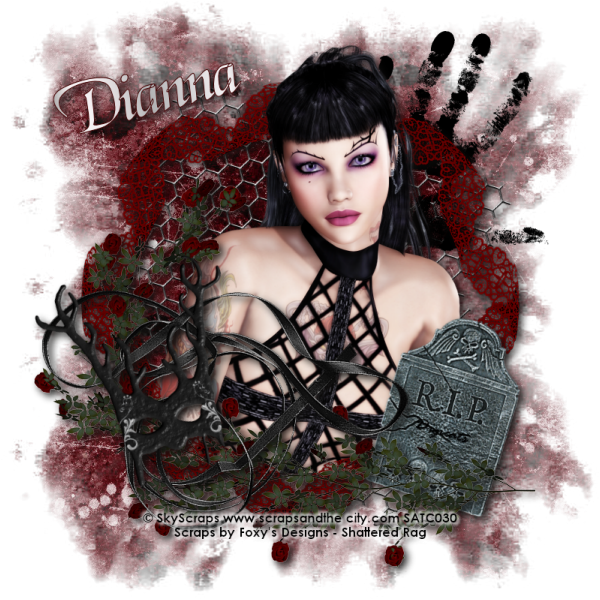
This tutorial was written by Dianna Richards of Digicats (and Dogs)/Di Before Dawn Tutorials. Any resemblance to any other tutorial, published or unpublished, living, dead or undead, is purely coincidental.
Please do not rebroadcast, redistribute or otherwise claim this tutorial or any part there of as your own work.
Items you will need to complete this project:
The Shattered Rage taggers kit by Foxy's Designs which is a PTU kit available at Stargazer Scraps.
Tube of choice. I am using Erica, by Sky Scraps. This is a PTU tube, and you must have a license to use this tube, which is available at ScrapsandtheCity.com.
Mask of choice. I am using the MysticalFog mask by Nik's Scripts & Scraps which is part of her PSP Masks Mega Pack.
Font(s) and/or alpha of choice. I am using Century Gothic which is a windows system font and Magik, which is a FTU font that can be download HERE.
Note that H# and V# refer to horizontal and vertical coordinates on your canvas ruler grid. Make sure you have View -> Rulers checked in order to see the ruler grid.
When I say "Add to your canvas" I expect that you will copy and paste it as a new layer, unless otherwise stated in the tutorial.
This tutorial assumes you have a working knowledge of PSP. It was written using PSP X3, but should work in PSP 8 and up.
To begin, open a new raster layer canvas, 800 x 800 pxl, flood fill white.
Open paper of choice. I am using Paper3_FD. Layers -> Load/Save Mask -> Load Mask from Disk and select mask of choice. I am using MysticalFog by Nik's Scripts and Scraps. Make sure the fit to canvas button is checked, then click on load.
Edit -> copy special -> copy merged and add to main canvas, centered.
Open Mesh_FD and add to main canvas, centered. Image -> Free Rotate -> Rotate right, 17 degrees.
Open Hand_FD and resize to 50%. Add to main canvas, centered at H600, V200.
Open Frame3_FD and add to main canvas, centered.
Open SkyScraps-Erica-CU and resize to 75%. Add to main canvas, centered at H375, V350.
On the layers pallet duplicate the frame layer - Raster 4 - and drag the copy over the tube layer.
With your selection tool set to Rectangle - Replace, highlight the top of the frame and delete.
Selections -> Select none.
Using your eraser tool, erase the bits of the tube that fall beyond the frame on the lower left hand side.
Open Roses2_FD and rotate right. Image -> Mirror. Add to main canvas, centered at H375, V500.
Open Ribbon3_FD and resize to 75%. Add to main canvas, centered at H300, V550.
Open Mask1-FD, and resize to 15%. Add to main canvs, centered at H200, V500. Image -> Free Rotate -> Rotate left, 15 degrees.
On the layers pallet, click on the frame copy layer - Copy of Raster 5. Open Tombstone_FD and resize to 75%/ add to main canvas, centered at H600, V550.
Image -> Free Rotate -> Rotate Right, 17 degrees.
Starting with Raster 2, the chain link layer and working upward, add a drop shadow to each of the elements on the main canvas, except for the hand print, Raster 3, and the Frame copy, Copy of Raster 4.
I am using offsets, vertical and horizontal of 5 each, opacity of 75, blur of 15 and color black (#000000).
On the materials pallet, set your foreground color to transparent, and your background color to black (#000000). Using font of choice, add the copyright information to the tag. For the Erica tube, that information is:
©SkyScraps www.scrapsandthecity.com Your SatC_License#.
I am using Century Gothic, 4 points, bold and centered and have the copyright centered at H400, V700 on my main canvas. You can also add the background credits and tagged by information at this point.
Using the following settings add a drop shadow to the credits: offsets of 3 each, opacity of 100%, blur of 5, color white (#ffffff). Repeate using offsets of -3 each but leaving all other settings the same.
You can now save the artist's copy of your tag as a .pspimage file.
Using font or alpha of choice add name of choice to tag. I am using the font Magik, 14 points, bold and centered, and have my foreground color set to dark red (#400000) and my background color set to a metallic gradient.
I centered the name at H200, V150, then free rotated left, 15 degrees. Finally I add a drop shadow to match the rest of the tag.
Drop the white background layer and merge visible. Resize to 75% (600 x 600 pixels) and save as a .png file and you are all done.
Note that if you are planning on using the tag on Facebook, you may wish to save it as a .jpg as Facebook does not handle .pngs well.
I hope you enjoyed this tutorial. If you should have a problem, please feel free to E-Mail Me and I'll be happy to help you out.
No comments:
Post a Comment