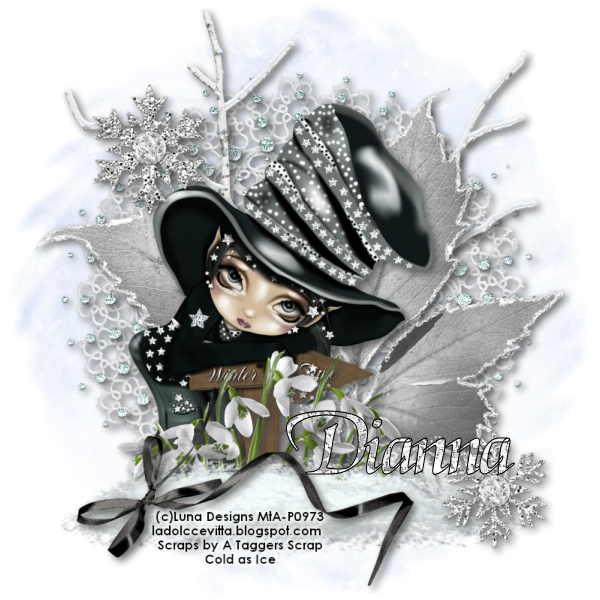
This tutorial was written by Dianna Richards of Digicats (and Dogs)/Di Before Dawn Tutorials. Any resemblance to any other tutorial, published or unpublished, living, dead or undead, is purely coincidental.
Please do not rebroadcast, redistribute or otherwise claim this tutorial or any part there of as your own work.
Items you will need to complete this project:
The Cold as Ice taggers kit by A Taggers Scrap. This is a PTU kit that is available at Scraps and the City.
Tube(s) of choice. I am using Magic Cartel, by Luna Designs. This is a PTU tube, and you must have a license to use this tube, which is available at My Tubed Art.
Mask of choice. I am using Feathered Circle by Nik's Scripts & Scraps which is part of her PSP Masks Mega Pack.
Font(s) and/or alpha of choice. I am using the font Century Gothic, which is a Windows System font, and Magik, which is a FTU font which you can download HERE.
Note that H# and V# refer to Horizontal and vertical coordinates on your canvas grid. Make sure you have View, Rulers checked in order to see the ruler grid.
When I say "Add to your canvas" I expect that you will copy and paste it as a new layer, unless otherwise state in the tutorial.
This tutorial assumes you have a working knowledge of PSP. It was written using PSP X3, but should work in PSP 8 and up.
To begin, open a new raster layer canvas, 800 x 800 pxl, flood fill black.
Open paper of choice. I am using paper 1. Layers -> Load/Save mask -> Load Mask from Disk and select mask of choice. I am using Nik's Feathered Circle. Make sure the "Fit to Canvas" button is checked, then click on load.
Edit -> Copy Special - Copy Merged and add to main canvas, centered.
Open circlelace, and add to main canvas, centered.
Open gemsnowflake1, and add to main canvas, centered at H200, V200.
Open gemsnowflake2, and add to main canvas, centered at H650, V650.
Open frame4 and add to main canvas, centered.
Open SnowyTrees and add to main canvas, centered at H400, V350.
Open leaves and add to main canvas, centered.
Open Luna Designs Magic Cartel. Using your magic wand, select the various stars on the hat and sweater of the tube. Adjust -> Add/Remove Noise -> Add noise, Gaussian, 100%
Copy tube (Raster 1) and add to main canvas, centered.
Open Snowdrops and add to main canvas, centered at H350, V600.
Open bow6 and resize to 65% and add to main canvas, centered at H325, V650.
Using your eraser tool, erase the bits of the snowdrops and the tube that fall below the ribbon.
Click on the snowdrops layer (Raster 9) to activate. Open snowcloud. Resize to 75%, and add to main canvas centered at H400, V675.
Starting with Raster 2 - the lace circle and working upward, add a drop shadow to each of the elements on your main canvas. I am using offsets, vertical and horizontal of 5 each, opacity 75, blur 15 and color of gray (#404040).
On the layers pallet, right click on the snowflake1 layer, Raster 3 and go to Arrange -> Bring to top.
Right click on the snowflake2 layer, Raster 4 and go to Arrange -> Bring to top.
On the materials pallet, set your foreground color to transparent and your background color to black. Using font of choice, add copyright information to the main canvas.
For the Magic Cartel tube that info is: (c)Luna Designs ladolccevitta.blogspot.com Your MTA_License#
I am using CenturyGothic, 4 points, bold and centered and added the info just below the ribbon. I then added a drop shadow of Offsets, Vertical and Horizontal of 3 each, opacity 100, blur 5 and color white, then repeated using offsets of -3 each, and leaving all other settings the same.
You can now save the artist's copy of your tag as a .pspimage file.
Using font or alpha of choice, add name of choice to tag. I am using the Magik font, 26 points, bold and centered. I have my foreground color set to black and my background color set to a white glitter. The name is centered at H550, V600.
Add a matching drop shadow to the name.
Drop your black background layer, and merge visible. Resize to 75% (600 x 600 pixels) and save a .png file and you are all done.
I hope you enjoyed this tutorial. If you should have a problem, please feel free to E-Mail Me and I'll be happy to help you out.
No comments:
Post a Comment