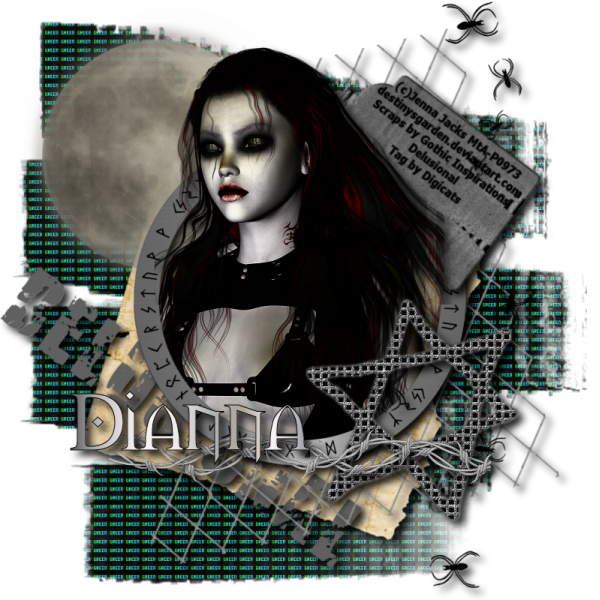
This tutorial was written by Dianna Richards of Digicats (and Dogs)/Di Before Dawn Tutorials. Any resemblance to any other tutorial, published or unpublished, living, dead or undead, is purely coincidental.
Please do not rebroadcast, redistribute or otherwise claim this tutorial or any part there of as your own work.
Items you will need to complete this project:
The Delusional taggers kit by Gothic Inspirations, which is a PTU kit available at Gothic Inspirations.com.
Tube of choice. I am using Deviant, by Jenna Jacks. You must have a license to use this tube, which is available at MIStaken Art.
Mask of choice. I am using the Chalk Erasers mask by Nik's Scripts & Scraps which is part of her PSP Masks Mega Pack.
Font(s) and/or alpha of choice. I am using the font Tahoma, which is a windows system font, and Morpheus, which is a FTU font you can download HERE.
Note that H# and V# refer to Horizontal and vertical coordinates on your canvas grid. Make sure you have View, Rulers checked in order to see the ruler grid.
When I say "Add to your canvas" I expect that you will copy and paste it as a new layer, unless otherwise state in the tutorial.
This tutorial assumes you have a working knowledge of PSP. It was written using PSP X3, but should work in PSP 8 and up.
To begin, open a new raster layer canvas, 800 x 800 pxl, flood fill white.
Open paper of choice. I am using Paper3-GI_Delusional. Layers -> Load/Save Mask -> Load Mask from Disk and select mask of choice. I am using Nik's Chalk Erasers. Make sure the fit to canvas box it checked, then click on load.
Resize paper to 90%. Edit -> Copy Special -> Copy Merged, then add to main canvas, centered.
Open Parchment-GI_Delusional, and add to main canvas, centered. Image -> free rotate -> rotate right, 17 degrees.
Open Mesh-GI_Delusional. Image -> Flip, Image -> Mirror. Add to main canvas, centered. Image -> free rotate -> rotate left, 13 degrees.
Open Moon-GI_Delusional, and resize to 75%. Add to main canvas, centered at H200, V200.
Open Encircle-GI_Delusional, and add to main canvas, centered.
Open tube of choice. I am using Deviant by Jenna Jacks. I only want the girl (although the gun is very nice) so I'm going to select the tube part to the right of H200. Copy and add to main canvas, centered at H350, V400.
On the layers pallet, right click on encircled layer (Raster 5) and duplicate. Drag the duplication over the tube layer.
Using your eraser tool, erase the bits of the tube that are outside bottom of frame.
Click on Copy of Raster5 to active. With your selection tool let to rectangle, replace, select the top half of the frame (Copy of Raster 5) and delete.
Selections -> Select none.
Open Spiders-GI_Delusional. Add to main canvas centered at H400, V600.
Open PentStar-GI_Delusional and add to main canvas, centered at H550, V550.
Open Barbwire-GI_Delusional, and add to main canvas, centered at H400, V600.
On the layers pallet, click on the parchment layer, Raster 2. Add a drop shadow of choice. I am using offsets of 7 each, opacity of 85, Blur of 15, and color black (#000000).
Open WordArt-GI_Delusional, and add to main canvas, centered at H250, V550. Image -> Free Rotate -> Rotate right, 37 degrees.
Add a drop shadow to the word art and to the rest of the elements on the main canvas, except for the encircled copy, Copy of Raster 5.
Open Tag3-GI_Delusional. on the Materials Pallet, set your foreground color to transparent and your background color to black (#000000). Using font of choice, add the copyright information to the tag. For the Deviant tube, that information is:
(c)Jenna Jacks destinysgarden.deviantart.com Your MTA_License#
You can also add the background credits and tagged by information at this point.
I am using Tahoma, 5 points, bold and centered. Position your text as near to the top of the tag as you can.
Merge visible, and resize to 75%. On the main canvas, click on the encircled layer (Raster 5) to activate. Add the tag to the main canvas, centered at H600, V200. Image -> Free Rotate -> Rotate right, 37 degrees.
Using your pick tool, scoot the tag in as close to the girl as you can get it without actually covering up the text. Add a drop shadow to your tag.
You can now save the artist's copy as a .pngimage file.
Click on Raster 9, the barbed wire layer, to activate.
Using font or alpha of choice, add name of choice to tag. I am using the font Morpheus, 24 points, bold and centered. and have set the foreground color to black on the materials pallet and the background color to a metal gradient.I have centered my name at H250, V600.
Actual location may vary depending upon the size of the font or alpha you are using and the length of the name.
Add a drop shadow to the name.
Drop the white background layer and merge visible. Resize to 75% (600 x 600 pixels) and save as a .png file and you are all done!
Note that if you are planning on using the tag on Facebook, you may wish to save it as a .jpg as Facebook does not handle .pngs well.
I hope you enjoyed this tutorial. If you should have a problem, please feel free to E-Mail Me and I'll be happy to help you out.
No comments:
Post a Comment