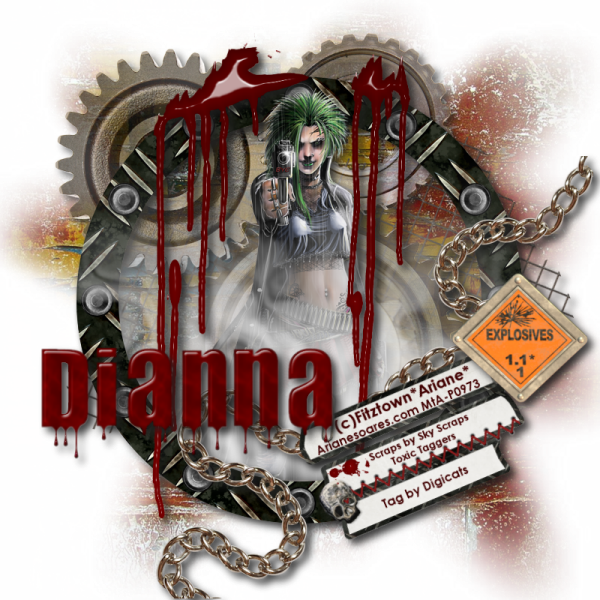
This tutorial was written by Dianna Richards of Digicats (and Dogs)/Di Before Dawn Tutorials. Any resemblance to any other tutorial, published or unpublished, living, dead or undead, is purely coincidental.
Please do not rebroadcast, redistribute or otherwise claim this tutorial or any part there of as your own work.
Items you will need to complete this project:
the Toxic taggers kit by Sky Scraps, which is a PTU kit that can be purchased at Scraps and the City.
Tube of choice. I am using Mad Girl, by Ariane Soares. This is a PTU tube, and you must have a license to use this tube, which is available at MIStaken Art.
Mask of choice. I am using Vignette10 by Nik's Scripts & Scraps which is part of her PSP Masks Mega Pack.
Font(s) and/or alpha of choice. I am using the font Century Gothic, which is a Windows System font, and the Bloody Alpha by Sarah Bryan, which is a FTU taggers size alpha you can download from her blog HERE.
Note that H# and V# refer to Horizontal and vertical coordinates on your canvas grid. Make sure you have View, Rulers checked in order to see the ruler grid.
When I say "Add to your canvas" I expect that you will copy and paste it as a new layer, unless otherwise state in the tutorial.
This tutorial assumes you have a working knowledge of PSP. It was written using PSP X3, but should work in PSP 8 and up.
To begin, open a new raster layer canvas, 800 x 800 pxl, flood fill white.
Open paper of choice. I am using SkyScraps Toxic-pp6. Edit -> Load/Save Mask -> Load Mask from Disk and select mask of choice. I am using Nik's Vignette10. Make sure the fit to canvas box is checked, then click on load.
Edit -> Copy Special -> Copy Load and add to main canvas, centered.
Open SkyScraps-Toxic-MetalE1, and add to main canvas, centered. Image -> Free Rotate -> Rotate Left -> 23 degrees.
Open skyScraps-Toxic-E3, and add to main canvas, centered at H350, V350. On the layers pallet, set the transparency to 75%.
Open frame of choice. I am using SkyScraps-Toxic-Frame8. Add to main canvas, centered.
Open tube of choice. I am using Ariane-MadGirl. copy the tube layer and add to main canvas, centered at H380, V380.
Open SkyScraps-Toxic-Smock, and add to main canvas, centered at H400, V350.
On the layers pallet, right click on the frame layer (Raster 4) to activate. Using your magic wand, click anywhere outside the frame to select.
With the area still selected, click on the smoke layer (Raster 6) and and press delete.
Selections -> Select None.
On the layers pallet, right click on the frame layer (Raster 4) and duplicate. Drag the duplication over the tube layer.
With your selection tool set to rectangle, replace, select the top half of the copy of the frame and delete.
Selections -> Select None.
Open SkyScraps-Toxic-MetalE6, and add to main canvas, centered at H500, V500.
Open skyScraps-Toxic-Splatter3, and add to main canvas, centered at H375, V365.
Open tag of choice, I am using SkyScraps-Toxic-Tag2. On the materials pallet, set your foreground color to transparent, and your background color to dark red (#400000).
Using font of choice add the copyright information to the tag. For the Mad Girl tube, that information is:
(c)Fitztown*Ariane* Arianesoares.com Your MtA-License#.
I am using Century Gothic, 8 points, bold and centered EXCEPT for the top line, which I used 10 points on.
Layers -> Merge Visible, and resize to 50%.
On the main canvas, click on the Splatter layer to activate, then add the tag, centered at H550, V600.
Image -> Free Rotate -> Rotate Left, 23 degrees.
Open SkyScraps-Toxic-E16, resize to 75% and add to main canvas, centered at H700, V450.
Starting with Raster 2, the wire fence layer, add a drop shadow of choice to eact of the elements on the main canvas, except the smoke layer (Raster 6) and the frame copy layer (Copy of Raster 4).
I am using offsets vertical and horizontal of 7 each, transparency of 85%, blur of 15, and color of off black (#202020).
You can now save the artist's copy of your tag as a .pspimage file.
Using font of alpha of choice add name of choice to tag. I am using the Bloody Alpha by Sarah Bryan, which is a FTU taggers size alpha.
One I composed the name, I went to adjust -> Brightness/Contrast and changed the brightness to -35 to darken the alpha. Then I resized it to 75%, and added it to the main canvas, centered at H275, V550. (Make sure it does not cover up the copyright info!)
Exact location will vary based on the size of the font or alpha you are using and the length of the name. Add a matching drop shadow to the alpha.
Drop the white background layer, and merge visible. Resize to 75% (600 x 600 pixels), and save as a .png file and your all done.
If you are planning on using the tag on Facebook, you might want to save it as a .jpg file, as Facebook's handling of .pngs has changed and the tags look better with the white background on them.
I hope you enjoyed this tutorial. If you should have a problem, please feel free to E-Mail Me and I'll be happy to help you out.
No comments:
Post a Comment