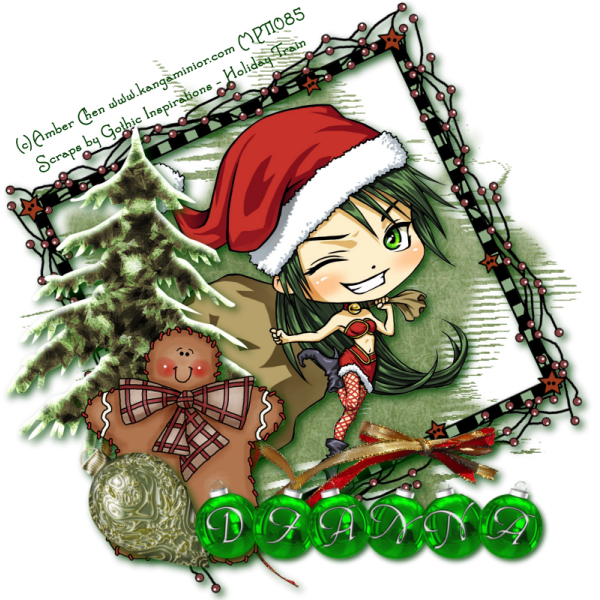
This tutorial was written by Dianna Richards of Digicats (and Dogs)/Di Before Dawn Tutorials. Any resemblance to any other tutorial, published or unpublished, living, dead or undead, is purely coincidental.
Please do not rebroadcast, redistribute or otherwise claim this tutorial or any part there of as your own work.
Items you will need to complete this project:
The Holiday Train mini kit by Gothic Inspirations. This is a PTU kit which is available at Gothic Inspirations.com.
Note that this is a full sized mini kit that I have scripted down to taggers size. I used Queen Brat Designs resizing script for this. Changes to sizes in this kit are AFTER they have been reduced to tagger size. You must resize the kit before attempting this tutorial.
Tube of choice. I am using Chibi Xmas, by Amber Chen. This tube was part of the 2010 holiday gift from MPT to their customers. You must have an MPT license number to use this tube, which you can get at MyPSPTubes.com.
Mask of choice. I am using Wee Scots Mask #94 which you can download HERE.
Font(s) and/or alpha of choice. I am using Santa's Sleigh, which is a FTU font that can be downloaded from Free Digital Scrapbooking HERE. The Green Ornament alpha is by Sugar Mama Scraps. I got it as a freebie about two years ago, and it is no longer available.
Note that H# and V# refer to Horizontal and vertical coordinates on your canvas grid. Make sure you have View, Rulers checked in order to see the ruler grid.
When I say "Add to your canvas" I expect that you will copy and paste it as a new layer, unless otherwise state in the tutorial.
This tutorial assumes you have a working knowledge of PSP. It was written using PSP X3, but should work in PSP 8 and up.
To begin, open a new raster layer canvas, 800 x 800 pxl, flood fill white.
Open paper of choice. I am using Paper6_GI_HolidayTrain. Layers -> Load/Save Mask -> Load Mask from Disk and select mask of choice. I am using Wee Scots Lass mask #94. Make sure the fit to canvas box is checked, then click on load.
Then go to Edit -> Copy Special -> Copy Merged and add to main canvas, centered.
Open Frame2-GI_Holiday Train and add to main canvas, centered. Image -> Free Rotate -> Free Rotate Left, 25 degrees.
Open tube of choice. I am using Amber Chen's Chibi Xmas. Copy the tube layer and add to main canvas, centered.
Open Frosted Tree-GI_Holiday Train and add to main canvas, centered at H175, V450.
Open Ribbon-GI_Holiday Train and add to main canvas, centered at H400, V600.
Open GingerBreadcookie-GI_Holiday Train, resize to 75% and add to main canvas, centered at H200, V600.
Open Ornament-GI_Holiday Train, resize to 50% and add to main canvas, centered at H200, V650. Image -> Free Rotate -> Rotate left, 47 degrees. Relocate center downward to V675.
Starting with Raster 2, the frame layer on the layers pallet and working upward, add a drop shadow of choice to the elements on your main tag. I am using offsets of 5 each, opacity of 85, blur of 15, and color of dark green (#004000).
On your materials pallet, set your foreground color to transparent and your background color to dark green (#004000). Using font of choice, add copyright to tag.
For the Chibi Xmas tube, that information is:
(c)Amber Chen www.kangaminior.com Your MPT_License#
I am using Santa's Sleigh (Full), 6 points, bold and centered. I then free rotated the text 25 degrees to the left to match the frame, and located it at H215, V120, along the top edge of the frame.
Add a drop shadow to the copyright of Offsets, vertical and horizontal of 3 each, opacity of 100, blur of 5, and color white (#ffffff). Repeat, but this time, use offsets of -3 each. Leave all the other settings the same.
You can now save the artist's copy of your tag as a .pspimage file.
Using font or alpha of choice, add name of choice to tag. I am using the green ornament alpha from Sugar Mama Scraps. I have centered the name at h450, V700. Your location may vary depending upon the size of the font or alpha you are using, and the length of the name.
Add a matching drop shadow to the name.
Drop your white background layer, and merge visible. Resize to 75% (600 x 600 pixles) and you are all done.
Note that if you are planning on using the tag on Facebook, you may wish to save it as a .jpg as Facebook does not handle .png well.
I hope you enjoyed this tutorial. If you should have a problem, please feel free to E-Mail Me and I'll be happy to help you out.
No comments:
Post a Comment