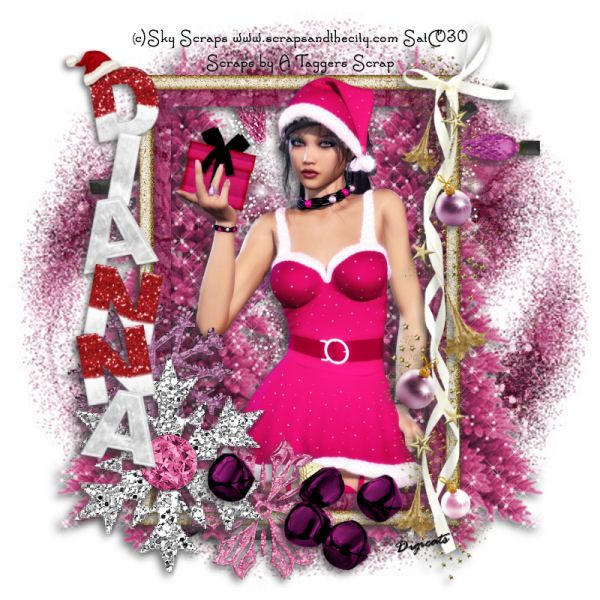
This tutorial was written by Dianna Richards of Digicats (and Dogs)/Di Before Dawn Tutorials. Any resemblance to any other tutorial, published or unpublished, living, dead or undead, is purely coincidental.
Please do not rebroadcast, redistribute or otherwise claim this tutorial or any part there of as your own work.
Items you will need to complete this project:
The Glitter Sweet Xmas taggers kit by A Taggers Scrap, which is a PTU kit available at Scraps and the City.
Tube of choice. I am using Noela by Sky Scraps. You must have a license to use this tube, which is available at Scraps and the City.
Mask of choice. I am using Wee Scots Mask #314 which you can download HERE.
Font(s) and/or alpha of choice. I am using Santa's Sleigh which is FTU font that can be downloaded from Free Digital Scrapbooking, and the Les Reves de l'Hiver alpha by Digiscrap.ch, which is a free to use alpha (full size and comes in 11 different varieties), which you can download from the link provided.
Note that H# and V# refer to Horizontal and vertical coordinates on your canvas grid. Make sure you have View, Rulers checked in order to see the ruler grid.
When I say "Add to your canvas" I expect that you will copy and paste it as a new layer, unless otherwise state in the tutorial.
This tutorial assumes you have a working knowledge of PSP. It was written using PSP X3, but should work in PSP 8 and up.
To begin, open a new raster layer canvas, 800 x 800 pxl, flood fill white.
Open Paper of choice. I am using Paper10. Layers -> Load/Save Mask -> Load Mask from Disk and select mask of choice. I am using Wee Scot Lass' mask #314. Make sure the "Fit to Canvas" box is checked, then click on load.
Edit -> Copy Special -> Copy Merged. Past onto main canvas, centered.
Open scatteredlights and add to main canvas, centered. On the layer pallet, click on Raster 1 (the paper layer) and with your magic wand, click outside the masked area to select.
With the area still selected, click on Raster3, the scattered lights and delete.
Select -> Select None.
Open Tree5, and add to main canvas, centered at H550, V400. Duplicate, then mirror.
Open Frame5, and rotate left. Resize to 75%, and add to main canvas centered.
Open tube of choice. I am using Noela by Sky Scraps. Copy Layer 2 (the mid-close up), resize to 75% and add to main canvas, centered.
On the layers pallet, right click on Raster4, the frame layer and duplicate. Drag the Copy of Raster 4 over the tube layer.
With your selection tool set to rectangle, replace, select the top half of the frame copy (Copy of Raster 4) and delete.
Select -> Select None.
Open Deco4 resize to 90%, and add to main canvas, centered at H600, V400.
Open Snowflake1, add to main canvas centered at H200, V500.
Open Snowflake5, and add to main canvas, centered at H350, V675.
Open Deco 9, and add to main canvas, centered at H225, V625
Open Bells4, resize to 75% and add to main canvas centered at H400, v650.
On the layer pallet, click on Raster 2, the scattered lights layer, to activate.
With your eraser tool, erase the bits of the lights that show above the top of the frame layer.
Then, Working upward, add a light drop shadow to all the elements on your main canvas, except for the copy of the frame layer, Copy of Raster 4.
I am using offsets vertical of 5, horizontal of -5, Opacity 75, blur 15, and color of dark gray (#404040).
On the materials pallet, set your foreground color to transparent and your background color to off black (#030304).
Using font of choice, add the copyright information to the tag. For the Noela tube that information is:
(c)Sky Scraps www.scrapsandthecity.com Your_SATC_License#
You can also add the background credits and the tagged by info at this time.
I am using the font Santa's Sleigh (Full), 6 points, bold and centered and have placed the information just above the top of the frame, centered at H400, V75
I then added a drop shadow of Offsets, Vertical and Horizontal of 3 each, opacity of 85%, blur of 5 and color white (#ffffff) to make it stand out. I then repeated with offsets of -3 each (all other settings stay the same) for a glow effect.
You can now save the artist's version of your tag as a .pspimage file.
Using font or alpha of choice, add name of choice to tag. I am my name centered at H150, V300, (350 for the longer names) along the left side of the frame. You location may vary depending the side of the font or alpha you are using and the length of the name.
Add a matching drop shadow to the name.
Since this tag works best on a white background, merge visible, resize to 75% (600 x 600 pixels) and save as a .jpg file and you're all done!
I hope you enjoyed this tutorial. If you should have a problem, please feel free to E-Mail Me and I'll be happy to help you out.
omg i love it!!!!!!!!!!
ReplyDelete