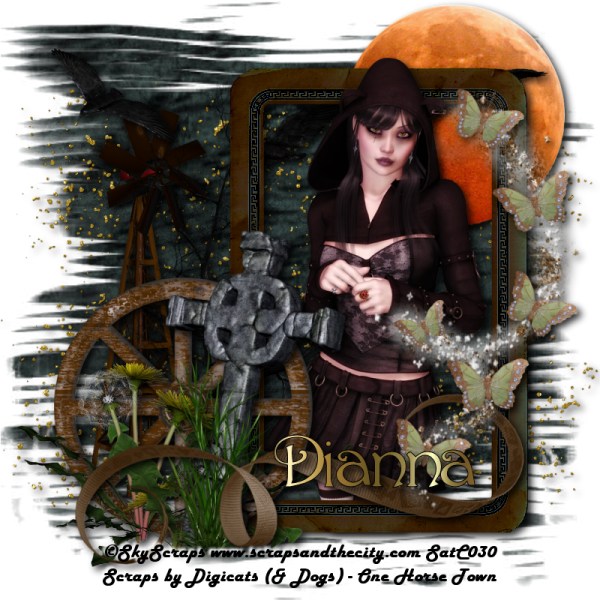
This tutorial was written by Dianna Richards of Digicats (and Dogs)/Di Before Dawn Tutorials. Any resemblance to any other tutorial, published or unpublished, living, dead or undead, is purely coincidental.
Please do not rebroadcast, redistribute or otherwise claim this tutorial or any part there of as your own work.
Items you will need to complete this project:
The One Horse Town taggers kit by Digicats (& Dogs), which is a PTU kit that can be purchased at Country Corner Creations.
Tube of choice. I am using Sarah, by Sky Scraps. This is a PTU tube, and you must have a license to use this tube, which is available at Scraps and the City.
Mask of choice. I am using Razor Cuts by Nik's Scripts & Scraps which is part of her PSP Masks Mega Pack.
Font(s) and/or alpha of choice. I am using the fonts Harlow Solid Italic, which you can download from free HERE, and Harrington, which you can snag for free HERE. These are two great fonts to have on hand for your western tags.
Note that H# and V# refer to Horizontal and vertical coordinates on your canvas grid. Make sure you have View, Rulers checked in order to see the ruler grid.
When I say "Add to your canvas" I expect that you will copy and paste it as a new layer, unless otherwise state in the tutorial.
This tutorial assumes you have a working knowledge of PSP. It was written using PSP X3, but should work in PSP 8 and up.
To begin, open a new raster layer canvas, 800 x 800 pxl, flood fill white.
Open paper of choice. I am using DCD_OHT_Paper12. Layers -> Load/Save Mask -> Load Mask from Disk and select mask of choice. I am using Razor Cuts by Nik's Scripts and Scraps. Make sure the fit to canvas box is checked, then click on OK.
Edit -> Copy Special -> Copy Merged and add to main canvas, centered.
Open DCD_OHT_Gold Rush Glitter and add to main canvas, centered.
Open DCD_OHT_Frame07, and rotate right. Add to main canvas centered at H500, V400.
Open tube of choice. I am using Sarah2 by SkyScraps. Resize to 75%, and add to main canvas, centered at H500, V400.
On the layers pallet, right click on the frame layer, Raster 3, and duplicate. Drag Copy of Raster 3 over the tube layer.
With your selection tool set to rectangle - replace, select the top half of Copy of Raster 3 and delete.
Selections -> Select none
Click on Raster 2, the Gold Dust Layer to activate. Open DCD_OHT_Dead Tree, and add to canvas centered at H350, V400.
Click on the frame copy layer, Copy of Raster 3, to activate. Open DCD_OHT_Wagon Wheel02, and resize to 65%. Add to main canvas, centered at H250, V550.
Open DCD_OHT_Wildflower02 and add to main canvas, centered at H250, V625.
Activate Raster 2, the Gold Dust layer again, and open DCD_OHT_Full Moon. Resize to 50%, and add to the main canvas, centered at H600, V150.
Open DCD_OHT_Windmill, and resize to 75%. Add to main canvas, centered at H200, V400.
Open DCD_OHT_Flying Ravens, and add to main canvas, centered at H400, V150.
Activate the Wildflower layer, Raster 7. Open DCD_OHT_Tombstone, and resize to 75%. Add to main canvas, centered at H325, V525.
Open DCD_OHT_Ribbon05, and resize to 75%. Add to main canvas, centered at H400, V650.
Open DCD_OHT_Butterfly Bling and resize to 75%. Add to main canvas, centered at H630, V400.
Starting with Raster 2, the Gold Dust layer and working upward, add a drop shadow of choice to each of the elements in your tag, exept the frame copy, Copy of Raster 3. I am using offsets, vertical and horizontal of 5 each, opacity of 85%, blur of 15 and color black (#000000).
Using font of choice, add the copyright information to the tube. For the Sarah tube, that information is:
©SkyScraps www.scrapsandthecity.com Your SatC_License#
I am using the font Harlow Solid Italic, 6 points, bold and centered and have the copyright centered at H400, V750. You can also add the background credits and tagged by line at this time.
Add white drop shadow to your copyright using the following settings: Offsets 3 each, opacity of 100%, blur of 5 and color white (#ffffff). Repeat using offsets of -3 each and leaving all other settings the same.
You can now save the artists copy of your tag as a .pspimage file.
On the materials pallet, set your foreground color to black (#000000) and your background color to a Metal Brass or Gold Gradient. Using font of choice add desired name to tag.
I am using Harrington, 24 points, bold and centered and have the name centered at H500, V650. Adjust placement to taste. Add a black drop shadow to match the rest of the tag.
Delete the White background layer, and merge visible. Resize to 75% (600 x 600), and save as a .png file and you are all done.
If you are planning on using the tag on Facebook, you might want to save it as a .jpg file, as Facebook's handling of .pngs has changed and the tags look better with the white background on them. For forum use, resize it to 75% again (480 x 480 pixels).
I hope you enjoyed this tutorial. If you should have a problem, please feel free to E-Mail Me and I'll be happy to help you out.
No comments:
Post a Comment