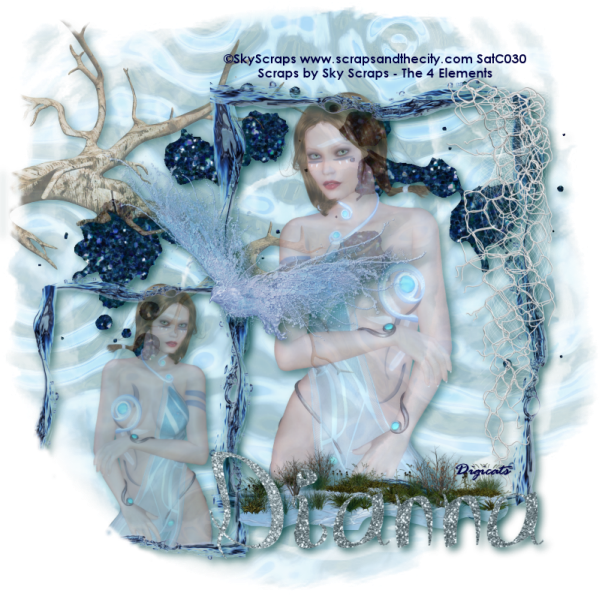
This tutorial was written by Dianna Richards of Digicats (and Dogs)/Di Before Dawn Tutorials. Any resemblance to any other tutorial, published or unpublished, living, dead or undead, is purely coincidental.
Please do not rebroadcast, redistribute or otherwise claim this tutorial or any part there of as your own work.
Items you will need to complete this project:
The 4 Elements taggers kit by Sky Scraps, which is a PTU kit that can be purchased at Scraps and the City.
Tube of choice. I am using Bluey, by Sky Scraps. This is a PTU tube, and you must have a license to use this tube, which is available at Scraps and the City.
Mask of choice. I am using Whirlpool2 by Nik's Scripts & Scraps which is part of her PSP Masks Mega Pack.
Font(s) and/or alpha of choice. I am using the font Century Gothic, which is a Windows System font, and the Alpha Tibo 2 by digiscrap.ch, which is a full size, FTU alpha you can download at the link provided.
Note that H# and V# refer to Horizontal and vertical coordinates on your canvas grid. Make sure you have View, Rulers checked in order to see the ruler grid.
When I say "Add to your canvas" I expect that you will copy and paste it as a new layer, unless otherwise state in the tutorial.
This tutorial assumes you have a working knowledge of PSP. It was written using PSP X3, but should work in PSP 8 and up.
To begin, open a new raster layer canvas, 800 x 800 pxl, flood fill white.
Open paper of choice. I am using SkyScraps-T4E-paper13. Layers -> Load/Save Mask -> Load Mask from Disk and load mask of choice. I am using Whirlpool2 by Nik's Scrips and Scraps. Make sure the "Fit to Canvas" button is checked, then click on load.
Edit -> Copy Special -> Copy Merged, then add to main canvas, centered.
Open SkyScraps-T4E-Dash5, and add to main canvas, centered at H400, V300.
Open SkyScraps-Bluey2 (the mid-close up tube), resize to 75%, and add to canvas, centered at H500, V400. Set Opacity to 65%.
Open SkyScraps-T4E-Frame and rotate right. Add to main canvas, centered at H500, V400. Using your eraser tool, erase the bits of the tube that stick out below the frame on the bottom.
On the Layers pallet, set the background layer, Raster 1 and Raster 2 to invisible. With Raster 4 (the frame layer) selected go to Layers -> Merge visible. Edit -> Copy, then Edit -> Undo Merge Visible.
Open the copy as a new image, mirror and resize to 65%. Edit -> Copy then paste as a new layer on the main canvas, at H200, V550.
Turn the invisible layers back on.
Open SkyScraps-T4E-Mesh and mirror. Resize to 75%, and add to main canvas, centered at H670, V380.
Open SkyScraps_T4E-E11, resize to 50%, and add to main canvas, centered at H500, V650.
On the layers pallet, click on Raster 2 - the Dash layer - to activate. Open SkyScraps-T4E-Tree and mirror. Add to main canvas, centered at H250, V250. Set the opacity level to 60%.
Activate Raster 1, the paper layer. With your magic wand, click anywhere outside the masked area to select.
with the area still selected, go back to your tree layer, Raster 8, and press delete.
Selections - Select None.
Click on your top layer, Raster 7, to activate. Open Sky Scraps-E6 and add to main canvas centered at H350, V325.
Going back to Raster 1, click outside your masked area once again with your magic wand. With the area still selected, click on the tube copy, Raster 5, and delete.
Selections -> Select none.
Click on your top layer, Raster 9 to activate.
On the materials pallet, set your foreground color to transparent and your background color to Dark Blue (#000040). Using font of choice add copyright information to the main canvas. For the Bluey tube, that information is:
©SkyScraps www.scrapsandthecity.com Your SatC_License#
I am using Century Gothic, 4 points, bold and centered. You can also add the background credits and tagged by info at this point.
Starting with Raster 3 - the Dash level and working upward, add a drop shadow of choice to the elements on your main canvas. I am using offsets, vertical and horizontal of 5 each, opacity of 75, blur of 15 and color #004040 (Dark Aqua?). Do not add a drop shadow to the copyright info (Vector 1).
You can now save the artist's copy of your tag as a .pspimage file.
Using font of alpha of choice, add name of choice to tag. I am using the Alpha Tibo 2, which I resized first to 35% before composing the name, and then again to 75% after composing the name, and have centered my name at H500, V675.
Add a matching drop shadow to the name.
Delete your white background layer, merge visible and resize to 75% (600 x 600 pixels) and save as a .png file and you are all done.
If you are planning on using the tag on Facebook, you might want to save it as a .jpg file, as Facebook's handling of .pngs has changed and the tags look better with the white background on them.
I hope you enjoyed this tutorial. If you should have a problem, please feel free to E-Mail Me and I'll be happy to help you out.
No comments:
Post a Comment